Table of contents
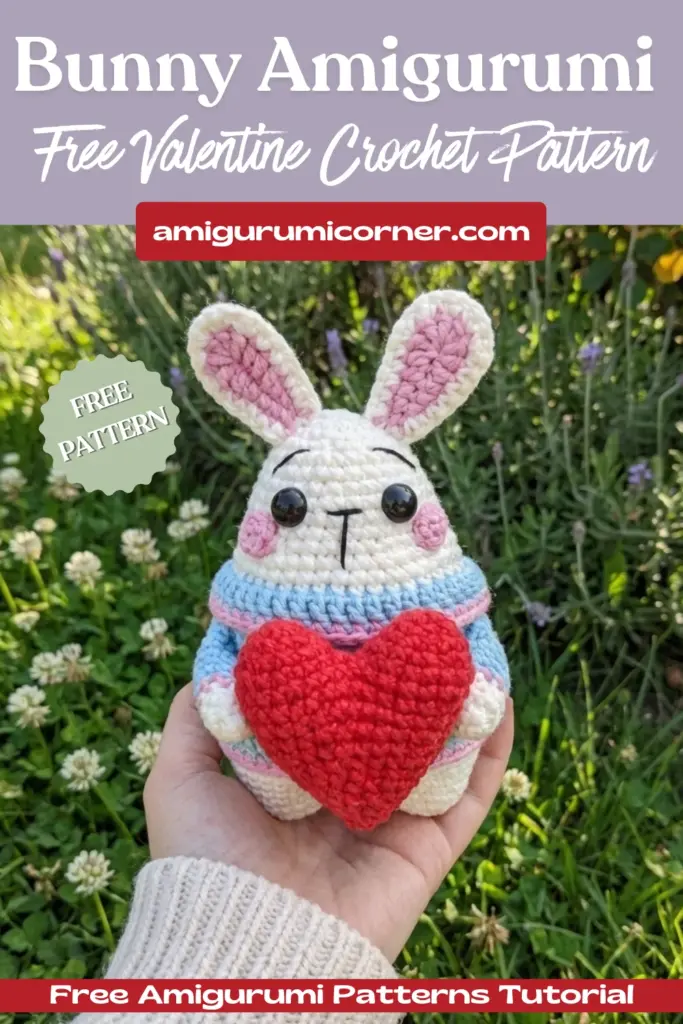
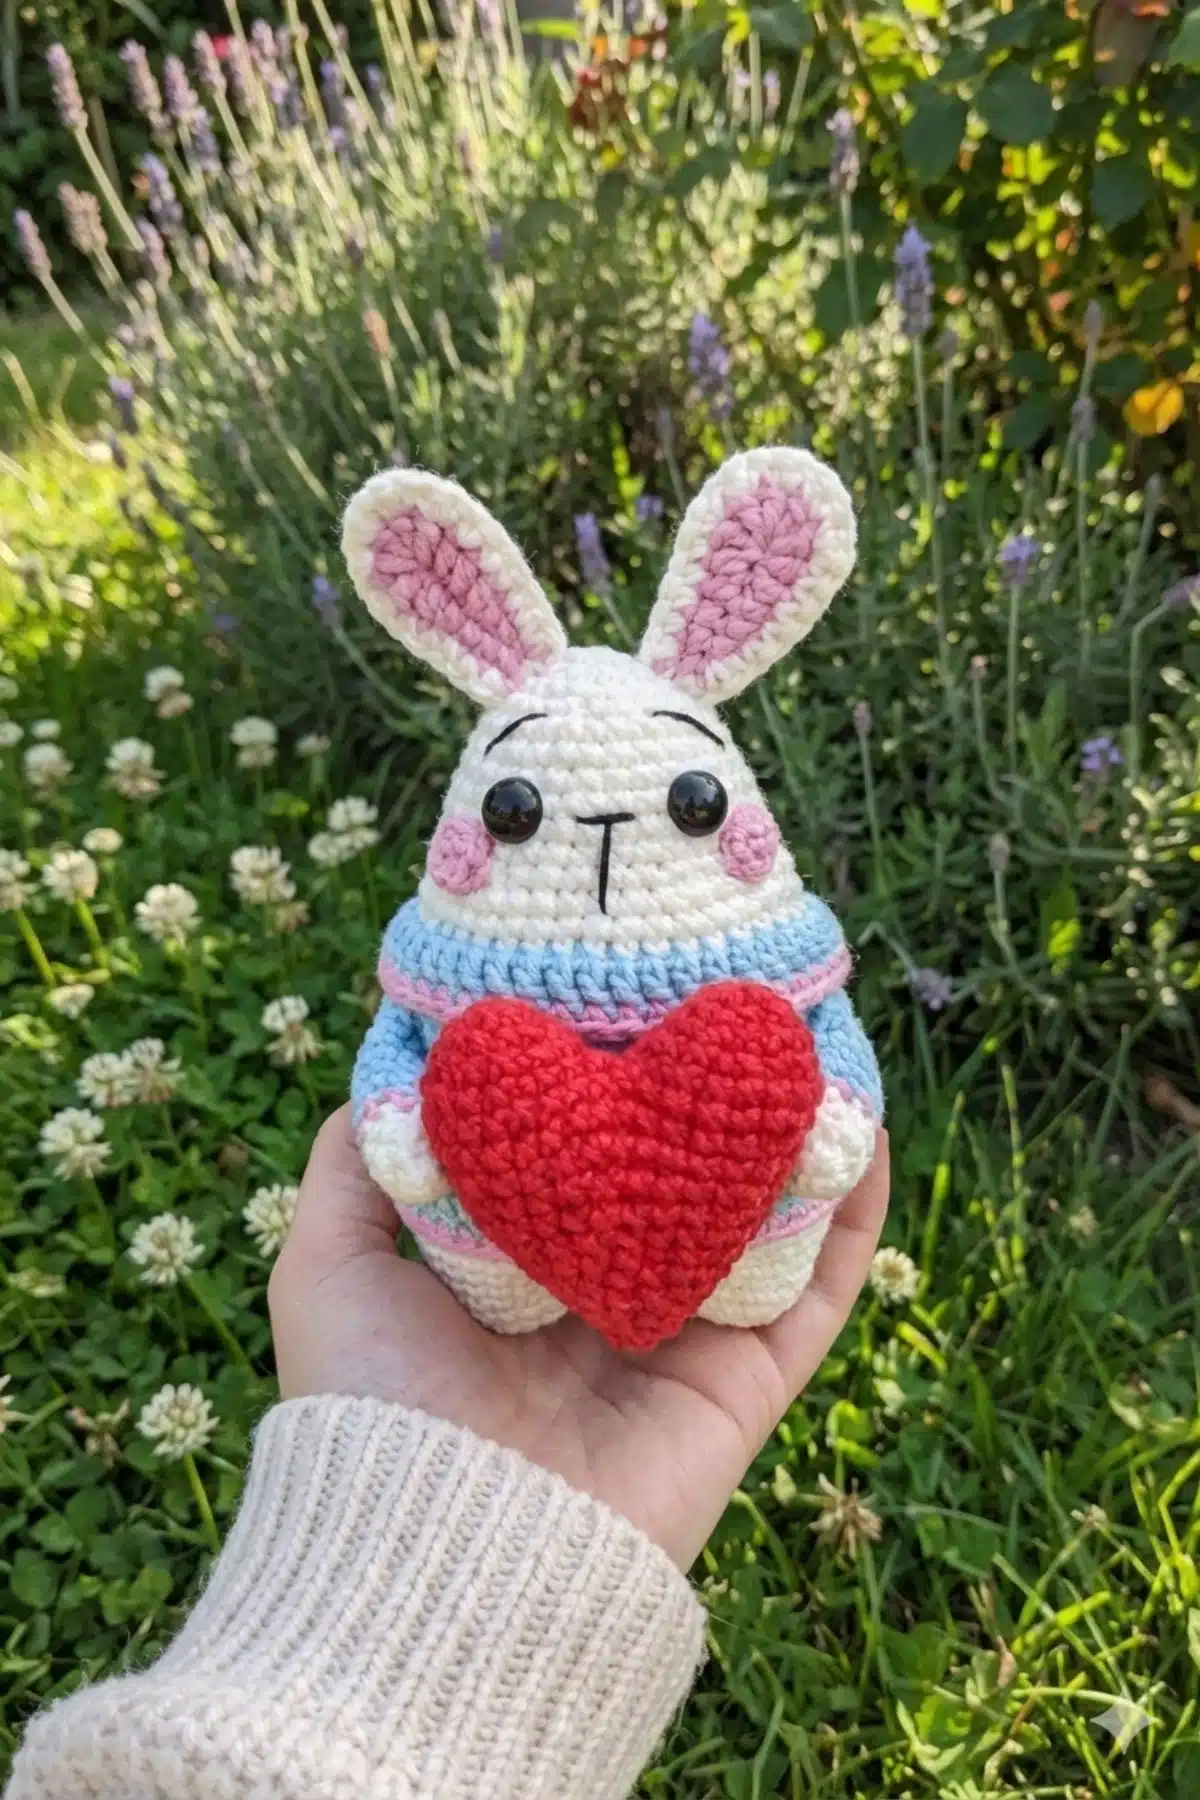
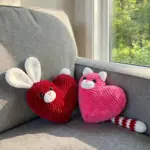
Looking for the perfect handmade gift this Valentine’s Day? This charming Valentine Bunny Amigurumi Pattern clutching a sweet heart is sure to melt anyone’s heart! Whether you’re a seasoned crocheter or just starting your amigurumi journey, this delightful pattern will guide you through creating an adorable bunny that’s perfect for gifting or decorating. With its soft white body, stylish Blue sweater, and lovable expression, this Valentine bunny is a project you’ll treasure making again and again.
Remember it later!
Planning to try this soon? Pin it for a quick find later!

Valentine Bunny Amigurumi Pattern – Materials Needed
Before you begin, gather these supplies:
Yarn:
- Alize Cotton Gold, color #01 (white)
- YarnArt Jeans, color #36 (pink) for cheeks and ears
- YarnArt Jeans, color #26 (red) for heart
- YarnArt Jeans, color #71 (coffee with milk/Blue)
- YarnArt Jeans, color #74 (pink)
Other Supplies:
- Hook size: 1.5 mm
- 8 mm half beads for eyes
- Black embroidery floss for eyebrows and nose
- Sewing needle and scissors
- Fiberfill for stuffing
Abbreviations Guide
- R = row
- mc = magic circle
- ch = chain
- sl st = slip stitch
- sc = single crochet
- dc = double crochet
- hdc = half double crochet
- inc = 2 sc in the next stitch
- dec = single crochet 2 stitches together
- BLO = back loop only
- FLO = front loop only
- F.o. = finish off
- (12) = number of stitches you should have at the end of the round/row
- (…) * 6 = repeat whatever is between the brackets the number of times stated
Pattern Instructions
This Valentine Bunny Amigurumi Pattern is worked from the bottom up, with the legs, body, and head crocheted as one continuous piece. This construction method creates a sturdy, seamless toy that’s perfect for cuddling.
Legs (make 2)
With white yarn:
- R 1: 6 sc in mc (6)
- R 2: (inc) * 6 (12)
- R 3: (1 sc, inc) * 6 (18)
- R 4-6: 18 sc (3 rows)
- F.o.
Don’t cut the yarn when you will finish the second leg!
From second leg: 3 ch, join to the first leg with sl st.
Continue crocheting the body in the round:
Body-Head
Stuff as you go.
- R 7: 18 sc on the first leg, 3 sc in 3 ch, 18 sc on the second leg, 3 sc in 3 ch (opposite side) (42)
- R 8: (6 sc, inc) * 6 (48)
- R 9: (7 sc, inc) * 6 (54)
- R 10: (8 sc, inc) * 6 (60)
- R 11: 60 sc
Change to Blue yarn:
- R 12-13: 60 sc (2 rows)
- R 14: add pink color: (1 sc – pink, 3 sc – Blue)*15 (60)
- R 15: 2 sc – Blue, (1 sc – pink, 3 sc – Blue)*14, 1 sc – pink, 1 sc -Blue
Cut the pink yarn.
- R 16: (8 sc, dec) * 6 (54)
- R 17: 54 sc
- R 18: (7 sc, dec) * 6 (48)
- R 19: 48 sc
- R 20: (6 sc, dec) * 6 (42)
- R 21-22: 42 sc (2 rows)
- R 23: BLO 42 sc
- R 24-25: 42 sc (2 rows)
- R 26: (5 sc, dec) * 6 (36)
- R 27-29: 36 sc (3 rows)
- R 30: (4 sc, dec) * 6 (30)
- R 31-32: 30 sc (2 rows)
- R 33: (3 sc, dec) * 6 (24)
- R 34: (2 sc, dec) * 6 (18)
- R 35: (1 sc, dec) * 6 (12)
- R 36: (dec) * 6 (6)
- F.o.
Collar
Go to the R 22, join Blue yarn and crochet:
- R 1: FLO 2 ch, (6 dc, 2 dc in one st) * 6 (48)
Change to pink yarn:
- R 2: 1 ch, 48 sc, sl st
- F.o.
Arms (make 2)
With white yarn:
- R 1: 6 sc in mc (6)
- R 2: (1 sc, inc) * 3 (9)
- R 3: 9 sc
Change to Blue color:
- R 4-8: 9 sc (5 rows)
Fold top of arm flat and 4 sc through both sides across.
F.o. and leave a long tail for sewing.
Sew arms to the body between R 16 and R 19 (view pic).
Cheeks (make 2)
With pink yarn:
- R 1: 6 sc in mc (6)
- F.o. and leave a long tail for sewing.
Ears (make 2)
With pink yarn:
Make 8 ch.
- R 1: From the 2nd ch from hook: sl st, 2 sc, 3 hdc, 5 dc in last st, turn and crochet on the opposite side of the chain: 3 hdc, 2 sc, sl st (17)
- F.o.
With white yarn:
Make 8 ch.
- R 1: From the 2nd ch from hook: sl st, 2 sc, 3 hdc, 5 dc in last st, turn and crochet on the opposite side of the chain: 3 hdc, 2 sc, sl st (17)
Don’t cut the yarn.
Put out pink part and white part of the ear together with inner part (wrong side to wrong side) and crochet through both parts sс around, making inc in every dc.
F.o. and leave a long tail for sewing.
Sew ears on the head between R 33 and R 35.
Heart
With red yarn:
Make 2 details:
- R 1: 6 sc in mc (6)
- R 2: (inc) * 6 (12)
- R 3: 12 sc
- R 4: (1 sc, inc) * 6 (18)
- F.o.
Don’t cut the yarn when you will finish the second detail.
Join two details together:
- R 5-6: 36 sc (2 rows)
- R 7: (4 sc, dec) * 6 (30)
- R 8-9: 30 sc (2 rows)
- R 10: (3 sc, dec) * 6 (24)
- R 11: 24 sc
- R 12: (2 sc, dec) * 6 (18)
- R 13: 18 sc
- R 14: (1 sc, dec) * 6 (12)
- R 15: 12 sc
- R 16: (dec) * 6 (6)
- F.o.

Assembly
Now it’s time to bring your bunny to life! Follow these finishing steps carefully:
- Sew the heart to the belly
- Sew the hands to the heart
- Glue eyes on R 28-29 at the distance of 5 stitches from each other
- Embroider eyebrows and nose with black floss
- Sew cheeks to the head
Frequently Asked Questions
When using the recommended yarn and 1.5mm hook, the finished bunny will be approximately 7-8 inches (18-20 cm) tall. The size may vary slightly depending on your tension and how firmly you stuff the toy.
While you can use different yarn weights, you’ll need to adjust your hook size accordingly and be aware that this will change the final size of your bunny. For best results, stick with sport or DK weight yarn and a hook size appropriate for that yarn.
To change colors for the stripes in rounds 14-15, complete the last stitch of the old color until two loops remain on your hook, then yarn over with the new color and pull through. Carry the unused color along the inside of your work and crochet over it to hide the strand.
This pattern requires basic amigurumi skills including working in the round, increasing, decreasing, and color changes. If you’re comfortable with these techniques, you should be able to complete this project. Complete beginners might want to practice basic amigurumi shapes first before attempting this pattern.
Valentine Bunny Amigurumi – Final Thoughts & Gifting Ideas
This Valentine bunny amigurumi is the perfect project to spread love and joy! With its endearing design and cuddly appearance, it makes a wonderful handmade gift for Valentine’s Day, birthdays, or any occasion that calls for something special. The combination of the sweet bunny holding a heart is sure to bring smiles to anyone who receives it. So grab your hook, gather your materials, and start stitching up this adorable companion today. Don’t forget to share your finished creation with fellow crocheters – your handmade bunny deserves to be shown off!
Remember it later!
Planning to try this soon? Pin it for a quick find later!