Table of contents
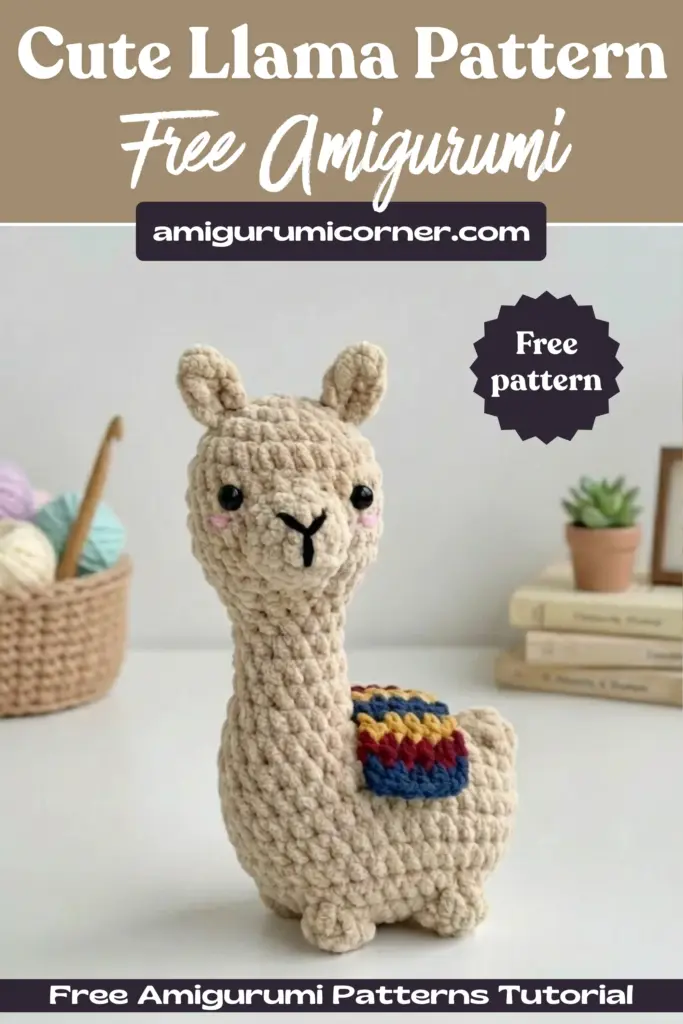
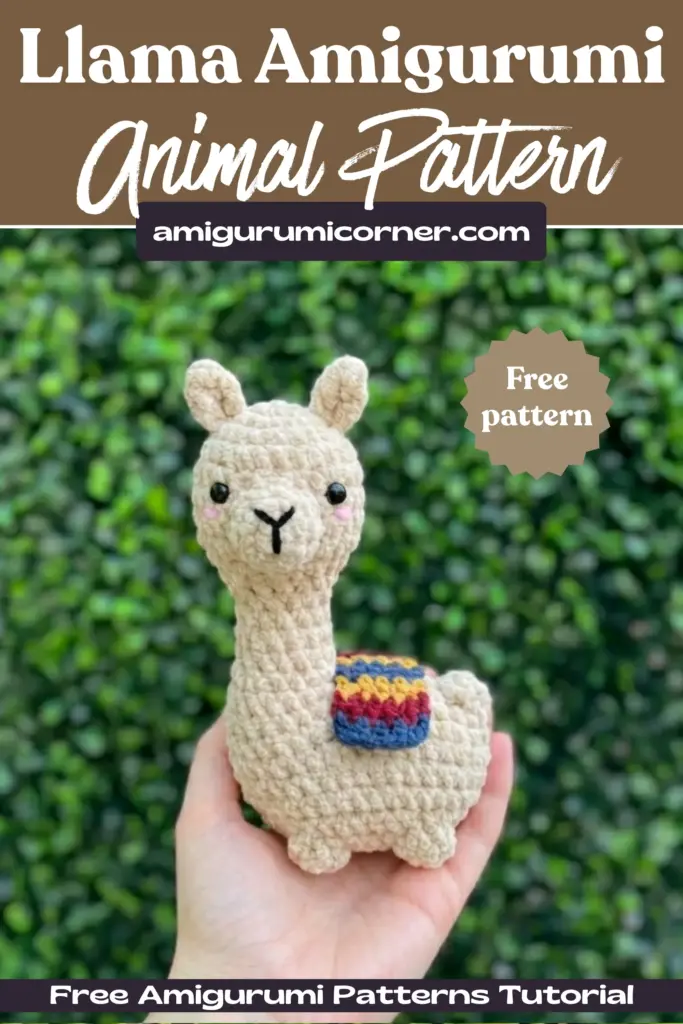
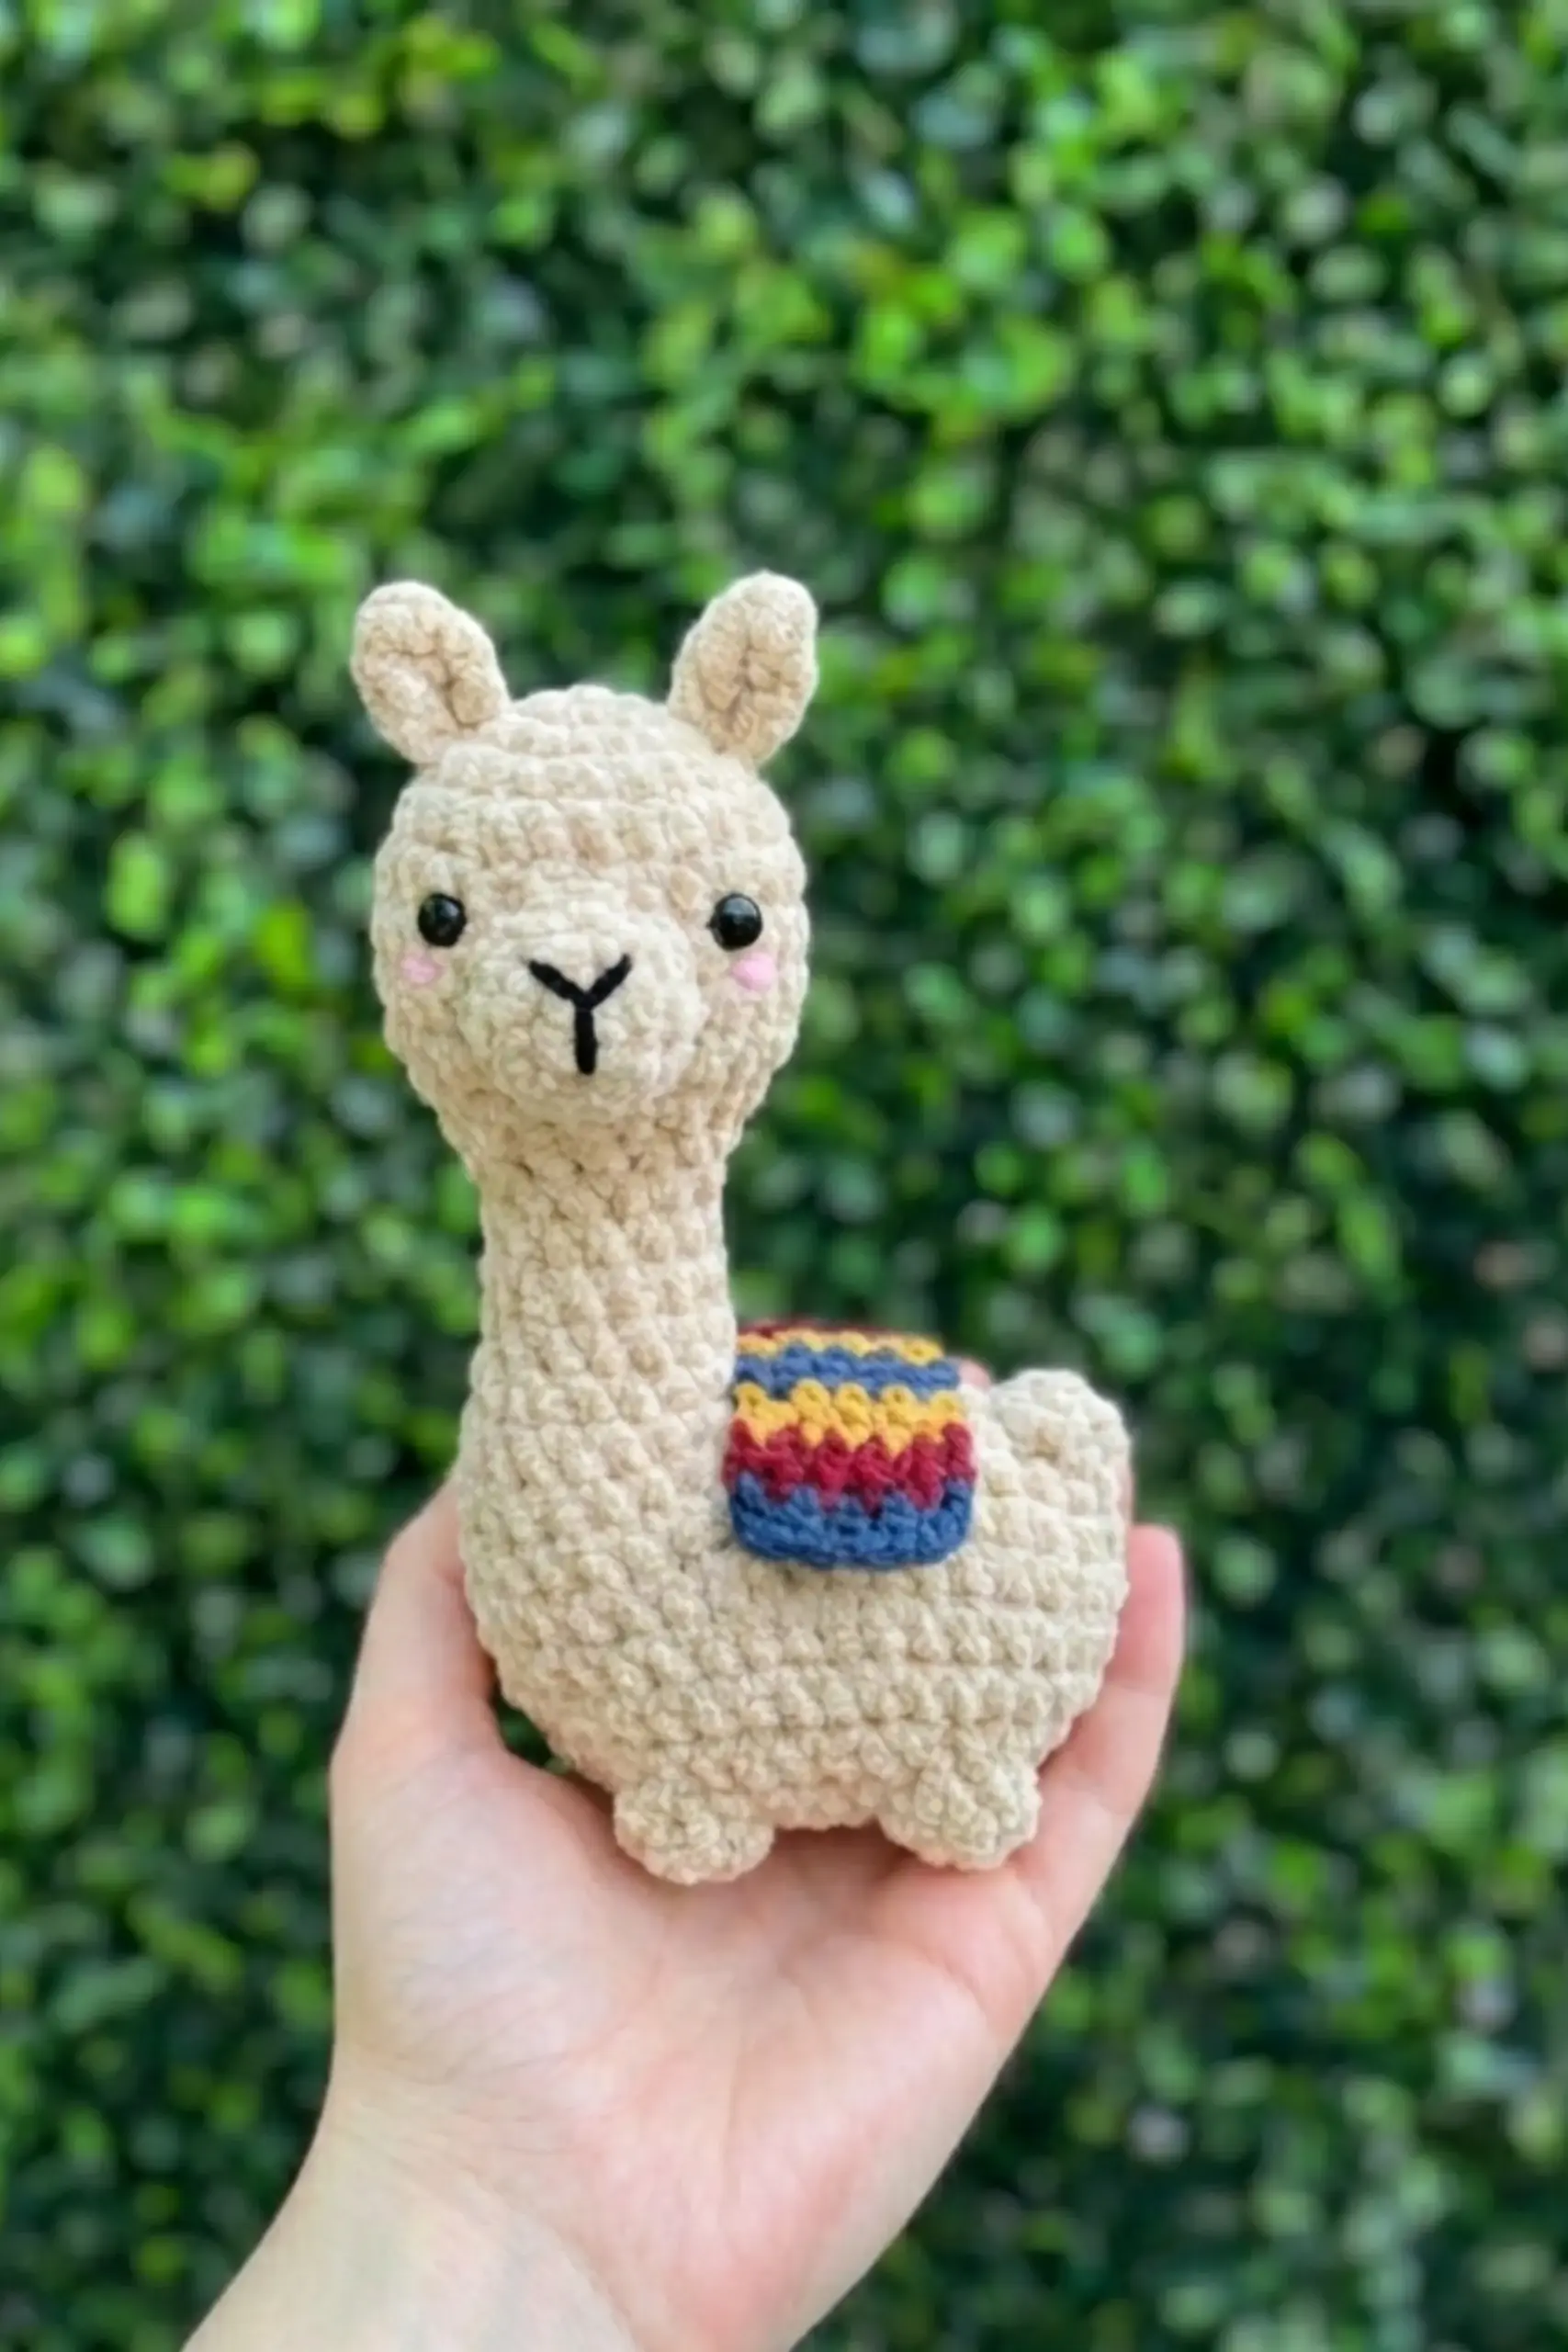
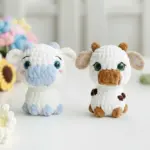
Looking for your next cute crochet project? This charming llama amigurumi pattern is perfect for beginners and experienced crocheters alike! Standing at approximately 15cm (5.9 inches) tall, this delightful llama features a colorful saddle blanket and sweet embroidered details that make it an irresistible handmade gift or personal keepsake.
Deisgned by keinmakercrochet
What You’ll Need
Materials
- Yarn: Bulky weight / Category 5
- Colors: White, blue, purple, and orange
- Crochet Hook: 4.0mm (G/6)
- Safety Eyes: 8mm plastic safety eyes
- Stuffing: Fiberfill
- Notions: Stitch marker, sewing needle, scissors
Abbreviations Used
- MR: Magic Ring
- st(s): Stitch(es)
- sl st: Slip stitch
- ch: Chain
- SC: Single crochet
- INC: Increase
- DEC: Decrease
- DC: Double crochet
- FLO: Front loop only
- BO: Bobble stitch (5 loops)
- HDC: Half double crochet
- DC-picot: dc, ch, slst

Important Technique: Ending Rows with Slip Stitch
This pattern uses a specific finishing technique that helps keep your stitches aligned and prevents the piece from skewing to one side. While you can use the spiral technique, this method ensures better positioning of features.
How to End Each Row:
- Mark your first stitch with a stitch marker
- Thread the needle through the last stitch
- Pull the yarn through to execute the slip stitch
- Gently tighten
- Yarn over and chain (ch 1 for SC/HDC, ch 2 for DC, ch 3 for TR/TRC)
- Make your first stitch of the new row into the slip stitch from the previous row
This technique maintains the correct stitch count and creates a professional finish.
Head Instructions
Begin with white yarn.
- Row 1: 6SC in an MR (6)
- Row 2: 6INC (12)
- Row 3: (SC, INC) 6 times (18)
- Row 4: (2SC, INC) 6 times (24)
- Row 5-8: 24SC (24)
- Row 9: (SC, DEC) 8 times (16)
- Row 10: (6SC, DEC) 2 times (14)
Attach the safety eyes between rows 5 and 6. Stuff the head firmly.
Body Instructions
- Row 11-14: 14SC (14) (4 rounds total)
- Row 15: 5SC, (SC, INC) 2 times, 5SC (16)
- Row 16: Make 8CH, crochet with the second chain from the hook: INC, 6SC (of the chains), 16SC (of the body), 6SC, (SC, BO in one st) (of the chains) (32)
- Row 17: 2INC, 28SC, INC, INC into the stitch’s BO (36)
- Row 18-21: 36SC (36) (4 rounds total)
- Row 22: SC, DEC, 9SC, (SC, DEC) 3 times, 9SC, (SC, DEC) 2 times (30)
- Row 23: DEC, SC, BO, 6SC, BO, SC, 4DEC, BO, 6SC, BO, DEC (24)
Stuff the body firmly before continuing.
- Row 24: 12 DEC (12)
- Row 25: 6DEC (6)
Weave in the yarn end and cut.
Nose Instructions
Begin with white yarn.
- Row 1: Crochet 10 slip stitches from rows 5-7 in a circular shape
- Row 2: Crochet 10SC into the 10 slip stitches of row 1
- Row 3: 5DEC
Lightly stuff the nose.
Weave in the yarn end and cut. Embroider the mouth below the nose, and add pink embroidered cheeks for extra charm.
Ears Instructions
Begin with white yarn. Pick up yarn from row 2 of the head.
- Row 1: 2CH, DC-picot, 2CH, slst in one stitch
Weave in the yarn end and cut. Repeat for the second ear.

Llama Saddle Instructions
This colorful saddle blanket adds personality to your llama! Change colors sequentially in the following order: blue, purple, orange, repeating the pattern until you complete row 10.
Begin with blue yarn.
- Row 1: 5Ch, turn: 4SC, turn (4)
- Row 2-10: Ch, 4SC, turn (4)
Weave in the yarn end and cut.
Secure the saddle on the llama’s back with fabric glue or by sewing it in place.
Assembly and Finishing
- Ensure all pieces are securely stuffed
- Attach the nose to the front of the head
- Position and attach the ears at the top of the head
- Embroider facial features (mouth and rosy cheeks)
- Secure the colorful saddle blanket to the llama’s back
- Weave in all remaining yarn ends
Tips for Success
- Tension matters: Your finished llama’s size will vary based on your crochet tension. If you want a larger or smaller llama, adjust your hook size accordingly.
- Stitch markers are essential: Use them to mark the beginning of each round to avoid losing your place.
- Stuff as you go: It’s easier to stuff the head and body before closing them completely.
- Eye placement: Position the safety eyes between rows 5 and 6 before stuffing and closing the head.
- Watch for row 16: This row creates the llama’s distinctive neck shape. Take your time with this row.
Frequently Asked Questions
The finished llama measures approximately 15cm or 5.9 inches tall when using bulky weight yarn and a 4.0mm hook. Your final size may vary depending on your tension and the specific yarn brand you choose.
While this pattern is written for bulky weight yarn, you can adapt it to other yarn weights by adjusting your hook size accordingly. Just remember that using a lighter weight yarn will result in a smaller llama, and heavier yarn will create a larger one.
Row 16 creates the llama’s neck extension. Start by making 8 chains, then crochet back along the chains starting from the second chain from your hook. Work an increase, then 6 single crochets along the chain, followed by 16 single crochets around the body, continuing with 6 more single crochets and ending with a single crochet and bobble stitch in one stitch.
Yes, this pattern uses bobble stitches (BO) which consist of 5 loops. Bobble stitches add texture and dimension to your llama. If you’re unfamiliar with this technique, practice a few before starting the project to ensure consistent results.
Conclusion
This adorable llama amigurumi is a delightful project that combines basic crochet techniques with charming details. The colorful saddle blanket and sweet embroidered features make each llama unique and special. Whether you’re making it as a gift or adding to your own collection, this pattern creates a lovable companion that’s sure to bring smiles.
Remember to share your finished llama creations with the crochet community! Your handmade llama is ready to bring joy wherever it goes. Happy crocheting!

Remember it later!
Planning to try this soon? Pin it for a quick find later!