Table of contents
- What You’ll Need to Get Started
- Understanding the Pattern Terminology
- Creating the Flamingo Body
- Crafting the Neck and Head
- Constructing the Wings
- Making the Legs
- Assembly Instructions
- Adding Facial Features
- Professional Finishing Techniques
- Color Variation: Blush Pink Flamingo
- Essential Tips for Success
- Caring for Your Finished Flamingo
- Conclusion
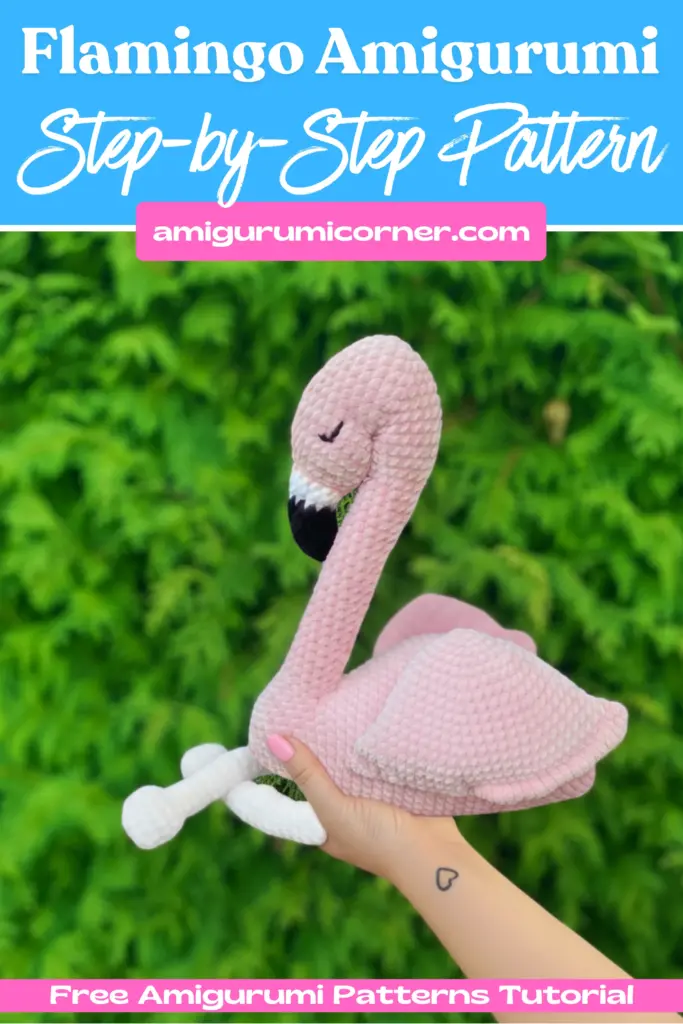
Transform soft yarn into an adorable amigurumi flamingo with this comprehensive crochet pattern. Whether you’re looking to create a charming gift or add to your handmade toy collection, Florence the Flamingo is the perfect intermediate crochet project that combines fundamental techniques with creative design.
What You’ll Need to Get Started
Essential Materials
Yarn Requirements:
- 80 grams (158 yards) of hot pink 10-ply cotton yarn
- 15 grams (30 yards) of pink rose
- 5 grams (10 yards) of snow white
- 3 grams (6 yards) of noir/black
- Black embroidery yarn for facial details
Tools and Supplies:
- 3.75mm crochet hook
- Tapestry needle
- Scissors
- Toy stuffing
- Stitch markers
- Pins for assembly
Skill Level and Requirements
This pattern is rated as intermediate, requiring proficiency in:
- Magic ring technique
- Crocheting in continuous spirals
- Chain stitches
- Working on both sides of foundation chains
- Single crochet stitches
- Color changes
- Increases and decreases
- Sewing amigurumi pieces together
Finished Dimensions
Your completed flamingo will measure:
- 21cm tall when sitting
- 33cm with legs fully extended
- 9cm wide
- 18cm from chest to tail
Note: Final size may vary based on yarn choice, hook size, and individual tension.

Remember it later!
Planning to try this soon? Pin it for a quick find later!
Understanding the Pattern Terminology
Key Abbreviations
- sc – Single Crochet
- ch – Chain
- sts – Stitches
- mr – Magic Ring
- ss – Slip Stitch
- inc – Increase (2 sc in one stitch)
- dec – Decrease (sc two stitches together)
- FLO – Front Loop Only
- BLO – Back Loop Only
- BL – Both Loops
Reading the Pattern
The pattern uses bracket notation to show stitch counts: [24] indicates the total stitches in that round. When you see instructions like “(sc 2, inc) x 6,” repeat the sequence in brackets 6 times.
Creating the Flamingo Body
The body is worked from the chest toward the tail in continuous rounds using hot pink yarn.
Initial Rounds (1-7)
Start with a magic ring and work in continuous rounds:
- 8 sc into magic ring [8]
- Increase in every stitch [16]
- (sc 3, inc) x 4 [20]
- (sc 4, inc) x 4 [24]
- (sc 5, inc) x 4 [28]
- (sc 6, inc) x 4 [32]
- (sc 7, inc) x 4 [36]
Creating the Neck Opening (Round 8)
This crucial step forms where the neck will attach:
- Chain 3
- Skip 12 stitches
- Single crochet 24 stitches
- Total count including chain: [27]
You should now have two openings: one for the neck and one for the body.
Building the Body Shape (Rounds 9-21)
Continue working the body, incorporating increases to shape:
- Round 9: Work 3 increases into back loop only of previous chain stitches, then sc 24 [30]
- Rounds 10-21: Follow pattern increases, reaching maximum size of 54 stitches
Decreasing and Closing (Rounds 22-39)
Gradually decrease to shape the tail:
- Stuff the body firmly as you work
- Continue decreasing according to pattern
- Final round should have 18 stitches
- Leave a long tail for sewing
Closing the Tail:
- Fold edges in half, aligning stitches
- Use mattress stitch to seamlessly close
- Hide yarn tail inside
Crafting the Neck and Head
The neck is worked separately and later attached to the body, with the head and beak created by continuing from the neck opening.
Neck Construction (Rounds 1-34)
Starting at the back of the head with hot pink:
- 8 sc into magic ring [8]
- Increase in every stitch [16]
3-8. Follow pattern increases to [36]
Creating Head Opening (Round 9):
- Chain 2
- Skip 18 stitches
- Single crochet 18 to form neck
- Total stitch count: [20]
Continue working 22 rounds of 15 stitches each to create the graceful long neck characteristic of flamingos.
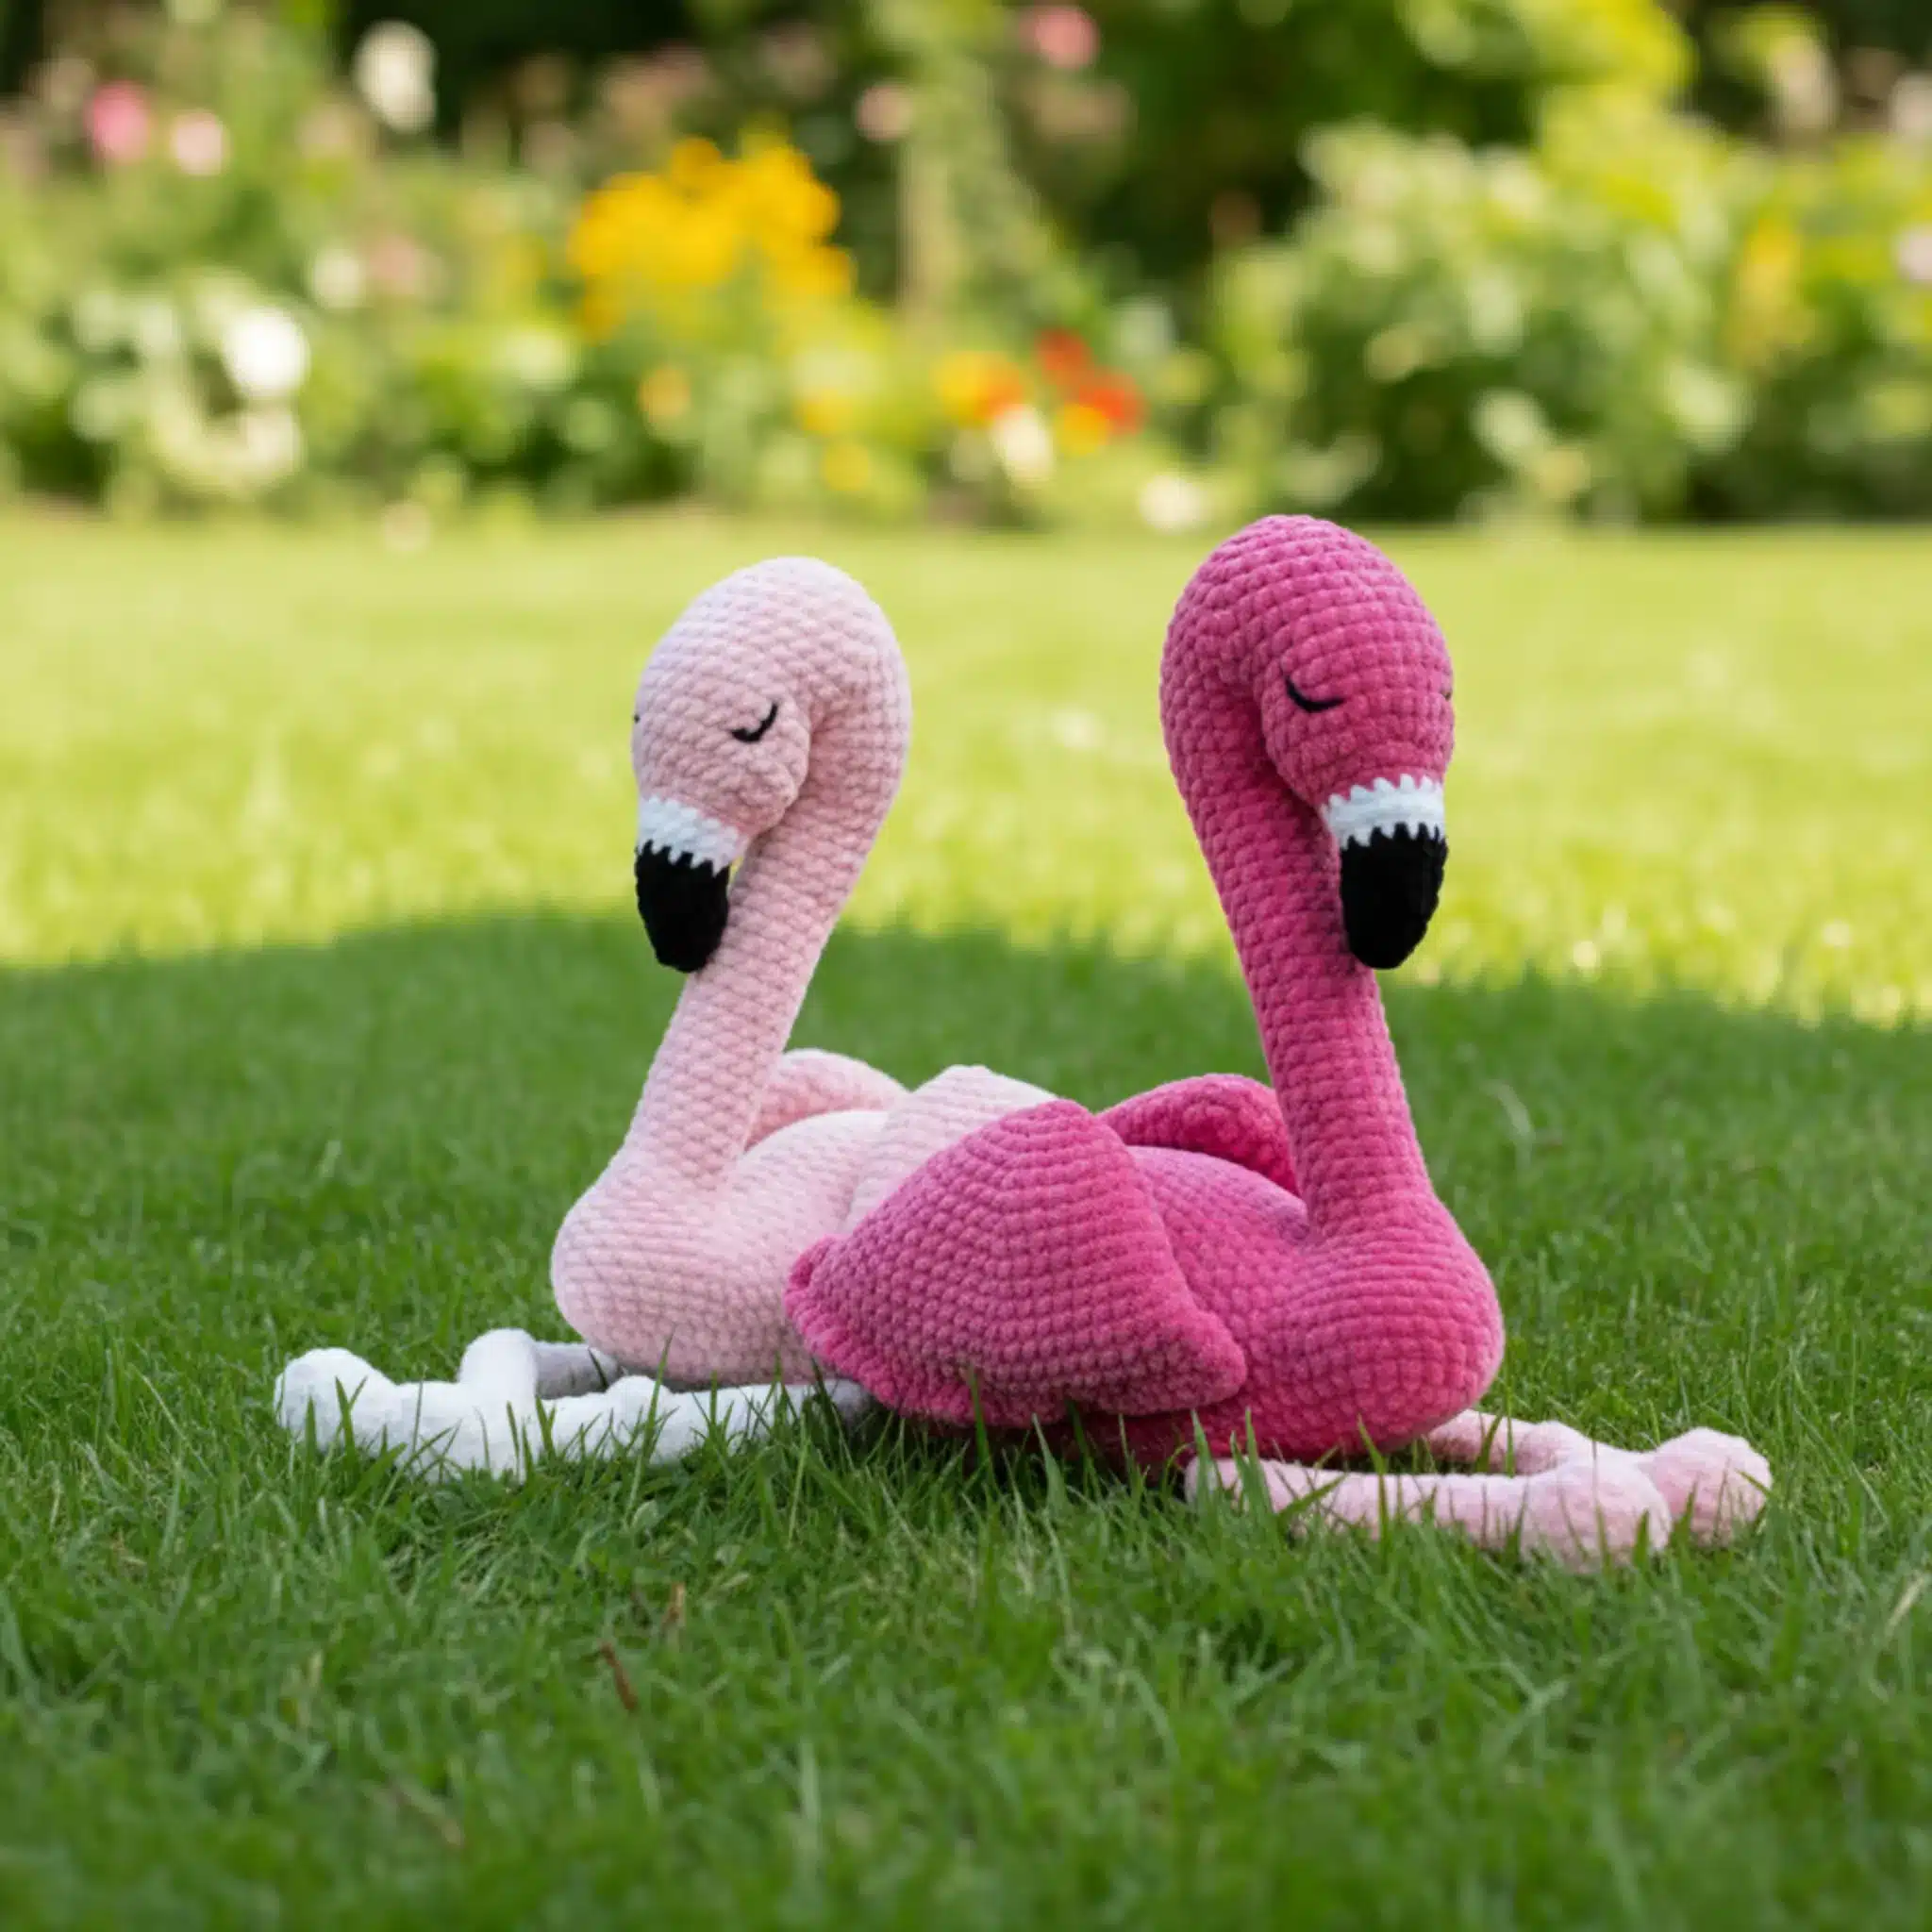
Head and Beak Details
Attaching for the Head:
Using a standing single crochet, attach yarn at the top of the neck immediately after the chain 2 join. Work in continuous rounds following the color changes:
- Rounds 1-7: Hot pink (shaping the head)
- Round 8: Change to snow white (back loop only)
- Round 10: Change to noir/black for beak
- Rounds 10-15: Complete beak shaping
The head naturally shapes as you work decreases, creating the distinctive flamingo profile.

Constructing the Wings
Each wing is made identically through round 16, then finished with different edge stitching to create mirror images.
Basic Wing Shape (Rounds 1-16)
Using hot pink yarn:
- 6 sc into magic ring [6]
- Increase in every stitch [12]
Continue increasing every few rounds to reach 60 stitches
Closing the Wing (Round 16):
- Fold flat with wrong sides together
- Chain 1
- Single crochet through both loops of both sides (30 stitches)
- Do not tie off
Wing Finishing
Wing One:
- Chain 1, turn
- Sc 14, then (sc, 2dc, 2dc, sc) x 4
- Tie off with long tail
Wing Two:
- Chain 1, turn
- (sc, 2dc, 2dc, sc) x 4, then sc 14
- Tie off with long tail
The different edge patterns create wings that mirror each other perfectly when attached.
Making the Legs
The legs are worked from the foot upward, creating realistic flamingo proportions.
Foot Formation (Rounds 1-6)
Starting with pink rose:
- Chain 5
- Work on both sides of foundation chain to create oval foot shape
3-6. Shape and decrease to 8 stitches
Creating the Knee Joint (Rounds 7-29)
- Rounds 7-18: Work even at 8 stitches (lower leg)
- Round 19: Create bobble stitch for knee joint
- Rounds 20-29: Continue at 8 stitches (upper leg)
- Round 30: Change to hot pink
- Rounds 31-32: Increase to 12 stitches for thigh
Important: Do not stuff the legs to maintain their characteristic slender appearance.
Bobble Stitch Technique
The knee joint bobble adds realistic dimension:
- Yarn over, insert hook, pull up loop
- Repeat in same stitch 4 times (6 loops on hook)
- Yarn over, pull through all loops
- Push bobble outward as you continue
Assembly Instructions
Proper assembly brings Florence to life. Take your time with this crucial step.
Pinning Strategy
Before sewing anything permanently:
- Pin neck to body, checking alignment
- Pin wings to body sides
- Pin legs with 1cm gap between them
- Pin beak against neck center
Attaching the Neck
Critical stuffing tip: Stuff the neck-to-body join very firmly before completely closing. This ensures the neck stands upright rather than flopping forward.
Using mattress stitch:
- Align stitches of neck opening and neck base
- Work zigzag pattern through both pieces
- Pull tight to close securely
- Hide yarn tail
Positioning the Wings
The wings should be placed with edge stitching facing outward:
- Position on either side of body
- Stitch along front edge only (creates dimensional movement)
- Ensure mirror positioning
Securing the Legs
Attach legs in the middle of the body’s underside with approximately 1cm spacing between them for stability.
Adding Facial Features
The eyes bring personality to your flamingo.
Eye Placement
Safe for children: Use embroidered eyes rather than safety eyes for young children to prevent choking hazards.
- Mark eye position halfway down face using pins
- Position eyes on sides of head
- Using black yarn and tapestry needle:
- Stitch horizontal line for eye
- Come through center one row below
- Loop over to create curved eye shape
- Hide all yarn tails securely
Professional Finishing Techniques
Mattress Stitch Method
This invisible seaming technique creates professional-looking joins:
- Align stitches of pieces to join
- Insert needle from wrong side through right side
- Repeat on opposite piece
- Create zigzag pattern
- Pull thread lengthwise to close gaps
- Finish stuffing before final closure
Hiding Yarn Tails
For a polished finish:
- Thread tail through tapestry needle
- Weave through several stitches inside piece
- Change direction and weave back
- Trim close to work
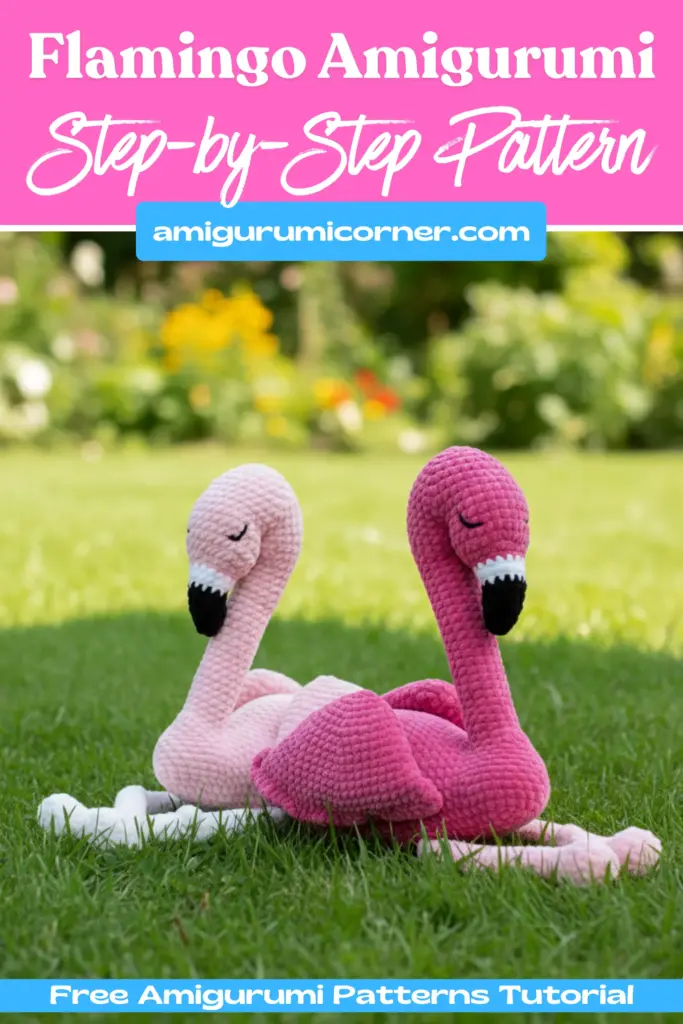
Color Variation: Blush Pink Flamingo
Create a softer, pastel version by substituting colors:
Primary color: Use pink rose instead of hot pink for body, neck, wings, and head beginning
Leg color: Use snow white for legs, changing to pink rose (not hot pink) at round 30
Keep noir/black unchanged for beak details
This creates an elegant blush-toned flamingo perfect for nursery decor.

Essential Tips for Success
Working in Continuous Rounds
- Use stitch markers at the beginning of each round
- Count stitches regularly to catch errors early
- Keep consistent tension throughout
Achieving Professional Results
Minimize holes: A smaller hook size relative to yarn weight reduces visible gaps between stitches.
Consistent stuffing: Stuff firmly but not so tight that stitches distort. Add stuffing gradually as you work.
Color changes: Change colors on the last single crochet before the new color round begins for clean transitions.
Troubleshooting Common Issues
Neck won’t stand upright: Increase stuffing at the neck-to-body join. The weight needs firm support.
Wings look uneven: Ensure you’ve created true mirror images with edge stitching on opposite sides.
Legs appear twisted: Don’t stuff the legs, and ensure the bobble knee joint faces forward when attaching.
Caring for Your Finished Flamingo
Your completed Florence the Flamingo will last for years with proper care:
- Spot clean with mild soap and water
- Air dry completely before storage
- Keep away from direct sunlight to prevent fading
- Store in breathable fabric bag to prevent dust accumulation
Conclusion
Creating Florence the Flamingo combines fundamental crochet techniques with creative assembly to produce a charming, dimensional toy. The combination of long neck, graceful wings, and slender legs captures the elegance of these beautiful birds in soft, huggable form.
Whether you choose vibrant hot pink or soft blush tones, this pattern offers the satisfaction of building something complex from simple stitches. Take your time with each section, count your stitches carefully, and enjoy the process of watching your flamingo come to life stitch by stitch.
The skills you develop while creating Florence—from working in continuous rounds to mastering color changes and perfecting mattress stitch assembly—will serve you well in future amigurumi projects. Happy crocheting!


Remember it later!
Planning to try this soon? Pin it for a quick find later!