Table of contents
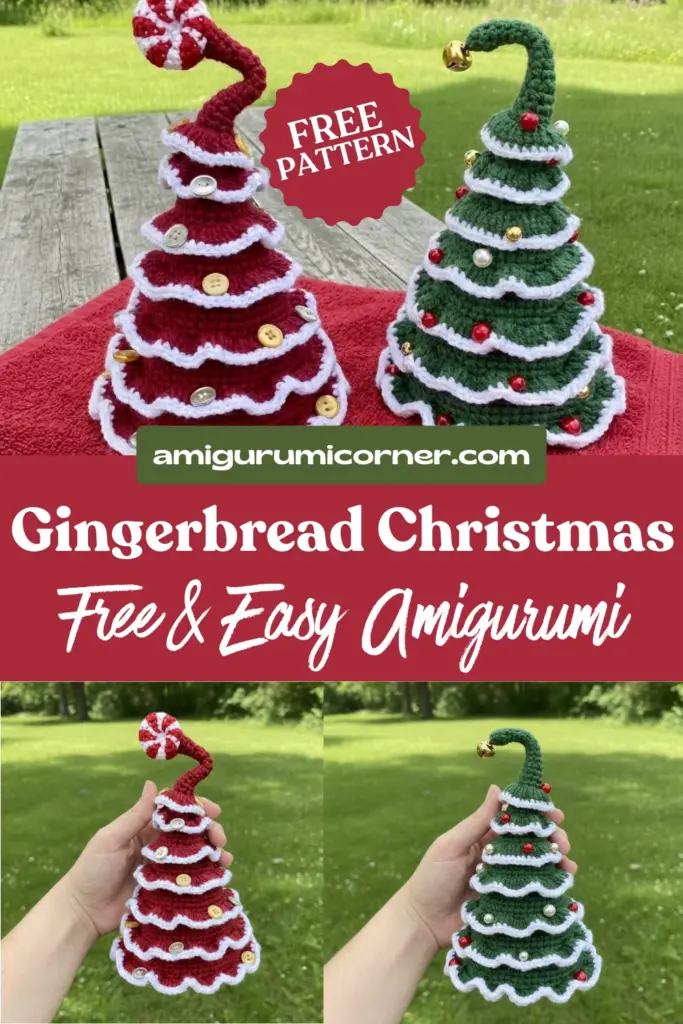
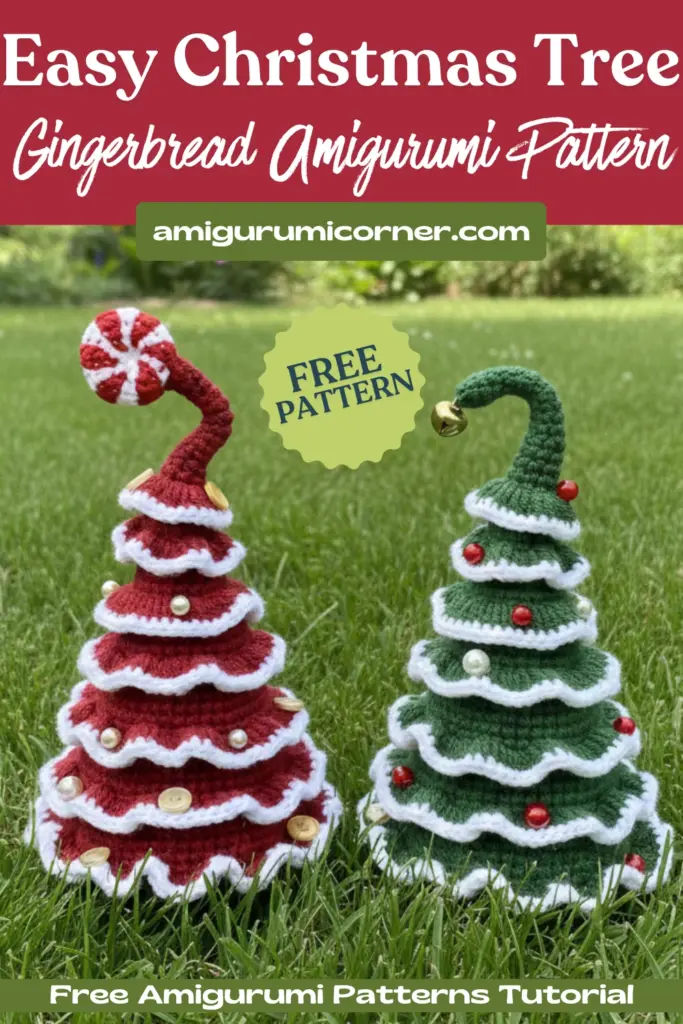
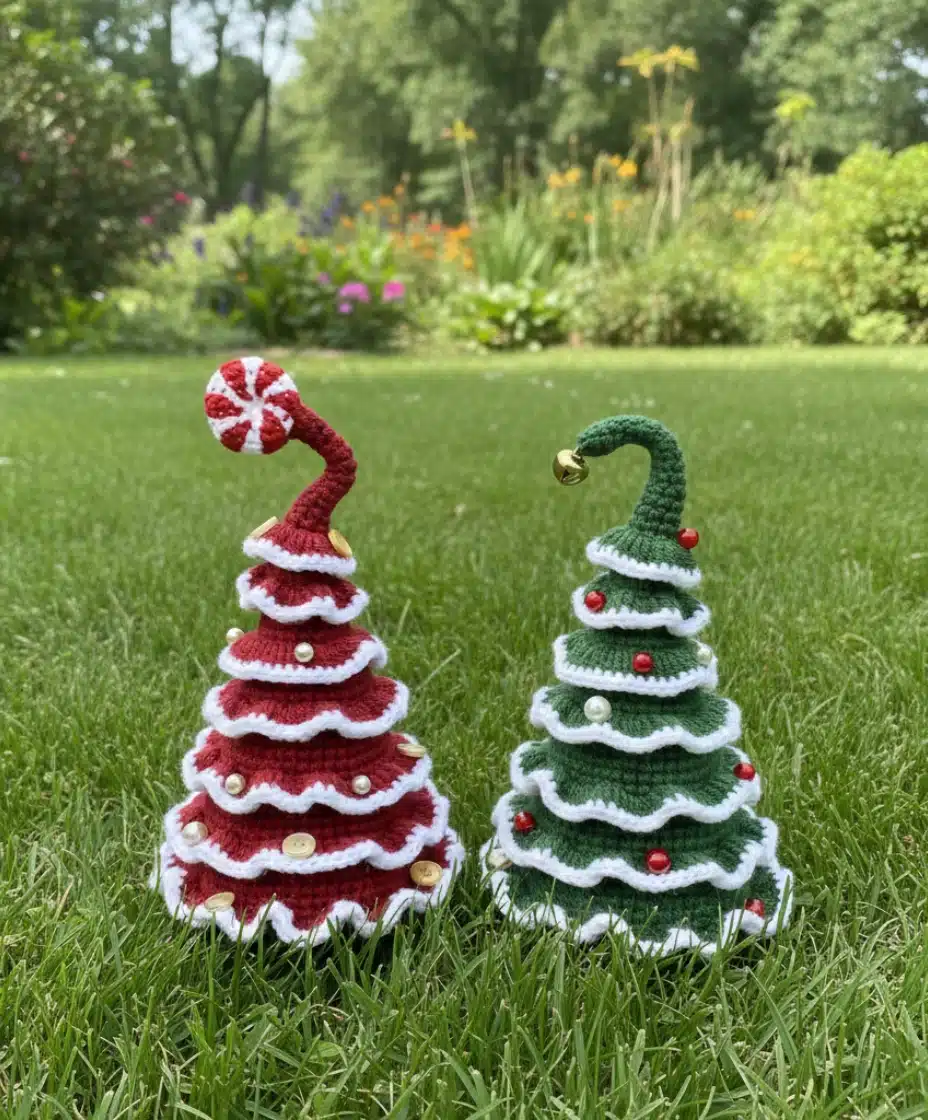
Looking for a charming holiday crochet project that’s both festive and functional? This delightful Gingerbread Christmas tree amigurumi combines the cozy warmth of gingerbread with the cheerful spirit of Christmas decorations. Standing approximately 7 inches tall, this beige and white striped tree topped with a candy-striped caramel makes the perfect handmade gift or seasonal decoration. Whether you’re an experienced crocheter or looking to expand your amigurumi skills, this pattern offers a satisfying medium-difficulty project that will bring holiday cheer to any space.
Remember it later!
Planning to try this soon? Pin it for a quick find later!
About This Pattern
This crochet pattern was designed by Olga Vasileva and includes detailed step-by-step instructions complete with 17 process photos to guide you through creating your own Gingerbread Christmas Tree Amigurumi. The pattern features a unique construction method that creates beautiful ruffled tiers, giving your tree a festive, layered appearance reminiscent of classic gingerbread decorations.
The tutorial covers everything from the basic tree structure with its internal wire support to the decorative white frosting-like edges and the adorable jacquard-technique caramel topper.
Materials You’ll Need
To create your Gingerbread Christmas Tree Amigurumi, gather the following supplies:
- Sport weight/4ply yarn Yarn Art Jeans (50g/160m) in three colors:
- 07 beige (main color)
- 01 white (frosting details)
- 90 red (caramel topper)
- Crochet hook – 1.75 mm (or size appropriate for your yarn)
- Fiberfill stuffing
- Plastic cover or thick cardboard (for base)
- Wire (for internal support)
- Insulating tape
- Multicolored buttons or beads (for decoration)
- Scissors
- Needle for embroidery and sewing pieces
- Pins for attaching details
- Stitch markers
Note: These materials are recommendations to achieve a tree identical to the photos. You can substitute with any yarn weight and appropriate hook size, though this will affect the final size and appearance of your tree.
Abbreviations and Techniques
Before beginning, familiarize yourself with these standard crochet abbreviations:
- MR – Magic ring
- ch – chain
- sc – single crochet
- dc – double crochet
- inc – increase
- dec – decrease
- sl st – slip stitch
- BLO – back loops only
- FLO – front loops only
- *6 – number of repeats
- (12) – total number of stitches in a round

Important Tips Before You Start
- Choose a hook size appropriate for your yarn choice
- Use stitch markers for convenience and round counting
- Stuff all pieces firmly as you go, adding small portions gradually to form the proper shapes
- The jacquard technique will be used for the caramel topper (don’t worry, detailed instructions are included!)
Instructions
Bottom Base
Start crocheting with beige thread.
- Round 1: 6 sc in MR
- Round 2: 6 inc (12)
- Round 3: (1 sc, inc) * 6 (18)
- Round 4: (2 sc, inc) * 6 (24)
- Round 5: (3 sc, inc) * 6 (30)
- Round 6: (4 sc, inc) * 6 (36)
- Round 7: (5 sc, inc) * 6 (42)
- Round 8: (6 sc, inc) * 6 (48)
- Round 9: (7 sc, inc) * 6 (54)
- Round 10: (8 sc, inc) * 6 (60)
- Round 11: (9 sc, inc) * 6 (66)
- Round 12: (10 sc, inc) * 6 (72)
Cut the yarn, fasten off, weave in the ends.
At this stage, cut a circular bottom from a plastic cover or thick cardboard to provide stability to your finished tree.
Christmas Tree Main Body
Start crocheting with beige thread. Stuff with fiberfill as you work through the rounds.
- Round 1: 6 sc in MR
- Rounds 2-11: 6 sc (10 rounds)
- Round 12: (1 sc, inc) * 3 (9)
- Rounds 13-17: 9 sc (5 rounds)
- Round 18: BLO: 9 sc
- Round 19: (2 sc, inc) * 3 (12)
- Rounds 20-22: 12 sc (3 rounds)
- Round 23: BLO: 12 sc
- Round 24: (1 sc, inc) * 6 (18)
- Rounds 25-26: 18 sc (2 rounds)
- Round 27: (2 sc, inc) * 6 (24)
- Round 28: 24 sc
- Round 29: BLO: 24 sc
Important: At this point, prepare your wire support. Wrap both ends of the wire with insulating tape to protect the stuffing and yarn. Insert the wire into the Christmas tree through the center.
- Round 30: (3 sc, inc) * 6 (30)
- Rounds 31-32: 30 sc (2 rounds)
- Round 33: (4 sc, inc) * 6 (36)
- Round 34: 36 sc
- Round 35: BLO: 36 sc
- Round 36: (5 sc, inc) * 6 (42)
- Rounds 37-38: 42 sc (2 rounds)
- Round 39: (6 sc, inc) * 6 (48)
- Round 40: 48 sc
- Round 41: BLO: 48 sc
- Round 42: (7 sc, inc) * 6 (54)
- Rounds 43-44: 54 sc (2 rounds)
- Round 45: (8 sc, inc) * 6 (60)
- Round 46: 60 sc
- Round 47: BLO: 60 sc
- Round 48: (9 sc, inc) * 6 (66)
- Rounds 49-50: 66 sc (2 rounds)
- Round 51: (10 sc, inc) * 6 (72)
- Round 52: 72 sc
- Round 53: BLO: 72 sc
Insert the cardboard circle you cut earlier into the bottom of the Christmas tree. Join the bottom and the Christmas tree by crocheting both pieces together with 72 sc around the entire circumference.
Cut the yarn, fasten off, weave in the ends.

Creating the Frosted Tier Edges
Now comes the fun part – creating those beautiful white frosting-like ruffled edges! You’ll work back into the front loops of specific rounds where you previously worked in back loops only. This creates the distinctive layered appearance of your gingerbread tree.
Tier 7 (Bottom/Largest Tier)
Go back to the 53rd round, continue to sc on FLO using the beige thread (with the tip of the hook pointing down):
- Round 1: ch 3, (3 dc in one stitch, 1 dc) * 36
Change color to white.
- Round 2: 144 sc
Cut the yarn, fasten off, weave in the ends.
Tier 6
Go back to the 47th round, continue to sc on FLO using the beige thread (with the tip of the hook pointing down):
- Round 1: ch 3, (3 dc in one stitch, 1 dc) * 30
Change color to white.
- Round 2: 120 sc
Cut the yarn, fasten off, weave in the ends.
Tier 5
Go back to the 41st round, continue to sc on FLO using the beige thread (with the tip of the hook pointing down):
- Round 1: ch 3, (3 dc in one stitch, 1 dc) * 24
Change color to white.
- Round 2: 96 sc
Cut the yarn, fasten off, weave in the ends.
Tier 4
Go back to the 35th round, continue to sc on FLO using the beige thread (with the tip of the hook pointing down):
- Round 1: ch 3, (3 dc in one stitch, 1 dc) * 18
Change color to white.
- Round 2: 72 sc
Cut the yarn, fasten off, weave in the ends.
Tier 3
Go back to the 29th round, continue to sc on FLO using the beige thread (with the tip of the hook pointing down):
- Round 1: ch 3, (4 dc in one stitch, 1 dc) * 12
Change color to white.
- Round 2: 60 sc
Cut the yarn, fasten off, weave in the ends.
Tier 2
Go back to the 23rd round, continue to sc on FLO using the beige thread (with the tip of the hook pointing down):
- Round 1: ch 3, (4 dc in one stitch) * 12
Change color to white.
- Round 2: 48 sc
Cut the yarn, fasten off, weave in the ends.
Tier 1 (Top/Smallest Tier)
Go back to the 18th round, continue to sc on FLO using the beige thread (with the tip of the hook pointing down):
- Round 1: ch 3, (4 dc in one stitch) * 9
Change color to white.
- Round 2: 36 sc
Cut the yarn, fasten off, weave in the ends.
Candy Cane Caramel Topper
This adorable topper uses the jacquard technique to create a red and white striped pattern. Start crocheting in white thread.
In the pattern below:
- Plain “sc” indicates white color
- sc in bold indicates red color
- Round 1: 6 sc in MR
- Round 2: 6 inc: (1 sc, 1 sc) * 6 (12)
- Round 3: (1 sc, inc) * 6 (18)
- Round 4: (inc, 2 sc) * 6 (24)
- Rounds 5-6: (2 sc, 2 sc) * 6 (24) (2 rounds)
- Round 7: (dec, 2 sc) * 6 (18)
- Round 8: (1 sc, dec) * 6 (12)
Fill the caramel with fiberfill stuffing.
- Round 9: 6 dec (6)
Cut the yarn, fasten off, leaving a long thread for sewing the caramel to the tree top.

Assembly and Finishing Touches
Now it’s time to bring your Gingerbread Christmas Tree Amigurumi to life!
Add Decorations: Sew decorative buttons or beads randomly around the tiers of your tree to mimic colorful Christmas ornaments and candy decorations.
Attach the Caramel Topper: Using the long tail you left, sew the candy cane caramel securely to the very top of your Christmas tree.
Final Adjustments: Arrange the ruffled tiers so they lay nicely and give your tree a full, festive appearance. The wire inside allows you to adjust the shape slightly if needed.
Weave in Any Remaining Ends: Make sure all yarn ends are securely woven in and trimmed for a professional finish.
Frequently Asked Questions
Yes, you can use any yarn weight, but you’ll need to adjust your hook size accordingly. Keep in mind that using different yarn will change the final size of your Christmas tree. Thicker yarn will create a larger tree, while thinner yarn will make a smaller one.
The wire provides internal structure and stability, helping your tree stand upright and maintain its shape. It also allows you to make slight adjustments to the tree’s posture. Make sure to wrap the wire ends with insulating tape to prevent them from poking through the yarn or stuffing.
Jacquard crochet is a colorwork technique where you work with two colors in the same round, carrying the unused color along the inside while working with the other. For the caramel topper, you’ll alternate between white and red stitches to create the candy cane striped effect. The pattern clearly marks which stitches should be which color.
The ruffled edges are created by working in back loops only during the main tree construction, then going back to work in the front loops only later. This creates a ridge that separates the tiers. You’ll then add double crochet increases in beige followed by a round of white single crochet to create the decorative frosting-like ruffled edge.
Conclusion
Your charming Gingerbread Christmas Tree Amigurumi is now complete and ready to spread holiday cheer! This delightful amigurumi makes a wonderful handmade gift, festive home decoration, or special addition to your seasonal decor collection. The unique construction technique and attention to detail result in a truly special piece that captures the warmth and sweetness of the holiday season.
Don’t forget to share your finished creation and tag the designer to show off your beautiful work. Happy crocheting, and may your holidays be filled with cozy crafting moments!


Remember it later!
Planning to try this soon? Pin it for a quick find later!