Table of contents
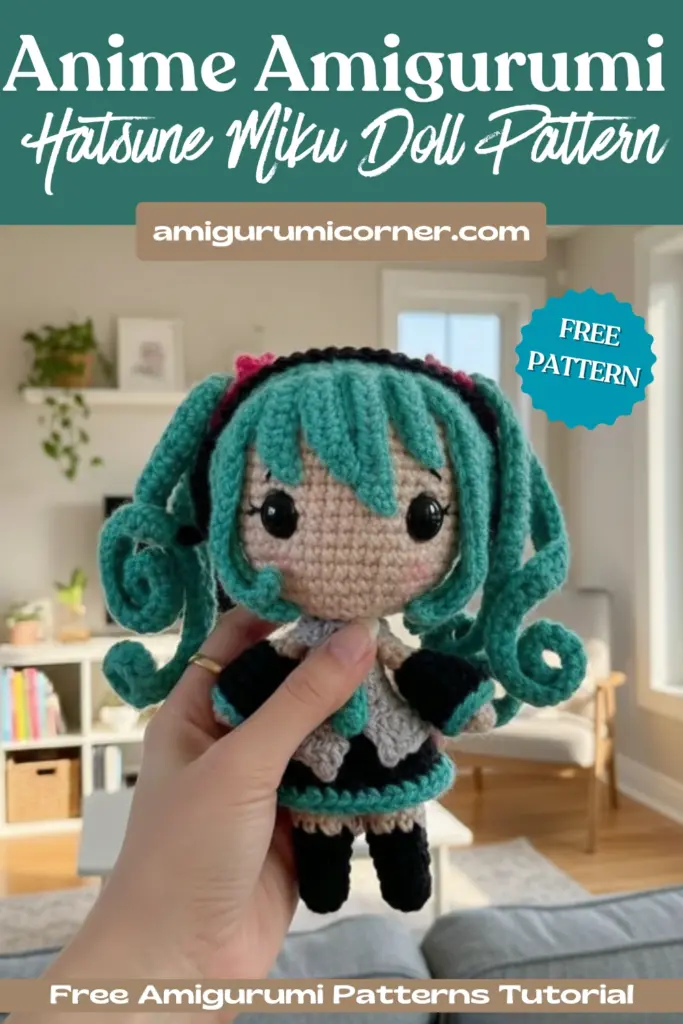
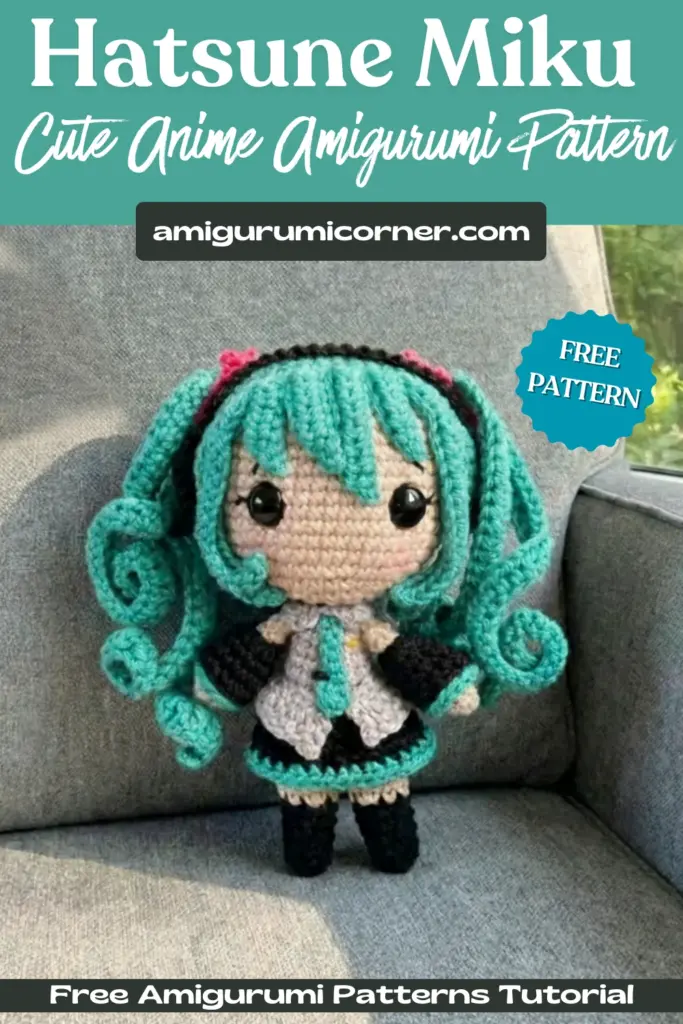
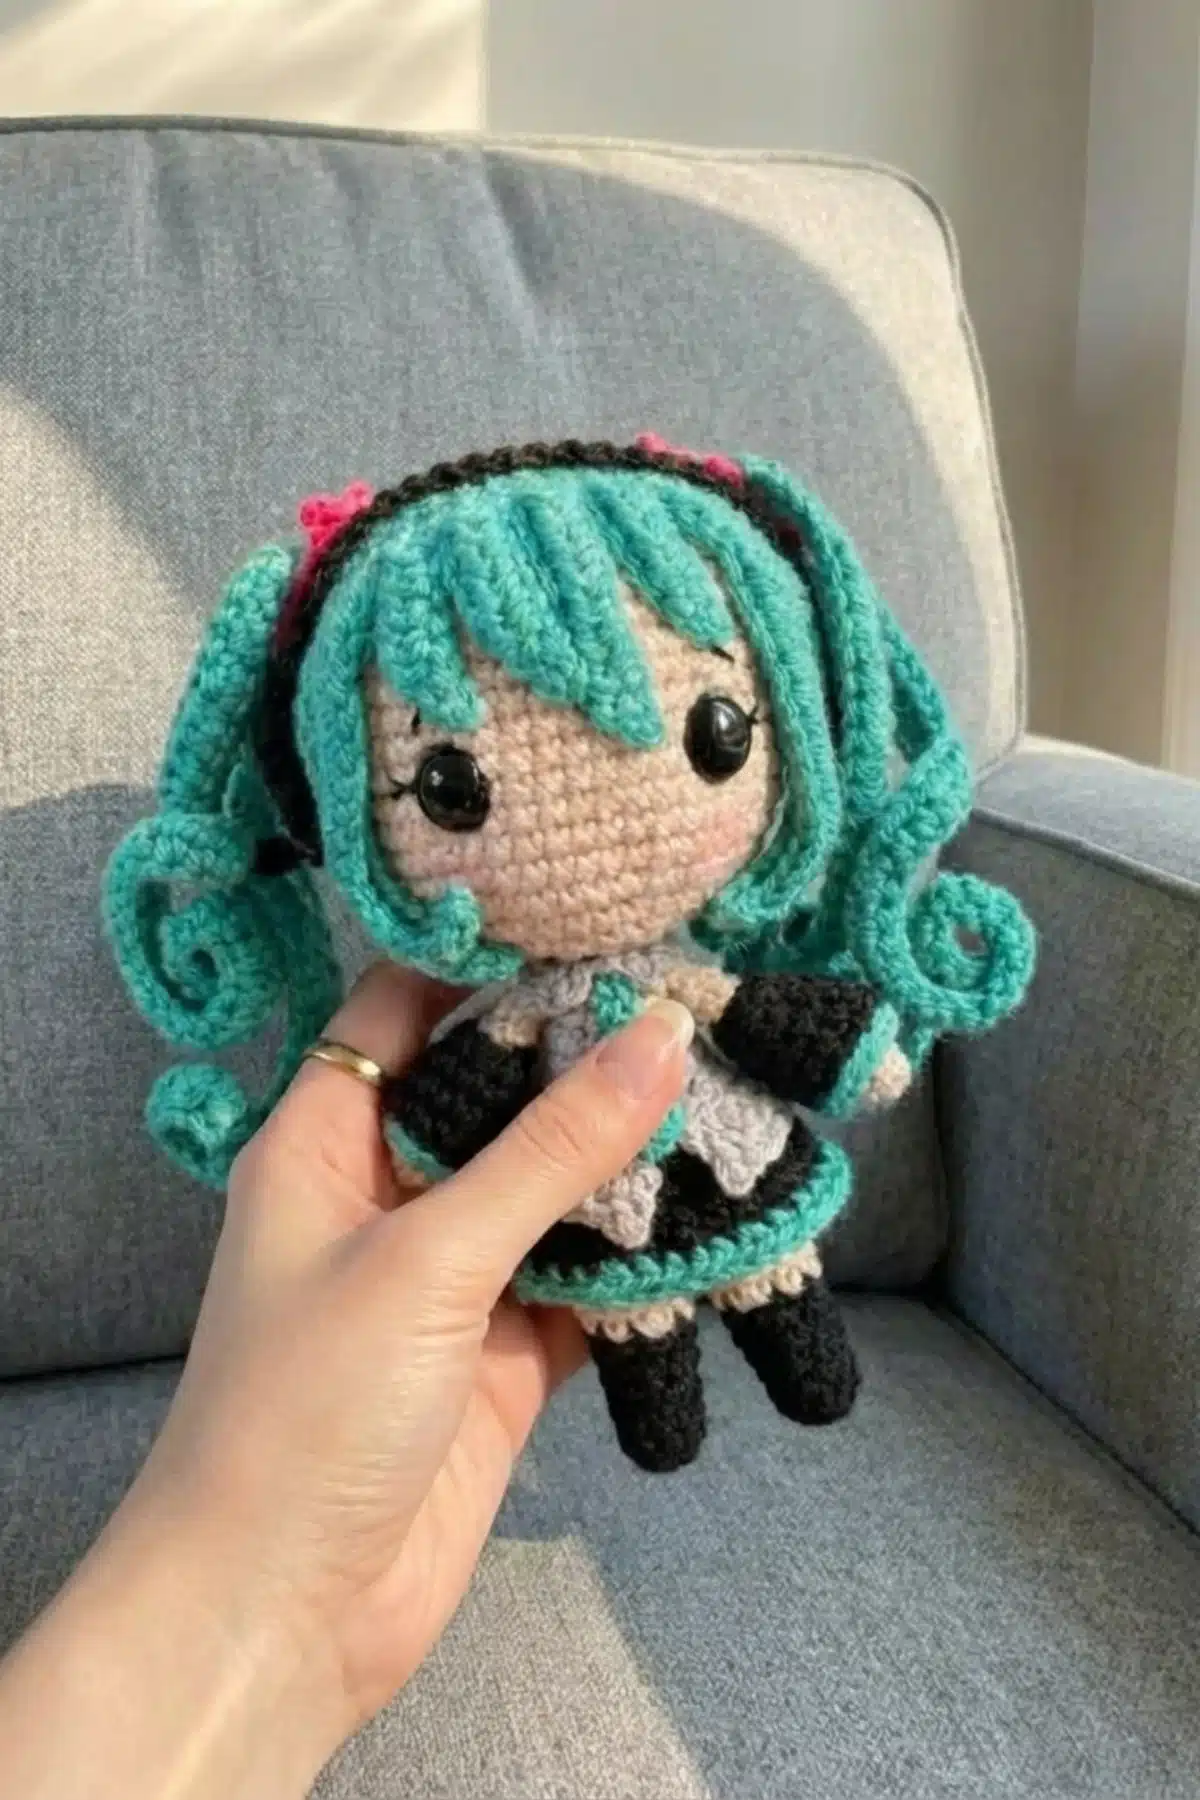
Are you ready to bring the iconic virtual pop star Hatsune Miku to life in adorable amigurumi form? This comprehensive crochet pattern will guide you through creating a charming 6.2-inch (16 cm) toy art doll that captures Miku’s signature style, complete with her distinctive teal pigtails, headphones, and stylish outfit. Whether you’re a Vocaloid fan or simply love creating cute amigurumi characters, this project combines fun stitching techniques with rewarding detail work.
Remember it later!
Planning to try this soon? Pin it for a quick find later!
Materials You’ll Need
Before you begin your Hatsune Miku amigurumi, gather the following supplies:
Yarn Colors (compatible with 3mm crochet hook):
- Beige (for skin)
- Black (for clothes)
- Tiffany blue (for hair and details)
- Grey (for clothes)
- Hot pink (for hair accessories)
Tools and Notions:
- 3mm crochet hook
- Black and yellow embroidery threads
- Embroidery needle
- Stuffing
- 11mm black safety eyes
- Tapestry needle for sewing
- Stitch markers
- Craft glue
Stitches and Abbreviations
This hatsune miku amigurumi pattern uses the following stitches: chain, slip stitch, single crochet, half double crochet, and double crochet.
Abbreviations:
- inc = increase
- dec = decrease
- ch = chain
- slst = slip stitch
- sc = single crochet
- hdc = half double crochet
- dc = double crochet
- ( ) = repetition of a sequence
- = total number of stitches
Important Note: The doll is worked in continuous rounds. Place a stitch marker at the beginning of each new round to keep track of where it starts.

Body Instructions
Legs (Make Two)
Start with black:
- Round 1: 6 sc in the magic ring
- Round 2: Sc around [6]
- Round 3: (2 sc, inc) x2 [8]
- Round 4: Sc around [8]
Change to beige:
- Round 5: (3 sc, inc) x2 [10]
- Round 6: Sc around [10]
Fasten off.
Body (Grey)
Using grey, join both legs with a slipknot or slip stitch.
- Round 1: 1 sc, 2 inc, 6 sc, dec, 6 sc, 2 inc, 1 sc [23]
- Round 2: 2 sc, inc, 2 sc, dec, 9 sc, dec, 2 sc, inc, 2 sc [23]
- Round 3: 6 sc, dec, 8 sc, dec, 5 sc [21]
Gently stuff the legs.
- Round 4-6: Sc around [18]
- Round 7: 2 sc, dec, 6 sc, dec, 6 sc, dec, 1 sc [18]
- Round 8-10: Sc around [18]
- Round 11: 4 sc, dec, 2 sc, dec, 3 sc, dec, 3 sc [15]
- Round 12: 3 sc, dec, 2 sc, dec, 2 sc, dec, 2 sc [12]
- Round 13: Sc around in back loops only [12]
- Round 14: Sc around [12]
Stuff the body.
- Round 15: Dec around [6]
- Round 16: Inc around [12]
- Round 17: Inc around [24]
- Round 18: Sc around [24]
- Round 19-20: Sc around [24]
- Round 21: Dec around [12]
Stuff.
- Round 22: Dec around [6]
Fasten off.
- Round 23: Close the opening with a tapestry needle.
- Round 24-25: Using yellow, embroider a small line on the right side, between rounds 19 and 20.
Skirt
Start with black:
- Round 1: Chain 20, join to close the ring, 20 sc
- Round 2: (4 sc, inc) around [24]
- Round 3: Sc around [24]
- Round 4: (3 sc, inc) around [30]
Change to tiffany blue:
- Round 5: (4 sc, inc) around [36]
Fasten off.
Position the skirt around the doll’s waist and sew it on the loops left on round 18 of the body.
Shirt Hem
Chain 21, skip one.
- Row 1: Slst 1, 3 sc, inc, 10 sc, inc, 3 sc, slst 1, turn [22]
- Row 2: Ch 4, skip one, slst 1 (picot stitch), 2 dc, 2 hdc, 14 sc, 2 hdc, 3 dc, 2 ch, slst 1 on the first chain, ch 2, slst 1 on the first base chain (first row).
Fasten off and leave a tail for sewing.
Wrap it around the doll’s waist and sew it on the front center.
Head
The head is worked around round 21 of the body.
Chain 8, skip one.
- Round 1: Inc around [14]
Wrap the strand around the neck and join on the other side. Continue the round from there.
- Round 2: (1 sc, inc) around [21]
- Round 3: (2 sc, inc) around [28]
Close the opening of the first round, keeping the head loose on the neck.
- Round 4: (3 sc, inc) around [35]
- Round 5: (4 sc, inc) around [42]
- Round 6: 5 sc, (inc, 1 sc) x7, 23 sc [49]
- Round 7-16: Sc around [49]
Important: Pay attention to the position of the eyes: they should be placed on the opposite side of the increases made on round 6, the curved part of the head.
Embroider eyelashes and insert safety eyes between rounds 9 and 10, ten stitches apart.
Embroider eyebrows between rounds 12 and 13.
- Round 17: (5 sc, dec) around [42]
- Round 18: (4 sc, dec) around [35]
Start stuffing the head and continue to stuff while you work. The head should be firmly stuffed.
- Round 19: (3 sc, dec) around [28]
- Round 20: (2 sc, dec) around [21]
- Round 21: (1 sc, dec) around [14]
- Round 22: Dec around [7]
Close the opening with a tapestry needle.
Arms
- Round 1: 6 sc in the magic ring
- Round 2-5: Sc around [6]
- Round 6: (1 sc, dec) x2 [4]
- Round 7-8: Sc around [4]
Close the opening with a tapestry needle.
Fasten off and leave a tail for sewing.
Sleeves
Start with black:
Note: leave a tail at the beginning of your work.
- Round 1: Chain 8, join to close the ring, 8 sc
- Round 2: (3 sc, inc) x2 [10]
- Round 3: (4 sc, inc) x2 [12]
- Round 4: Sc around [12]
- Round 5: Using tiffany blue, slst around in back loops only.
Tip: If the opening is too tight, stretch it using a round object, like a pen or the handle of your crochet hook.
Place the sleeves over the arms.
Sew the arms on the sides of the body, between rounds 19 and 20.
Collar
Chain 14, skip 3.
- Row 1: 1 hdc, 1 sc, slst 7, 1 sc, 1 hdc, ch 2, slst 1 in the same chain you made the hdc. Fasten off and leave a tail for sewing.
Wrap the piece around the doll’s neck and sew the ends on the front center.
Tie
Chain 9, skip 2.
- Row 1: 1 hdc, 1 sc, slst 5
Fasten off and leave a long tail for sewing.
Tip: If the tie is curved, slightly pull the smaller side to straighten it.
Sew the tie on the center of the collar.
Using black, attach the tie on the body with a small line.
Hair
Important: Work looser stitches so the wig can fit easily on the head.
- Round 1: 7 sc in the magic ring
- Round 2: Inc around [14]
- Round 3: (1 sc, inc) around [21]
- Round 4: (2 sc, inc) around [28]
- Round 5: (3 sc, inc) around [35]
- Round 6: Sc around [35]
- Round 7: (4 sc, inc) around [42]
- Round 8: Sc around [42]
- Round 9: (5 sc, inc) around [49]
- Round 10-14: Sc around [49], turn
Try the wig on the head; if it’s too short, add another round.
From now on, start working the stitches on the “wrong” side of the wig.
Bangs
Attention: The strands are worked on the “wrong” side of the wig.
- Row 1 at the base: Ch 10, skip one, slst 1, 1 sc, 7 hdc
- Row 2 at the base: 1 hdc in the same stitch you started the chains, 6 hdc, slst 1
- Row 3: Ch 15, skip one, slst 1, 1 sc, 12 hdc
- Row 4: 1 hdc in the same stitch you started the chains, 3 hdc, slst 1
- Row 5: Ch 7, skip one, slst 1, 1 sc, 4 hdc, skip one stitch, slst 1 at the base
- Row 6 at the base: Ch 10, skip one, slst 1, 1 sc, 7 hdc, skip one stitch, slst 1 at the base
- Row 7 at the base: Ch 8, skip one, slst 1, 1 sc, 5 hdc, skip one stitch, slst 1 at the base
- Row 8 at the base: Ch 7, skip one, slst 1, 1 sc, 4 hdc, skip one stitch, slst 1 at the base
- Row 9: 3 hdc
- Row 10: Ch 15, skip one, slst 1, 1 sc, 12 hdc
Slst 1 in the same stitch you started the chains, 6 hdc
Ch 10, skip one, slst 1, 1 sc, 7 hdc
Slst 1 in the same stitch you started the chains
Fasten off.
Hatsune Miku Amigurumi Assembly
Position and glue the wig on the doll’s head.
Pin the 10-ch and 8-ch strands close together, on the center of the forehead. Attach the other two strands irregularly. Keep the long strands on the sides loose.
Ponytails (Make Two)
Ch 40, skip one.
- Row 1-3: (slst 1, 1 sc, 1 hdc, 15 dc, 15 hdc, 5 sc, slst 1) x3
Slst 1 at the first base chain.
Fasten off and leave a long tail for sewing.
Sew on both sides of the head, between rounds 10 and 11, approximately 15 stitches apart.

Hair Accessories (Pink) – Make Two
Chain 13, skip one.
- Row 1: Slst 2, picot, (slst 3, picot) x3, slst 1
Picot stitch: ch 2, slst 1 on the 2nd chain
Fasten off and leave a long tail for sewing.
Wrap the piece around the ponytail and close the opening with a stitch on the bottom.
Hide the end tails inside the head.
Headphones
Headphones (Make Two)
In the magic ring:
- Round 1: (1 sc, 2 ch) x4
Close the ring and start the second round:
- Round 2: (1 sc, {1 sc + 2 ch + 1 sc in the 2-ch space}, 1 sc) x4
Fasten off and leave a long tail for sewing.
Sew or glue the center of the headphones on the sides of the head.
Band
Ch 32 (leave a long tail at the beginning and end)
Sew the ends on the center of the headphones.
Frequently Asked Questions
Your completed amigurumi will measure approximately 16 cm (6.2 inches) tall when made with the specified yarn weight and 3mm crochet hook. The final size may vary slightly depending on your tension and how firmly you stuff the doll.
While the pattern is designed with Hatsune Miku’s iconic colors (teal/tiffany blue hair, grey and black outfit), you can certainly customize the colors to create your own unique version. Just make sure all your yarns are compatible with a 3mm hook for consistent sizing.
Use a stitch marker or contrasting piece of yarn to mark the beginning of each round. Move the marker up as you complete each round. This is essential for keeping track of your progress, especially during shaping sections like the head.
Insert the safety eyes between rounds 9 and 10 of the head, positioning them ten stitches apart on the curved side (opposite the increases from round 6). Make sure to attach them before you finish stuffing and closing the head, as they cannot be inserted once the head is completed.
Conclusion
Congratulations on completing your Toy Art Hatsune Miku amigurumi! This charming doll captures the essence of the beloved virtual pop star with her signature teal pigtails, stylish outfit, and iconic headphones. The combination of different crochet techniques and careful assembly creates a truly special handmade piece that any Vocaloid fan would treasure.
Remember to share your finished creation on social media and tag the original designer so they can see your beautiful work. Each amigurumi you create helps support pattern designers and encourages the creation of more wonderful patterns for the crafting community. Happy crocheting, and enjoy displaying your adorable Hatsune Miku doll!

Remember it later!
Planning to try this soon? Pin it for a quick find later!