Table of contents
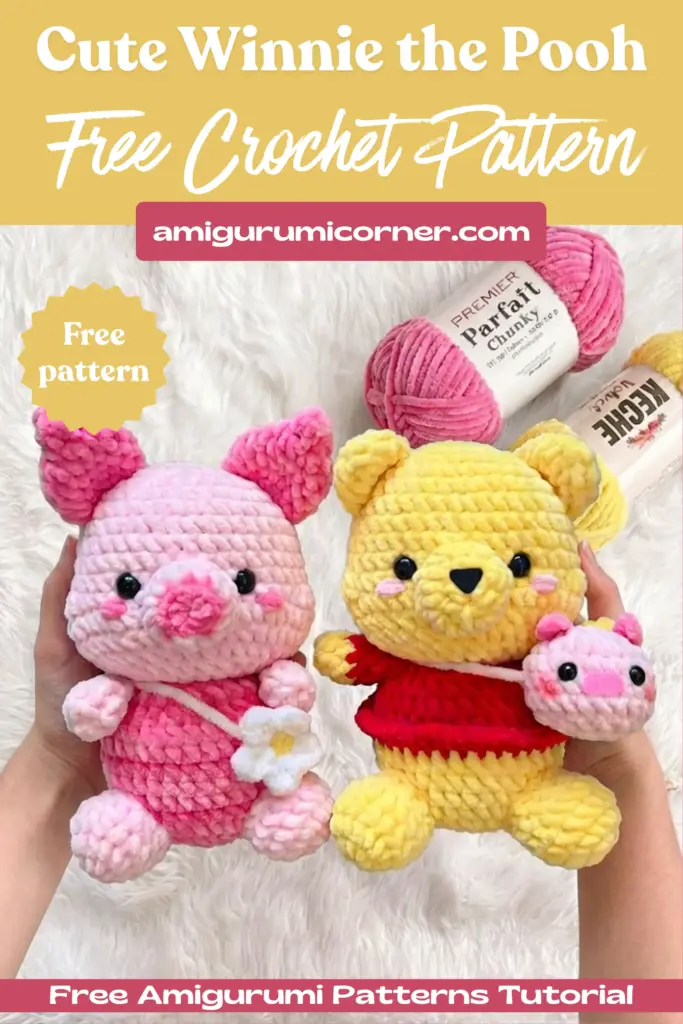
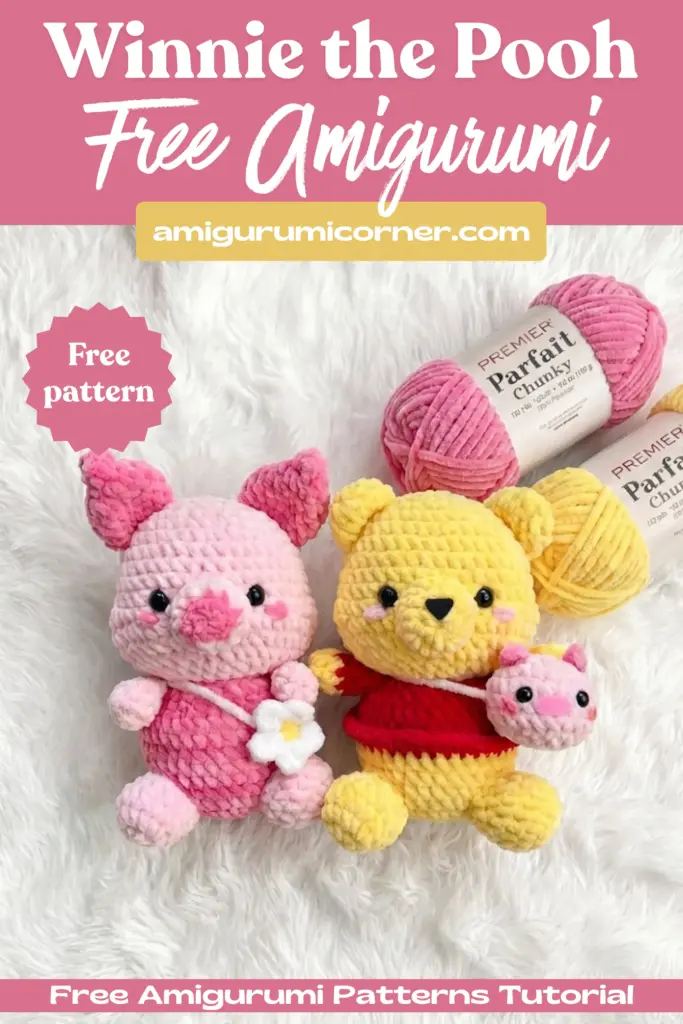
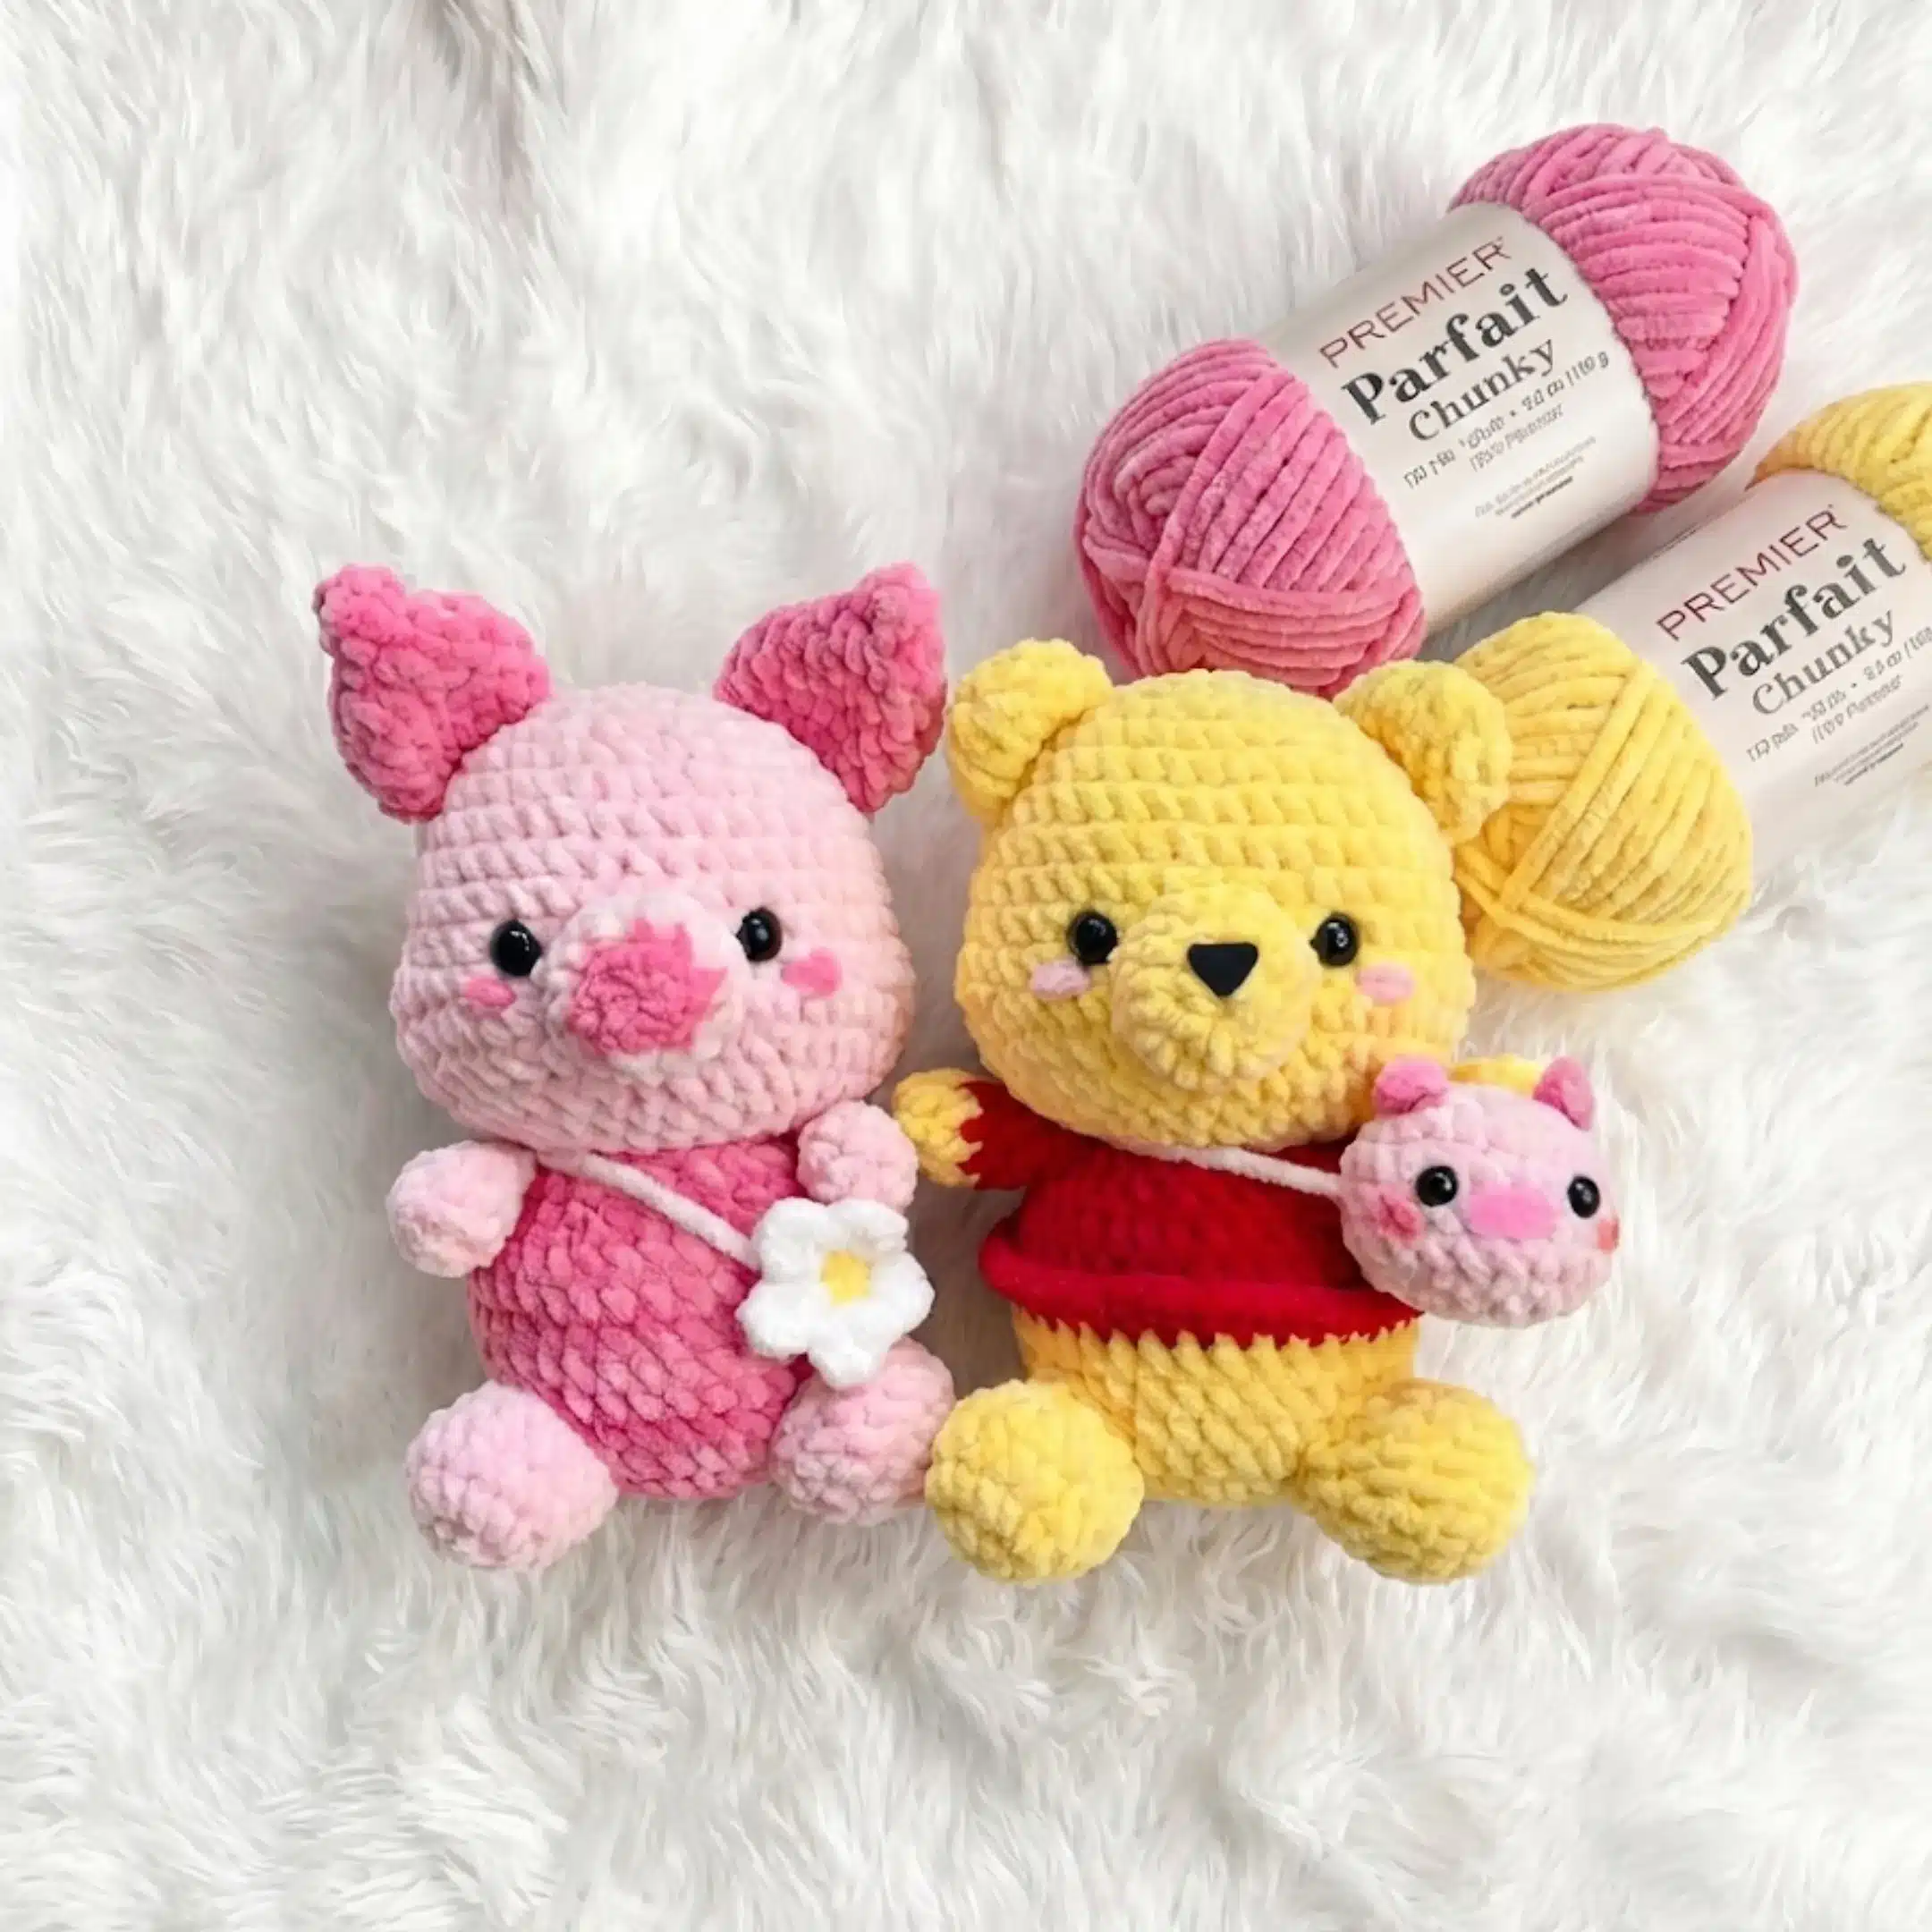
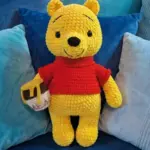
If you’ve ever dreamed of creating your own huggable version of the Hundred Acre Wood’s most beloved honey-loving bear, this comprehensive crochet pattern will guide you through every stitch. This charming Pooh Bear pattern uses soft, plush yarn to create an irresistibly cuddly companion that captures the sweet simplicity of this timeless character.
Whether you’re an experienced crocheter or looking to expand your amigurumi skills, this pattern offers both standing and sitting versions, complete with his signature red shirt and adorable accessories including a piggy friend and honey pot. The finished bear showcases perfect proportions with a chubby body, gentle expression, and all the details that make Pooh so endearing
Designer: rin.meow21
Materials You’ll Need

Before starting your project, gather these essential supplies:
- Crochet hook: 4mm
- Yarn: Himalaya Dolphin Baby (less than 1 skein per color needed)
- Yellow – 80302
- Red – 80352
- Pink – 80303/80319
- Darker pink – 80309
- Brown – 80337
- Beige – 80365
- Alternative yarn brands: Yarn Art, Premier Parfait (US availability)
- Stitch marker
- Scissors
- Craft glue
- Fiberfill stuffing
- 12mm safety eyes (or black felt for safety)
- 9mm safety eyes for piggy
- Tapestry needle
- Pink and black felt (for facial details)
Pro Tip: Use a larger yarn and hook to make a bigger bear, or smaller yarn and hook for a miniature version!
Abbreviations Guide
- Mr – magic ring (or ch 2 and sc into first ch)
- Sc – single crochet
- Inc – increase
- Dec – decrease (invisible decrease)
- (…)*n – repeat stitches in brackets n times
- Slst – slip stitch
- Ch – chain
- Hdc – half double crochet
- DC – double crochet
- Trc – treble crochet
- BLO – back loop only
- FLO – front loop only
- BB – bobble stitch
Pattern Instructions
Head (Yellow)
Row 1: Mr 8sc (8)
Row 2: 8inc (16)
Row 3: (sc, inc)*8 (24)
Row 4: (3sc, inc)*6 (30)
Row 5: 2sc, inc, (4sc, inc)*5, 2sc (36)
Row 6: (5sc, inc)*6 (42)
Row 7-10: 42sc (42)
Row 11: 11sc, inc, 3-hdc into one stitch, 16sc, 3-hdc into one stitch, inc, 11sc (48)
Row 12: 48sc (48)
Row 13: 3sc, dec, (6sc, dec)*5, 3sc (42)
Row 14: (5sc, dec)*6 (36)
Row 15: 2sc, dec, (4sc, dec)*5, 2sc (30)
Row 16: (3sc, dec)*6 (24)
Row 17: (2sc, dec)*6 (18)
Fasten off and cut the yarn. Insert 12mm safety eyes between rows 10-11, spacing them 6 stitches apart. Stuff the head fully to create that signature chubby Pooh shape. Use pink yarn to sew small circles beside the eyes for adorable rosy cheeks.
Snout (Yellow)
Row 1: Mr 8sc (8)
Row 2: 8inc (16)
Row 3: 16sc (16)
Fasten off, leaving a long tail for sewing. Attach the snout to rows 10-13 of the head. Use a plastic nose or cut a small triangle from black felt and glue it onto the snout center.
Ears (Yellow) – Make 2
Row 1: Mr 6sc (6)
Row 2: 6inc (12)
Row 3-4: 12sc (12)
Fasten off with a long tail and sew the ears onto rows 4-7 of the head.
Standing Body (Yellow)
First Leg:
Row 1: Mr 5sc (5)
Row 2: 5inc (10)
Row 3-4: 10sc (10)
Fasten off and cut yarn.
Second Leg:
Repeat to Row 4, but don’t cut the yarn. Chain 3 and join to the first leg with a sc.
Row 5: 10sc (first leg) + 3sc (first side of chains) + 10sc (second leg) + 3sc (other side of chains) (26)
Row 6: (3sc, inc)*6, 2sc (32)
Row 7-9: 32sc (32)
Row 10: Red 32sc (32)
Row 11: BLO 32sc (32)
Row 12: 32sc (32)
Row 13: (14sc, dec)*2 (30)
Row 14: 30sc (30)
Row 15: (3sc, dec)*6 (24)
Row 16: (2sc, dec)*6 (18)
Fasten off with a long tail for attaching to the head. Stuff the body fully for that huggable chubby appearance. Using red yarn, work in the front loops only of Row 11: (sc, inc)*16 to create the decorative shirt edge.

Sitting Body (Yellow)
Row 1: Mr 8sc (8)
Row 2: 8inc (16)
Row 3: (sc, inc)*8 (24)
Row 4: (3sc, inc)*6 (30)
Row 5: (4sc, inc)*6 (36)
Row 6-8: 36sc (36)
Row 9: Red 36sc (36)
Row 10: BLO 36sc (36)
Row 11: 36sc (36)
Row 12: (4sc, dec)*6 (30)
Row 13: (3sc, dec)*6 (24)
Row 14: (2sc, dec)*6 (18)
Fasten off with a long tail. Stuff completely. Using red yarn in the front loops of Row 10: (sc, inc)*18 for the shirt edge.
Legs for Sitting Version (Yellow) – Make 2
Row 1: mr 8sc (8)
Row 2: 8inc (16)
Row 3-4: 16sc (16)
Row 5: 4sc, 4dec, 4sc (12)
Row 6: 12sc (12)
Fasten off and sew to rows 4-7 of the sitting body.
Arms (Yellow) – Make 2
Row 1: mr 4sc (4)
Row 2: 4inc (8)
Row 3: 8sc (8)
Row 4-7: red 8sc (8)
Stuff lightly with fiberfill. Fasten off and sew between rows 15-16 of standing body or rows 13-14 of sitting body.
Tail (Yellow)
Row 1: mr 5sc (5)
Row 2: 5inc (10)
Row 3: 10sc (10)
Fasten off and sew to rows 7-9 of standing body or rows 3-5 of sitting body.
Piggy Bag Accessories
Piggy Head (Pink)
Row 1: Mr 7sc (7)
Row 2: 7inc (14)
Row 3: (Sc, inc)*7 (21)
Row 4-6: 21sc (21)
Row 7: (Sc, dec)*7 (14)
Row 8: 7dec (7)
Stuff the head before closing. Weave in ends. Insert 9mm plastic eyes between rows 4-5, 3 stitches apart. Cut an oval from pink felt and glue between the eyes for the snout.
Piggy Ears (Darker Pink) – Make 2
Chain 4, starting in second chain from hook: slst, hdc-inc, sc into last chain. Leave long tail and sew to row 2 of piggy head.
Honey Pot (Brown)
Row 1: Mr 7sc (7)
Row 2: 7inc (14)
Row 3: (sc, inc)*7 (21)
Row 4: 21sc (21)
Row 5-6: Beige 21sc (21)
Row 7: Brown (sc, dec)*7 (14)
Row 8: BLO yellow 14sc (14)
Row 9: 7dec (7)
Stuff completely. Weave in ends. For the pot’s edge, work in front loops of Row 8 with brown yarn: (sc, inc)*7.
Honey Drip Detail:
Using yellow yarn, chain 5. Starting in second chain from hook: sc, (ch 3, second ch from hook 2sc), 2sc, (ch 4, second ch from hook 3sc), sc. Sew this piece to the honey pot edge for a realistic dripping honey effect.

Assembly Tips
Stuffing Technique: Stuff the head and body generously to achieve that signature cuddly, chubby Pooh appearance. Shape as you stuff to maintain proper proportions.
Eye Placement: Position safety eyes carefully before securing. The distance between them significantly affects the expression.
Facial Features: Take time with the cheeks and snout placement—these details bring the character to life.
Shirt Edge: The red shirt’s decorative edge should sit naturally at the color change line. Make sure it lies flat and even.
Final Touches: Attach all pieces securely with matching yarn. Hide knots inside the stuffed pieces for a professional finish.
Frequently Asked Questions
Using 4mm hook and Himalaya Dolphin Baby yarn, your Pooh will be approximately 8-10 inches tall in sitting position and 10-12 inches in standing position. You can make him larger by using bulkier yarn with a bigger hook, or smaller with lighter yarn and a smaller hook.
Yes! While the pattern specifies Himalaya Dolphin Baby, you can substitute with Yarn Art Dolce, Premier Parfait, or any similar chenille or plush yarn. Just maintain the same weight and adjust your hook size to match the yarn’s recommended gauge for best results.
Insert your hook into the front loop only of the next two stitches, yarn over and pull through both front loops (you’ll have 2 loops on hook), then yarn over and pull through both loops. This technique creates a much neater decrease that’s less visible in the finished piece.
The standing body has separate legs built into the body construction and creates a free-standing figure. The sitting body has a rounded bottom with separately attached bent legs, giving Pooh a permanent sitting position. Choose based on how you want to display your finished bear.
Conclusion
Creating your own crocheted Winnie the Pooh is a rewarding project that results in a treasured keepsake or gift. This pattern’s attention to detail ensures your bear will capture all the charm and sweetness of this beloved character. Remember to take your time with each section, especially the facial features, as these small details make the biggest impact on your finished piece.
Don’t forget to share your completed Pooh Bear creations—each one will have its own unique personality! Whether you choose the standing or sitting version, add the honey pot accessory, or create an entire Hundred Acre Wood collection, you’ll have a handmade treasure to cherish.
Happy crocheting, and may your stitches be as sweet as honey!

Remember it later!
Planning to try this soon? Pin it for a quick find later!