Table of contents
- What Makes This Pattern Special
- Materials You’ll Need
- Understanding the Abbreviations
- The Heart Pattern
- The Sloth Head and Body
- Creating the Arms
- Adding Facial Features (Embroidery)
- Assembly Instructions
- Making Optional Accessories
- Tutorial: Color Change Technique
- Frequently Asked Questions
- Create Your Own Adorable Valentine
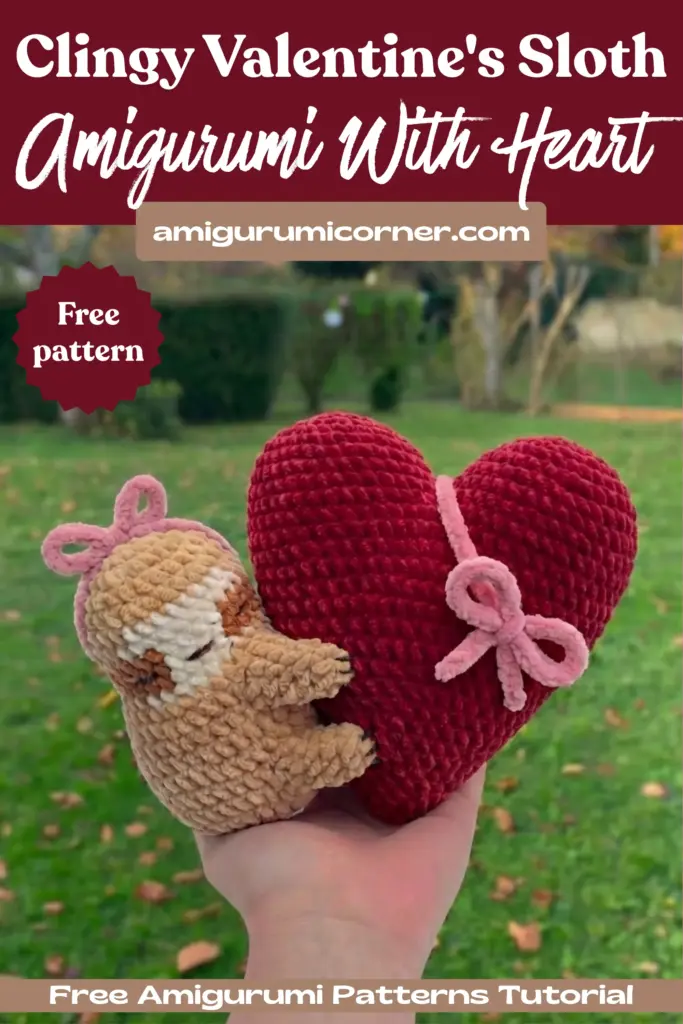
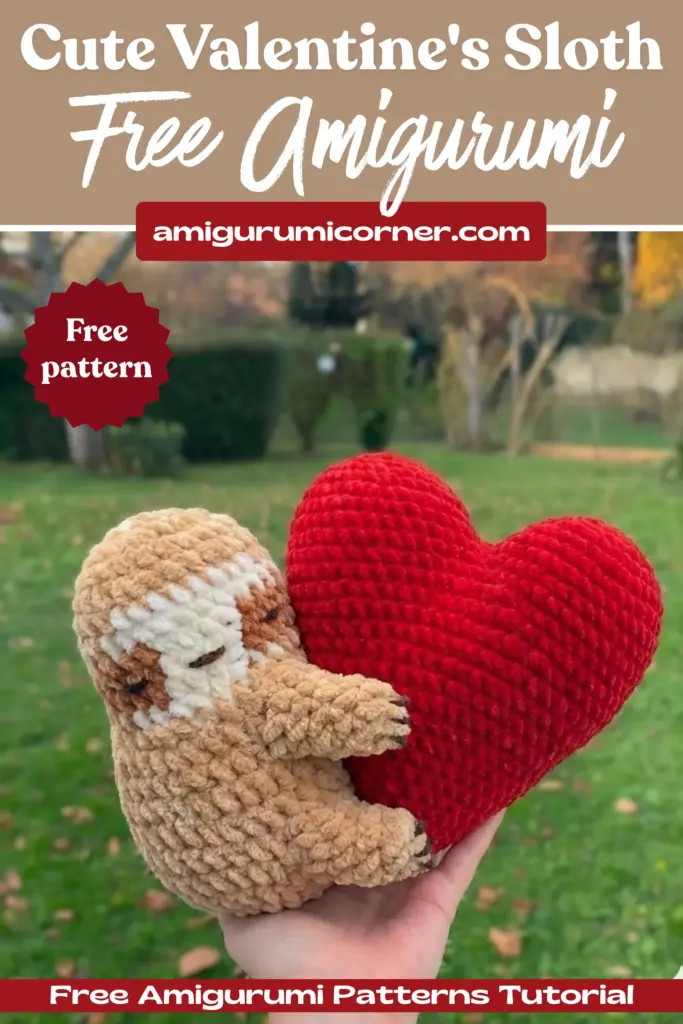
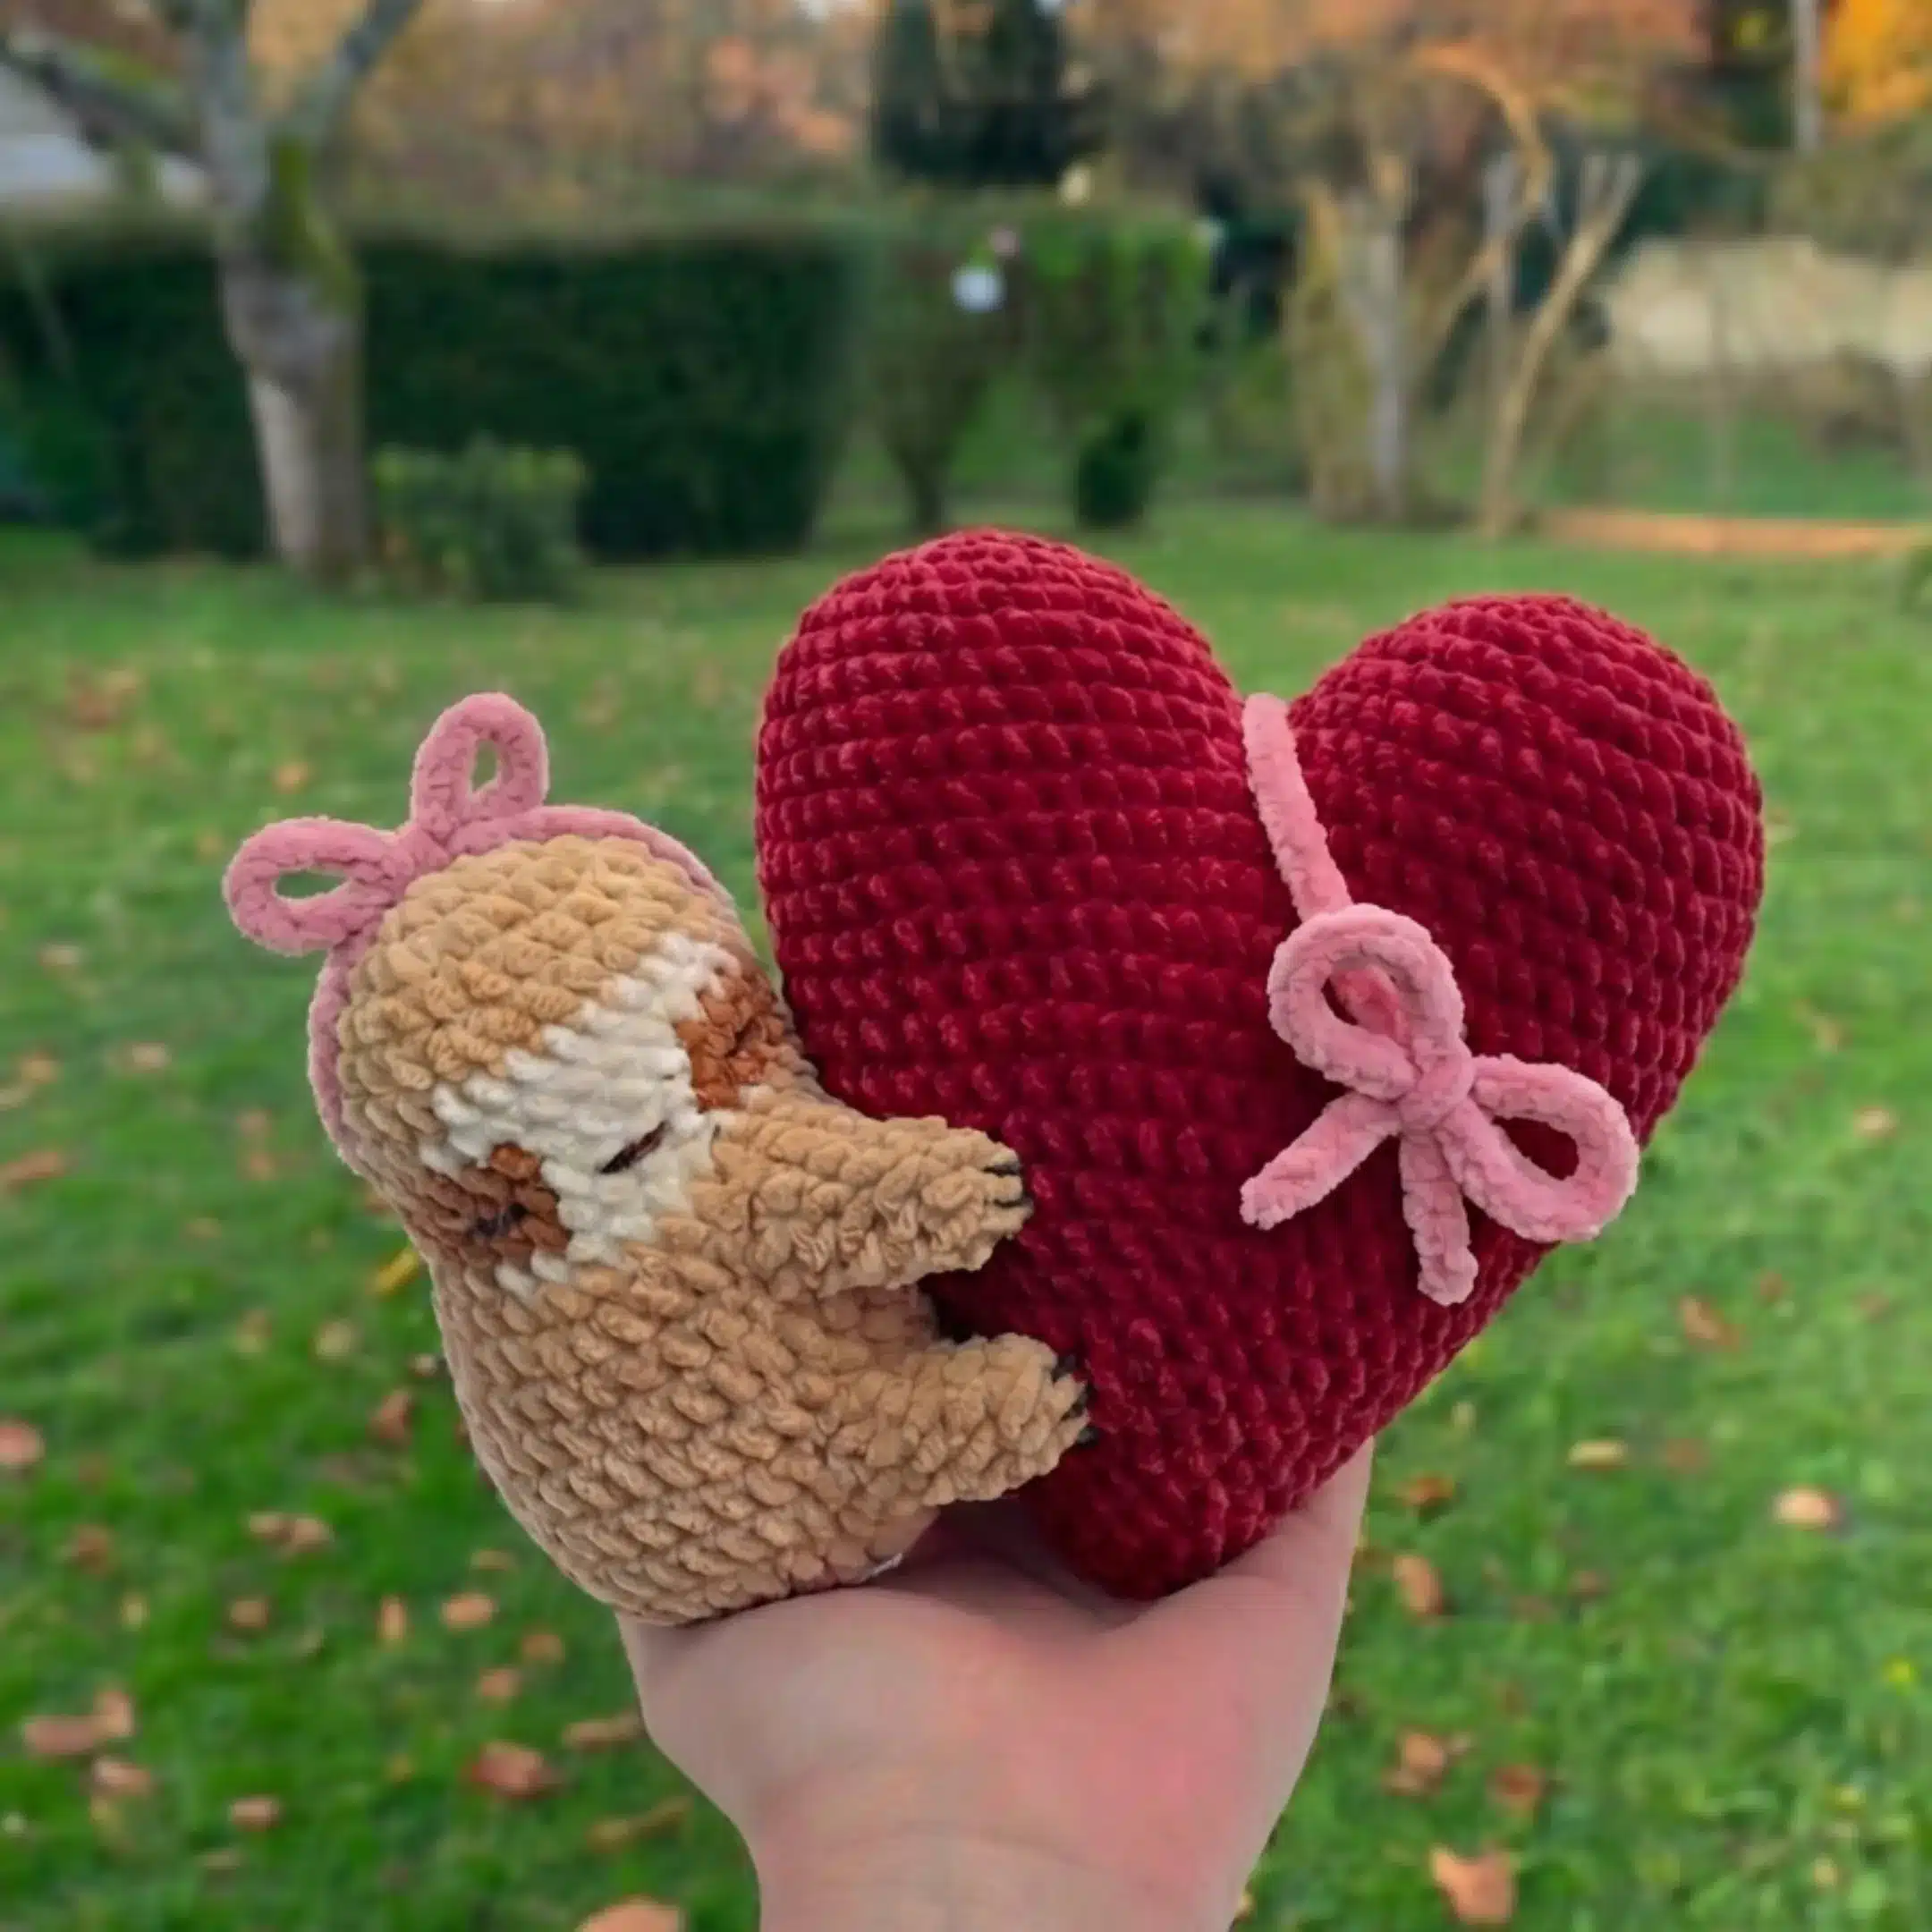
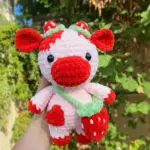
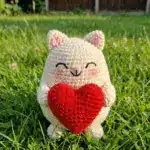
Looking for an adorable Valentine’s Day crochet project that’s both charming and surprisingly low-sew? This clingy sloth amigurumi, designed to hug a plush heart, is the perfect handmade gift for that special someone or a delightful addition to your own Valentine’s decor. With its sweet expression, cuddly arms that wrap around a red heart, and minimal sewing required, this pattern is ideal for intermediate crocheters looking for their next lovable project.
Designer: knotted.angels
What Makes This Pattern Special
This free crochet pattern was created as a 5k follower special and features a super low-sew construction method, meaning less finishing work and more crocheting fun. The sloth’s arms are worked directly onto the body through specially created holes, eliminating the need to sew them on separately. The result is an adorable amigurumi that appears to be clinging to its heart with genuine affection.

Remember it later!
Planning to try this soon? Pin it for a quick find later!
Materials You’ll Need
Before you begin, gather the following supplies:
- Size 6 Yarn in 5 colors (Alize Softy Plus recommended):
- Brown, beige, and dark brown for the body
- Red for the heart
- Color of your choice for the head accessory
- Thinner black yarn for embroidery and sewing
- 5mm crochet hook
- Stuffing (polyester fiberfill works well)
- Optional: 12mm safety eyes
- Tapestry needle
- Stitch markers
- Scissors
- Ribbon for decoration
Understanding the Abbreviations
Before diving into the pattern, familiarize yourself with these common crochet abbreviations:
- Rnd – Round
- R – Row
- ch – chain
- st – stitch
- sc – single crochet stitch
- inc – increase (two single crochet stitches in the same stitch)
- dec – decrease (two stitches together)
- slst – slip stitch
- F/O – fasten off
- FLO – crochet through front loop only
- BLO – crochet through back loop only
Color Coding: The pattern instructions are written in different colors to represent which yarn color to use:
- Dark brown
- Brown
- Beige
- Red
- Color of your choice
The Heart Pattern
The heart is worked in two parts that are joined together, creating the characteristic top curves of a heart shape before tapering down to the point.
Top of the Heart (Make 2)
Rnd1: 6sc in magic ring (6)
Rnd2: 6inc (12)
Rnd3: (sc, inc) × 6 (18)
Rnd4: (sc, inc, sc) × 6 (24)
Rnd5: (3sc, inc) × 6 (30)
Rnd6: (2sc, inc, 2sc) × 6 (36)
Rnd7-8: 36sc [2rnds] (36)
F/O only the first one. Continue with the main part of the heart.
Main Heart Part
Keep the second top part on your hook and make a sc on the first top part to connect them. Continue working on the first top part.
Rnd9: 35sc on the rest of the first top part, 36sc on the second top part (72)
Place your stitch marker on the first stitch of Rnd10.
Important tip: After Rnd9 there might be a hole in between the top parts. You can sew it closed afterwards.
Rnd10: 72sc (72)
Rnd11: (5sc, dec, 5sc) × 6 (66)
Rnd12: 66sc (66)
Rnd13: (9sc, dec) × 6 (60)
Rnd14: 60sc (60)
Rnd15: (4sc, dec, 4sc) × 6 (54)
Rnd16: 54sc (54)
Rnd17: (7sc, dec) × 6 (48)
Rnd18: 48sc (48)
Rnd19: (3sc, dec, 3sc) × 6 (42)
Rnd20: 42sc (42)
Rnd21: (5sc, dec) × 6 (36)
Rnd22: 36sc (36)
Rnd23: (2sc, dec, 2sc) × 6 (30)
Rnd24: 30sc (30)
Rnd25: (3sc, dec) × 6 (24)
Rnd26: 24sc (24)
Start stuffing the heart at this point.
Rnd27: (sc, dec, sc) × 6 (18)
Rnd28: 18sc (18)
Rnd29: (sc, dec) × 6 (12)
Rnd30: 12sc (12)
Rnd31: 6dec (6)
Rnd32: 6sc (6)
F/O and close the hole. Set the completed heart aside.
The Sloth Head and Body
The head and body are worked as one continuous piece, with color changes creating the sloth’s distinctive facial markings. The arms will be added later by crocheting directly into specially created holes.
Rnd1: 8sc in magic ring (8)
Rnd2: 8inc (16)
Rnd3: (sc, inc) × 8 (24)
Rnd4: 24sc (24)
Rnd5: (3sc, inc) × 6 (30)
Rnd6: 8sc, 8sc, 14sc (30)
Rnd7: 7sc, 10sc, 13sc (30)
Rnd8: 6sc, 4sc, 4sc, 4sc, 12sc (30)
Rnd9: 5sc, 5sc, 4sc, 5sc, 11sc (30)
Rnd10: 6sc, 4sc, 4sc, 4sc, 12sc (30)
Rnd11: 8sc, 8sc, 14sc (30)
Rnd12: (4sc, inc) × 6 (36)
If you use safety eyes: Place them between Rnd9-10 on the dark brown parts.
Rnd13: 16sc, ch4 and skip 4sc, 6sc, ch4 and skip 4sc, 6sc (36)
Rnd14-16: 36sc [3rnds] (36)
Note: In Rnd14 & 18, work onto the chains created in the previous round.
Rnd17: 16sc, ch4 and skip 4sc, 6sc, ch4 and skip 4sc, 6sc (36)
Important: In Rnd13 & 17 we made the holes for the arms. You can adjust their placement if necessary before continuing!
Rnd18: 36sc (36)
Rnd19: (4sc, dec) × 6 (30)
Rnd20: (3sc, dec) × 6 (24)
Start stuffing the body at this point.
Rnd21: (sc, dec) × 8 (16)
Rnd22: 8dec (8)
F/O and close the hole.
Creating the Arms
The arms are what make this sloth “clingy”! They’re worked directly onto the holes created in Rounds 13 and 17, which means minimal sewing later.
We will work onto the holes of Rnd13 & 17. Every arm will be crocheted in the same way! Make a slip knot on your hook and turn your sloth body upside down.
We start on the right, on the first unworked sc:
Rnd1: 4sc onto the unworked sc, 1sc on the side (between sc and ch, see pic), 4sc onto the chain, 1sc on the side (10)
Rnd2: 10sc (10)
Stuff the arm as you go (don’t overstuff).
Rnd3: (3sc, dec) × 2 (8)
Rnd4: 8sc (8)
Rnd5: (2sc, dec) × 2 (6)
Rnd6: 6sc (6)
F/O and close the hole.
Repeat for the other arms.
Helpful tip: There might be a small hole where you start the arm. You can sew them close with the yarn end from the start!

Adding Facial Features (Embroidery)
The sloth’s adorable face is created using simple embroidery techniques with your thinner black yarn.
Face details: Eyes and mouth are embroidered between Rnd9-10, each 2 stitches wide.
Use your tapestry needle and black yarn to create:
- Two sleepy eyes (simple horizontal lines)
- A small smile
If you opted for safety eyes earlier, you only need to embroider the mouth.
Assembly Instructions
The claws serve a dual purpose—they’re both decorative and functional, as they also secure the sloth to the heart!
Creating the claws:
- Each claw is made of 2 lines of embroidery
- Make 3 claws for every arm
- Use the claws as the connection/sewing points to attach the sloth to the heart
- Position the arms so they wrap around the heart in a hugging position
- Sew securely through both the arm and the heart
Making Optional Accessories
Add a finishing touch to your sloth with a cute accessory!
Bow Option
Adjust the length of the chain to your liking. Ch40 and tie that chain into a bow. Sew it onto the head of the sloth or wherever you want it to be!
Hat Option
Rnd1: 8sc in magic ring (8)
Rnd2: BLO 8sc (8)
Rnd3-4: 8sc [2rnds] (8)
Rnd5: FLO 8inc (16)
Rnd6: (sc, inc) × 8 (24)
Make a slst and F/O. Sew your accessory onto the head of the sloth or wherever you want it to be!
Tutorial: Color Change Technique
Smooth color transitions are key to achieving the sloth’s distinctive markings. Here’s how to change colors seamlessly:
Step 1: Start a sc and stop with 2 loops on your hook
Step 2: Take the new color and pull through the loops
This technique creates a clean color change without bulky knots or visible transitions.
Frequently Asked Questions
This pattern is best suited for intermediate crocheters who are comfortable with amigurumi techniques including magic rings, increasing, decreasing, and color changes. Beginners with some amigurumi experience can also tackle this project with patience.
Depending on your crochet speed and experience level, this project typically takes 6-10 hours to complete. The heart takes approximately 3-4 hours, the sloth body takes 2-3 hours, and assembly and finishing details take another 1-2 hours.
Yes, you can substitute any size 6 (super bulky) yarn or use two strands of worsted weight yarn held together. Keep in mind that different yarn types will affect the final size and texture. Velvet or chenille yarns work beautifully for a plush, cuddly finish.
The key is to work your first single crochet into the unworked stitches tightly and ensure you’re picking up the side stitches between the sc and chain as indicated in Round 1 of the arm instructions. Any small gaps can be closed by using the yarn tail from your starting slip knot to whip stitch the hole closed.
Create Your Own Adorable Valentine
This clingy Valentine’s sloth is more than just a crochet project—it’s a labor of love that results in a gift that truly says “I’m holding onto you.” The super low-sew construction makes it less tedious than traditional amigurumi patterns, while the finished product is just as professional and polished.
Whether you’re making this for Valentine’s Day, an anniversary, or just because, this sweet sloth clutching its heart is sure to bring smiles. The beauty of this pattern is its versatility—change up the colors for different occasions, or add your own creative accessories to make each sloth unique.
Ready to start your project? Gather your materials, settle in with your favorite crochet hook, and let’s bring this adorable clingy sloth to life. Don’t forget to share your finished creations and tag the original designer to show your appreciation for this wonderful free pattern. Happy crocheting!
Remember it later!
Planning to try this soon? Pin it for a quick find later!