Table of contents
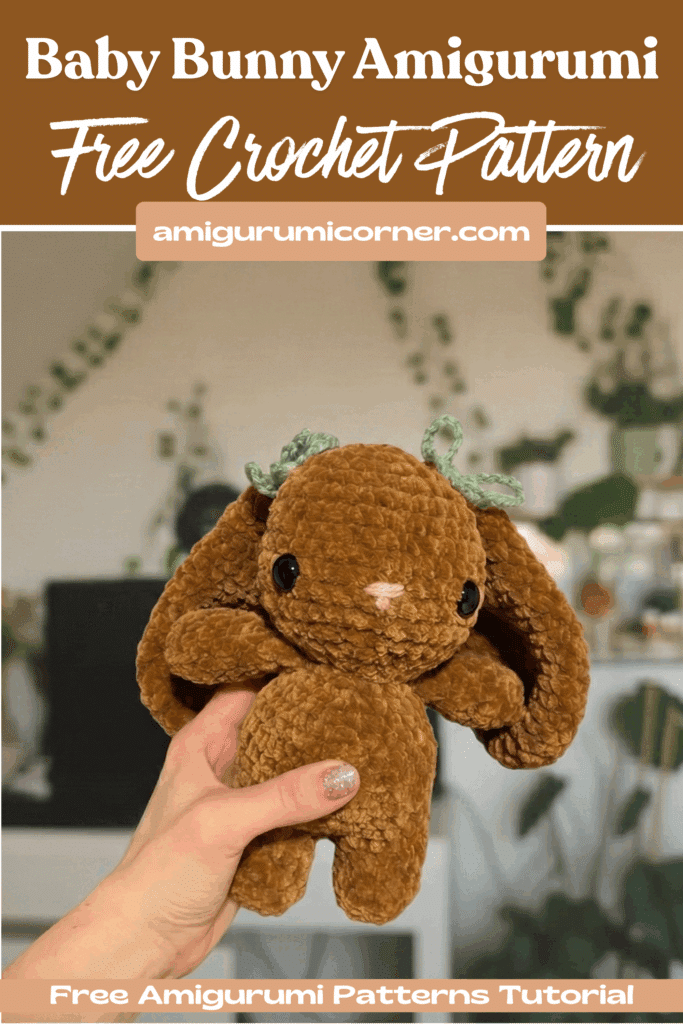
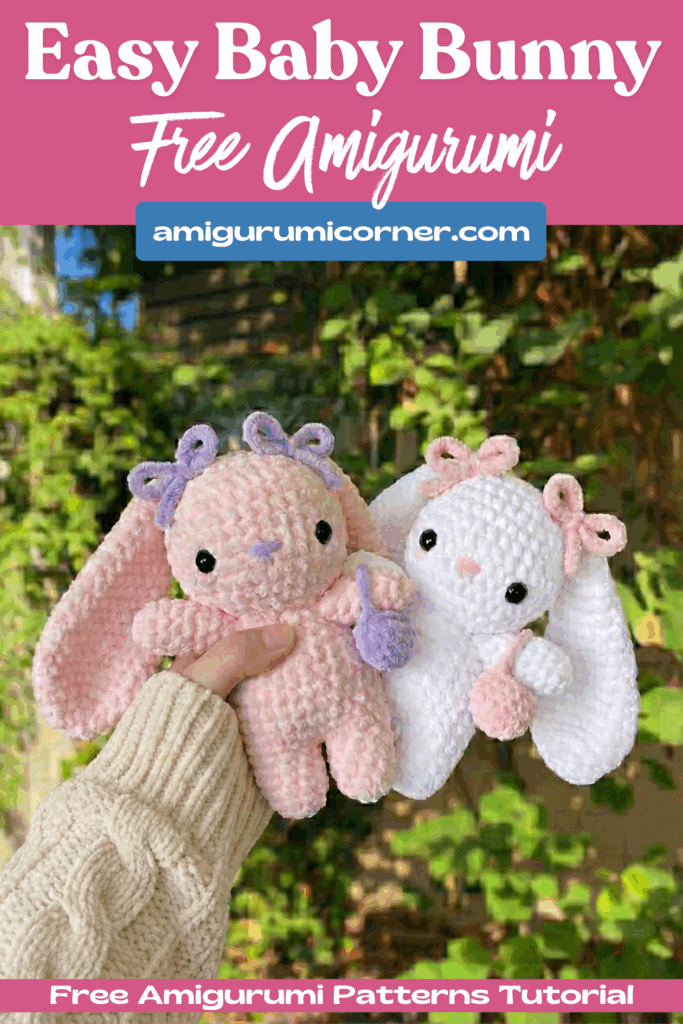
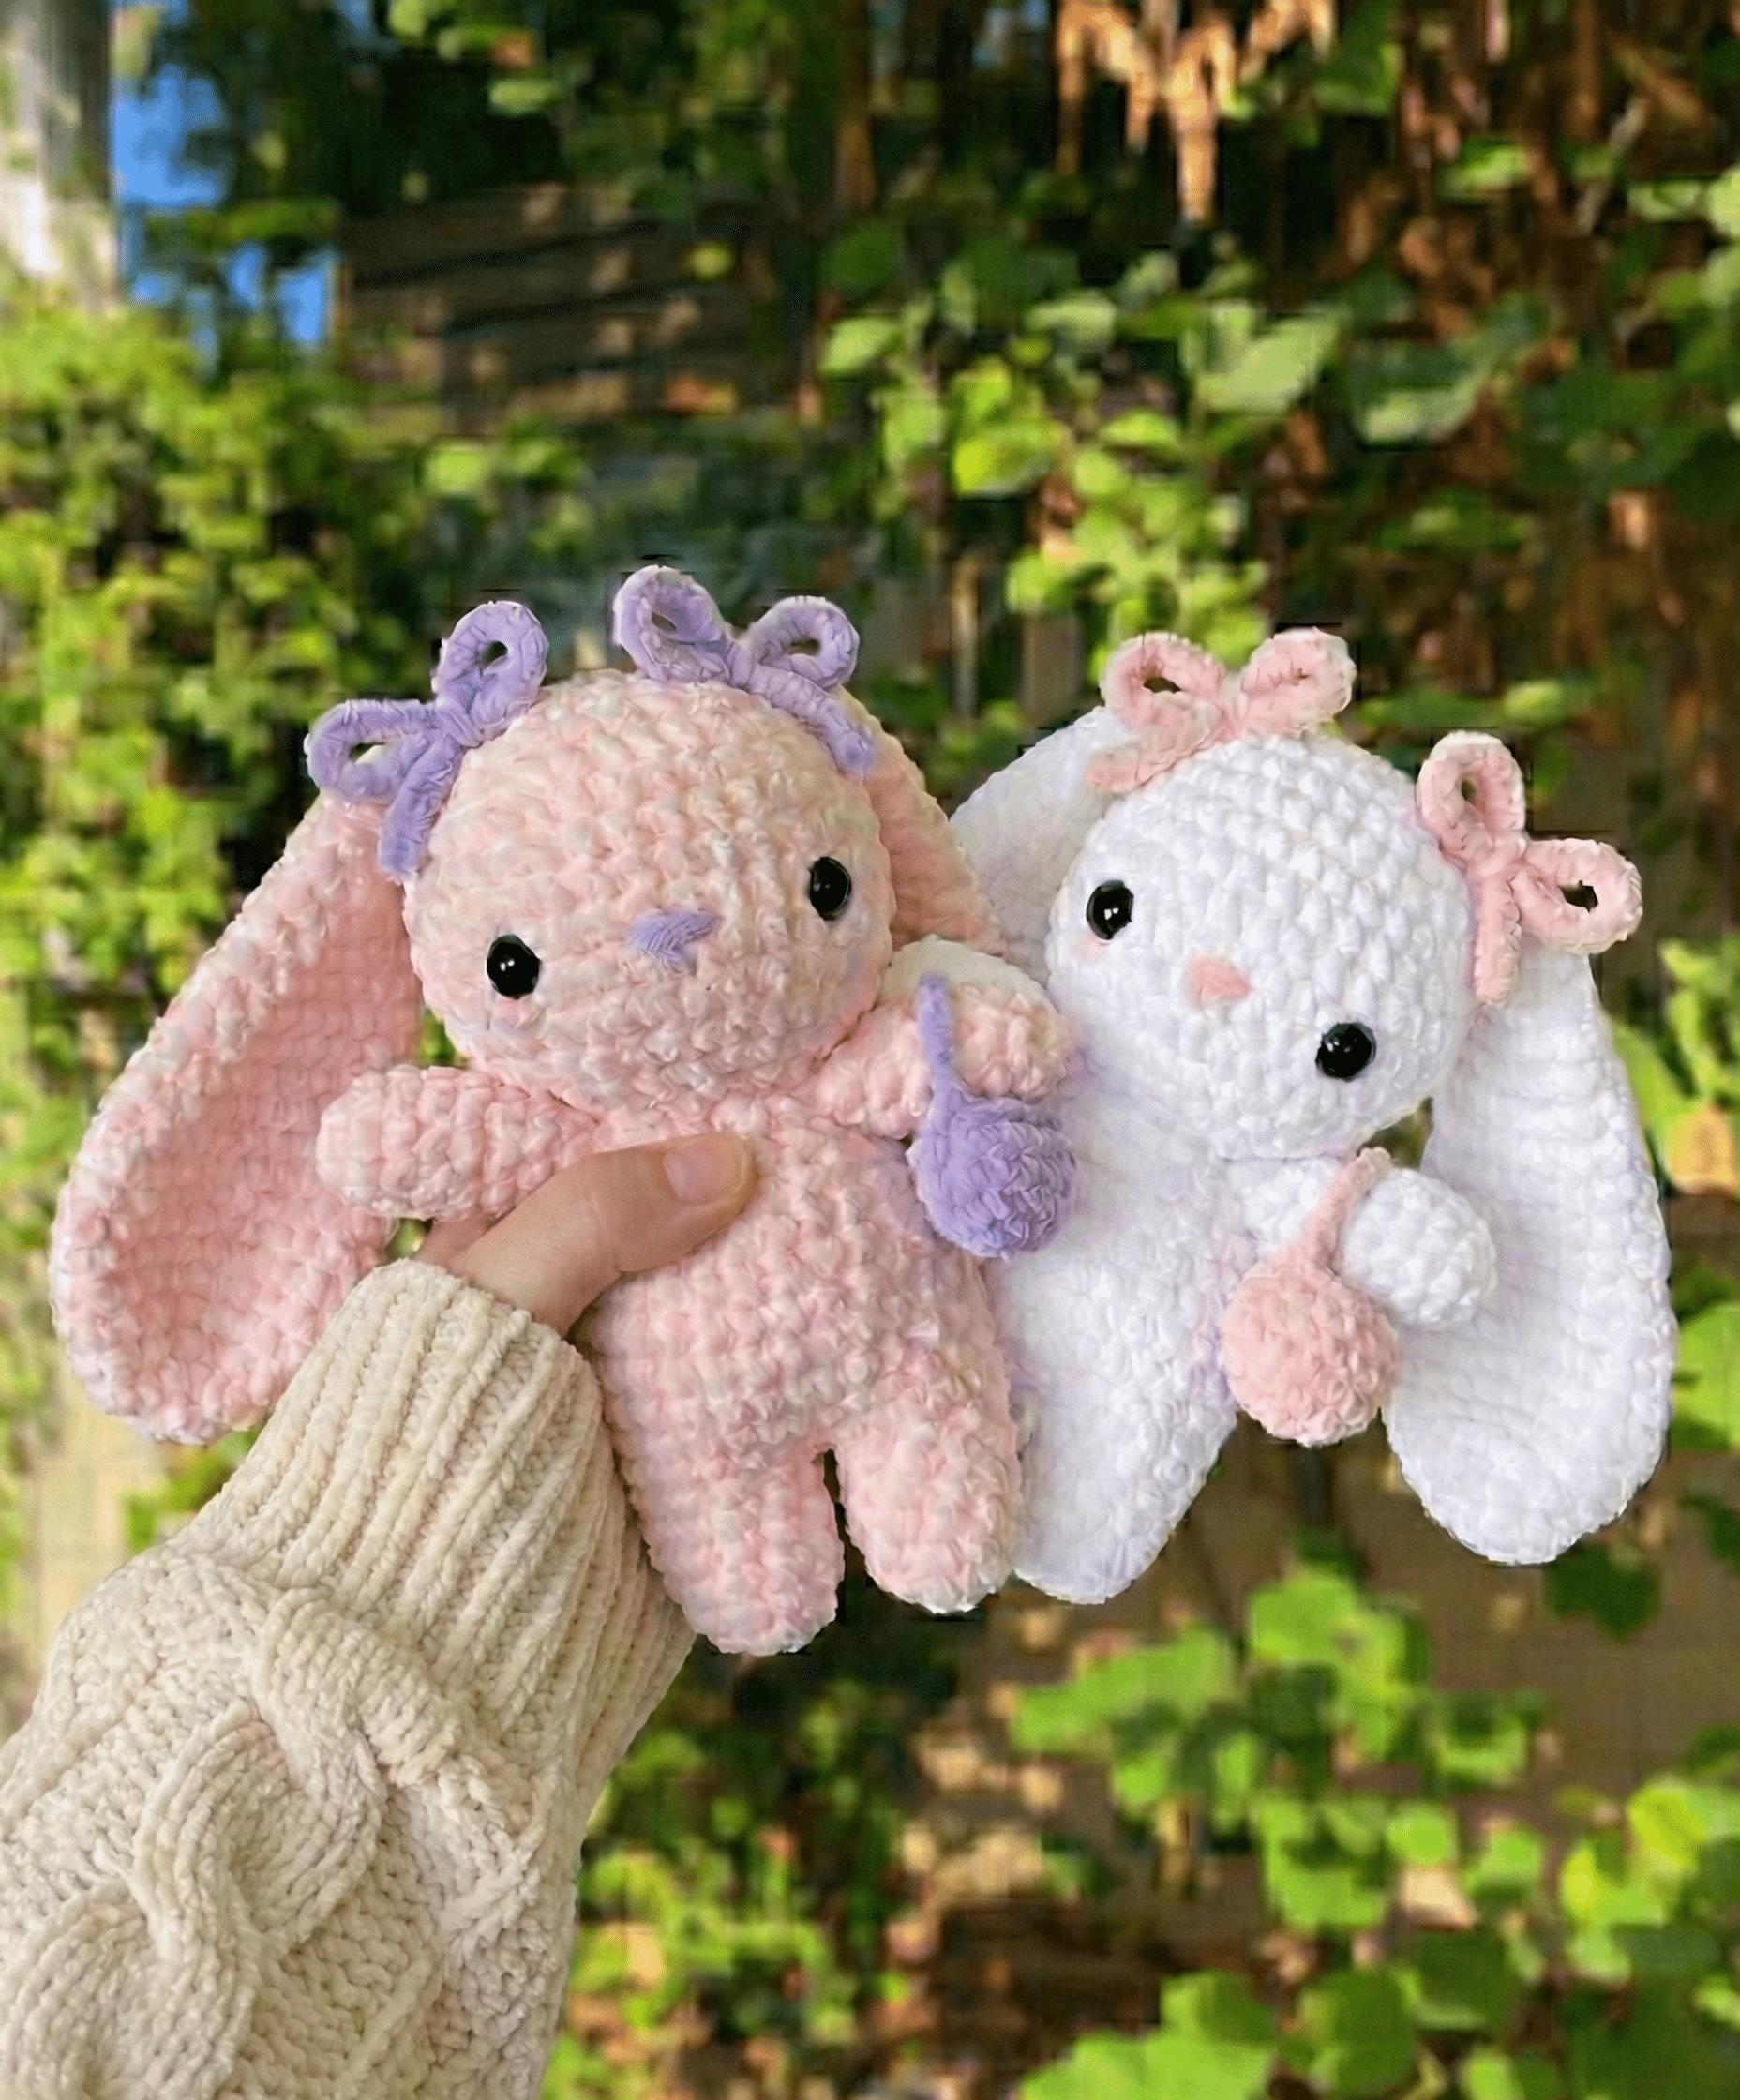
Are you ready to create the cutest crochet bunny companion? This comprehensive guide will walk you through crafting your very own baby bunny plushie, complete with adorable accessories. Whether you’re an experienced crocheter or looking to expand your amigurumi skills, this pattern offers a delightful project that results in an irresistibly huggable finished piece.
What Makes This Pattern Special

Remember it later!
Planning to try this soon? Pin it for a quick find later!
This baby bunny pattern is worked in continuous rounds and features a unique two-hook technique that gives the ears extra definition and character. The finished bunny has a charming, soft appearance with customizable accessories including sweet bows and a tiny purse.
Materials You’ll Need
The beauty of this pattern is its flexibility—you can use yarn of any weight as long as you match it with the appropriate hook size. Here’s what you’ll need:
Essential Supplies
- 4mm crochet hook (for the body, head, arms, and legs)
- 4.5mm crochet hook (specifically for the ears)
- Chunky weight yarn in your choice of color (Premier Parfait Chunky in Mushroom works beautifully)
- Pink yarn for the nose and optional blush details
- Safety eyes
- Polyfil or stuffing material
- Tapestry needle for assembly
- Scissors
- Stitch marker (optional but helpful)
Understanding the Abbreviations
Before we begin, familiarize yourself with these common crochet terms:
- MR: magic ring
- sc: single crochet
- inc: increase
- dec: invisible decrease
- BLO: back loop only
- FO: fasten off
- R: round
Crafting the Head
The head is where your bunny’s personality begins to shine. Start with a magic ring and work in continuous rounds:
- Round 1: Single crochet 7 stitches in magic ring (7)
- Round 2: Increase around (14)
- Round 3: Single crochet, increase, repeat 7 times (21)
- Round 4: Single crochet 2, increase, repeat 7 times (28)
- Round 5: Single crochet 3, increase, repeat 7 times (35)
- Rounds 6-12: Single crochet around (35)
- Important: Add safety eyes between rounds 10 and 11, spacing them 8 stitches apart.
- Round 13: Single crochet 3, decrease, repeat 7 times (28)
- Round 14: Single crochet 2, decrease, repeat 7 times (21)
- Begin stuffing the head at this point.
- Round 15: Decrease, then single crochet 2 and decrease 4 times, single crochet, decrease (15)
Finish stuffing and fasten off, leaving a long tail for sewing the head to the body.
Creating the Arms
Make two identical arms using your 4mm hook:
- Round 1: Single crochet 5 in magic ring (5)
- Round 2: Increase around (10)
- Round 3: Single crochet around in back loops only (10)
- Rounds 4-8: Single crochet around (10) for 5 rounds total
Stuff lightly and fasten off with a long tail. Flatten the top of the arm to create a sewing surface that will make attachment to the body easier.

Forming the Distinctive Ears
Switch to your 4.5mm hook for the ears—this larger hook gives them a lovely drape:
- Round 1: Single crochet 6 in magic ring (6)
- Round 2: Increase around (12)
- Round 3: Single crochet, increase, repeat 6 times (18)
- Round 4: Single crochet 2, increase, repeat 6 times (24)
- Rounds 5-7: Single crochet around (24) for 3 rounds
Continue with decreases:
- Round 8: Single crochet 10, decrease, repeat twice (22)
- Rounds 9-10: Single crochet around (22)
- Round 11: Single crochet 9, decrease, repeat twice (20)
- Round 12: Single crochet around (20)
- Round 13: Single crochet 8, decrease, repeat twice (18)
- Round 14: Single crochet around (18)
- Round 15: Single crochet 7, decrease, repeat twice (16)
- Round 16: Single crochet around (16)
- Round 17: Single crochet 6, decrease, repeat twice (14)
- Round 18: Single crochet around (14)
- Round 19: Single crochet 5, decrease, repeat twice (12)
- Round 20: Single crochet around (12)
- Round 21: Single crochet 4, decrease, repeat twice (10)
- Round 22: Single crochet around (10)
Do not stuff the ears. Fasten off with a long tail and flatten the top for easier attachment.
Building the Legs and Body
Create two legs first, then join them to form the body:
Individual Legs
- Round 1: Single crochet 6 in magic ring (6)
- Round 2: Increase around (12)
- Round 3: Single crochet around in back loops only (12)
- Rounds 4-6: Single crochet around (12) for 3 rounds
Fasten off the first leg. For the second leg, after completing round 6, chain 2 and keep it on your hook.
Joining and Body Construction
- Round 7: Single crochet into the next stitch on the first leg, single crochet 11 around first leg, single crochet into each of the 2 chains, single crochet 12 around second leg, then single crochet into the other side of each of the 2 chains (28)
- Round 8: Single crochet 13, increase, repeat twice (30)
- Rounds 9-11: Single crochet around (30) for 3 rounds
- Round 12: Single crochet 13, decrease, repeat twice (28)
- Round 13: Single crochet around (28)
- Round 14: Single crochet 8, decrease, repeat twice, single crochet 8 (26)
- Round 15: Decrease, then single crochet 6 and decrease 3 times (22)
- Round 16: Single crochet around (22)
- Round 17: Single crochet 5, decrease, repeat 3 times, single crochet (19)
- Round 18: Single crochet 2, decrease, repeat 4 times, single crochet 3 (15)
Begin stuffing and continue as you go. Fasten off leaving a long tail and finish stuffing.
Assembly Instructions
Now comes the exciting part—bringing your bunny to life:
Attach the head to the body using your long tail and tapestry needle.
Sew the ears to the head between rounds 4 and 5. You may need to angle them slightly between the rows. Position the back of the ears about 6 stitches apart, though you can adjust this spacing for different looks.
Attach the arms to round 17 of the body (the last round).
Embroider the nose using pink yarn between the eyes, approximately 2-3 stitches away from each eye.
Optional: Add blush under the eyes for extra cuteness.
- Adding Charming Accessories

Adorable Bows
Chain 40 or adjust the length to measure approximately 8-9 inches. Fasten off and either weave in ends or double knot them. Insert your hook into the stitch just in front of your bunny’s ear, pull the bow through, tie a knot, and then tie your bow. Position as desired.
Tiny Purse
- Round 1: Single crochet 6 in magic ring (6)
- Round 2: Increase around (12)
- Round 3: Single crochet around in back loops only (12)
- Round 4: Single crochet around (12)
Keep the last loop on your hook, fold the purse in half, and single crochet the next stitch and last stitch together. Chain 10 for the strap. While folded in half, single crochet the last two stitches of the purse together. Fasten off and weave in ends.
Tips for Success
- Maintain consistent tension throughout your work for an even appearance
- Stuff firmly but not too tightly to maintain the bunny’s soft, cuddly feel
- Use stitch markers to track your rounds if you find it helpful
- Take your time with assembly—proper positioning makes all the difference
- Customize freely—try different yarn colors, eye placements, or bow styles
Final Thoughts
Congratulations on completing your baby bunny! This pattern creates an adorable companion perfect for gift-giving or adding to your own collection. The combination of the unique two-hook technique, careful shaping, and sweet accessories results in a plushie with genuine character and charm.
Remember, each bunny you create will have its own personality based on your yarn choices, eye placement, and finishing touches. Don’t be afraid to experiment with different colors and expressions to make each bunny truly unique. Happy crocheting!
Remember it later!
Planning to try this soon? Pin it for a quick find later!