Table of contents
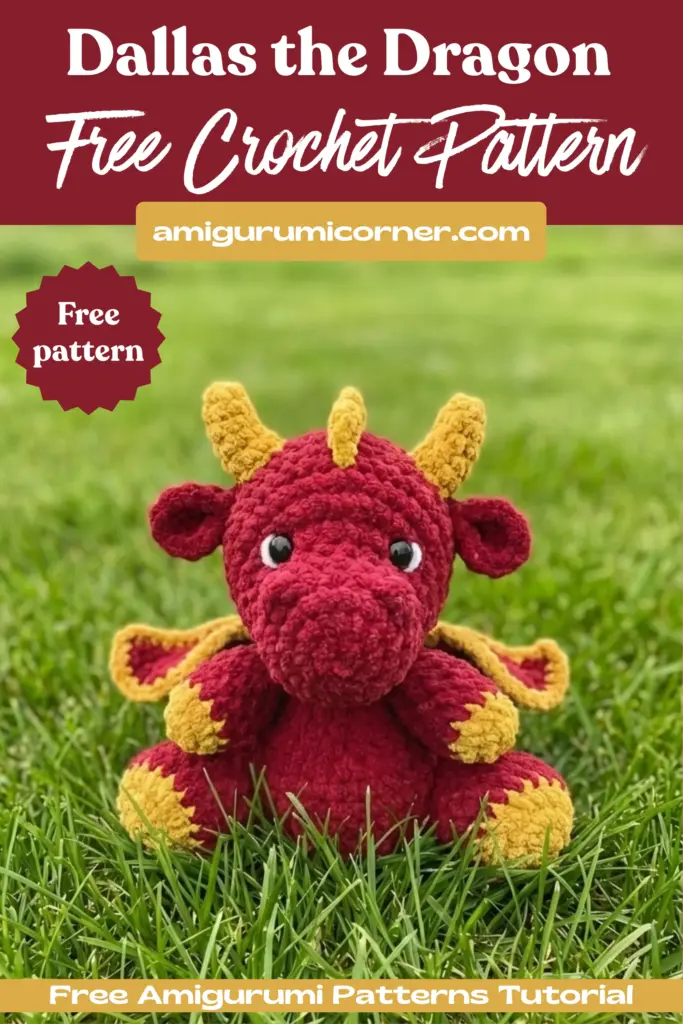
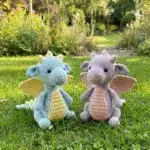
Welcome to the enchanting world of amigurumi! If you’ve been searching for the perfect dragon crochet pattern that’s both adorable and achievable, you’ve come to the right place. This comprehensive guide will walk you through creating Dallas the Dragon, a charming plush companion that’s sure to delight crafters of all skill levels.
Before you dive into this magical crochet adventure, take a moment to read through all the instructions and guidelines. The beauty of amigurumi lies in making each creation uniquely yours, so don’t be afraid to add your personal touches along the way. Whether you’re crafting this dragon for yourself, as a gift, or to expand your handmade collection, the creative process is meant to be enjoyed!
Materials You’ll Need

To bring Dallas the Dragon to life, gather the following supplies:
- 1 ball of navy plush yarn
- Medium amount of white plush yarn
- Medium amount of light blue plush yarn
- 5.00mm crochet hook
- Safety eyes (15 mm)
- Polyester fiber fill stuffing
- Scissors
- Stitch marker
- Optional: Embroidery needle and sewing pins to hold pieces in place
Yarn Specifications
The specific yarns used in the original design include:
- Bernat Blanket Yarn in Navy – Super bulky (6)
- Sweet Snuggles™ Yarn by Loops & Threads® in White – Super bulky (6)
- Baby Bee Adore-A-Ball Yarn in Baby’s Blue – Super bulky (5)
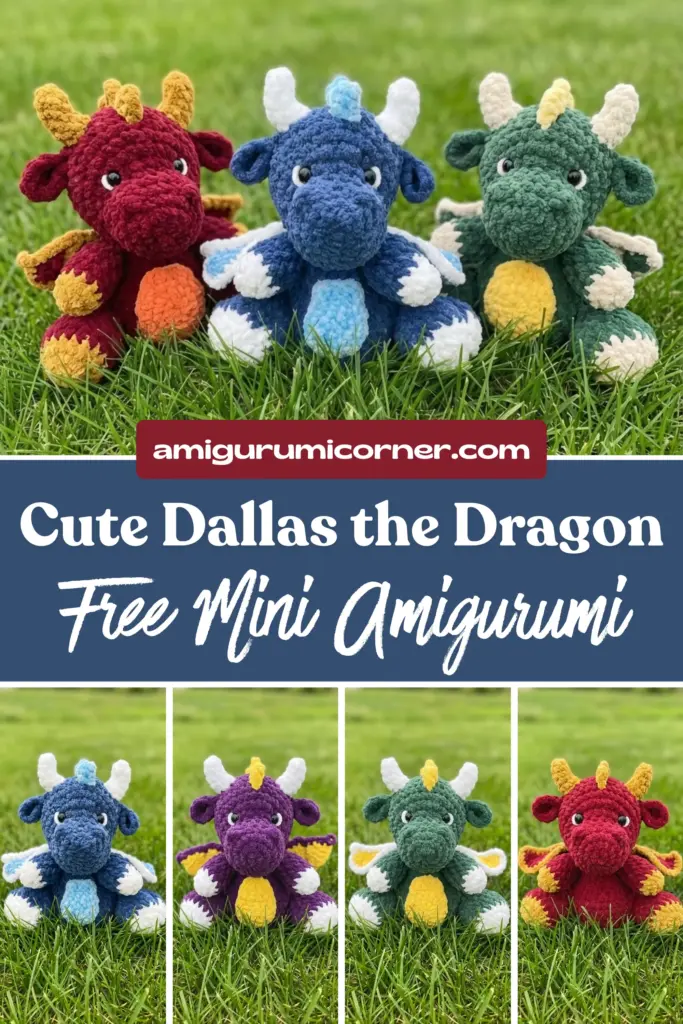
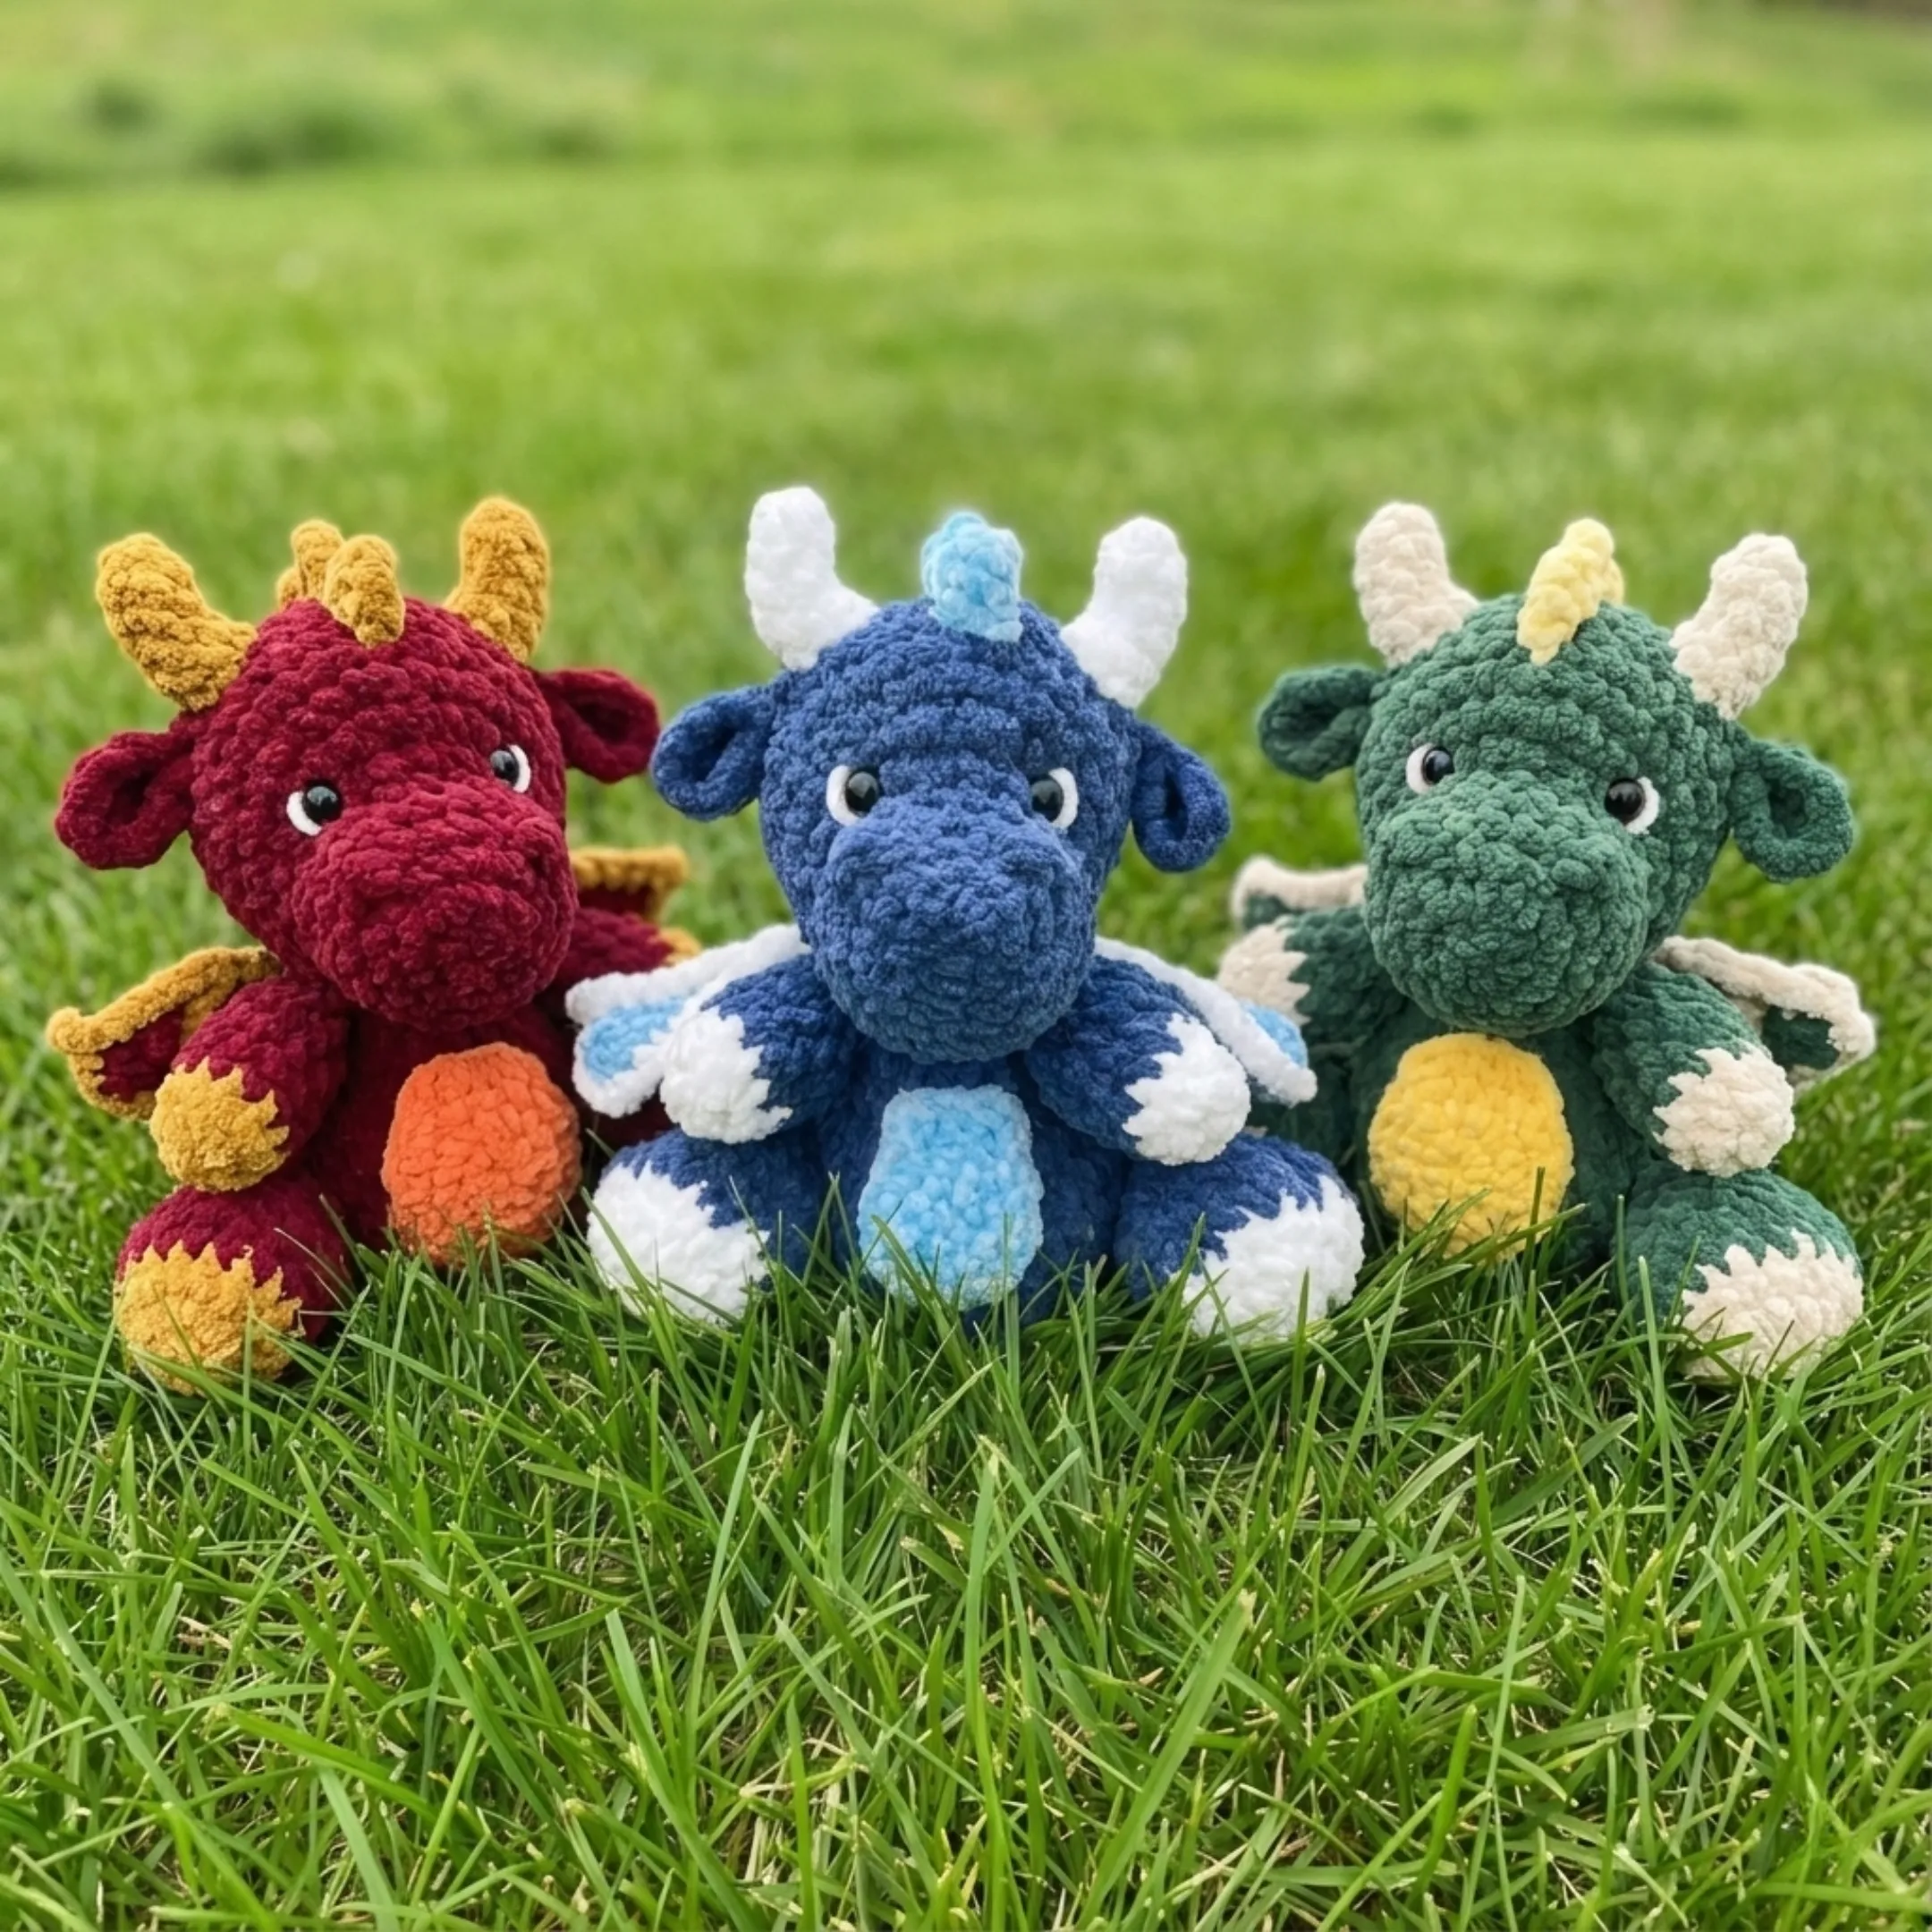
Feel free to experiment with different yarn brands and colors to create your own unique dragon!
Abbreviations Guide
- SC: Single Crochet
- SLST: Slip Stitch
- INC: Increase
- DEC: Decrease
- HDC: Half Double Crochet
- DC: Double Crochet
Essential Tips & Tricks
Creating a perfect amigurumi dragon requires patience and attention to detail. Here are some insider tips to ensure your success:
Count Your Stitches: Some instructions may look overwhelming at first glance. Take it one stitch at a time and count your stitches after each round. This simple habit helps you catch mistakes early before they become bigger problems.
Use Stitch Markers: Keep track of your progress by using a stitch marker at the beginning of each round. Don’t have one handy? Get creative with household items like bobby pins, hair clips, safety pins, or anything small enough to mark your place.
Stuff Generously: Use more stuffing than you think you need to create a firm, round, and fluffy shape. Don’t hesitate to add extra stuffing in specific areas to help shape them properly, especially in the belly area.
Stuffing Technique: For the most professional-looking result, pull apart clumps of stuffing and add small pieces at a time. This creates a smoother, more even fill and prevents lumpy areas.
Color Experimentation: The beauty of handmade crafts is customization! Feel free to experiment with different color combinations to make Dallas truly your own.

Instructions
Head
Start the head using navy plush yarn.
Make a slip knot on your hook and ch 5.
- Row 1: skip 1 and sc into the next stitch. Place stitch marker here. Make 2 sc, 3sc in one, 3 sc, 3 sc in 1, and finish with a slst in the first marked stitch (12)
- Row 2: (sc, inc) X6 (18)
- Row 3: (2 sc, inc) X6 (24)
- Row 4: 24 sc (24)
- Row 5: (4 sc, dec) X4 (20)
- Row 6: (sc, inc) x2, 9 inc, (sc, inc) X3, sc (34)
- Row 7: 4 sc, (sc, inc) X10, 10 sc (44)
- Row 8: 3 dec, 28 sc, 5 dec (36)
- Row 9: 1 dec, (3 sc, inc) X6, 3 dec, 4 sc (38)
- Row 10-11: 38 sc (38)
- Row 12: (4 sc, dec) X6, dec (31)
- Row 13: (3 sc, dec) X6, sc (25)
- Row 14: (2 sc, dec) X6, sc (19)
- Insert safety eyes here between rows 7-8 of the head, 7 stitches apart. Stuff the head here, make sure the head is firm after stuffing.
- Row 15: 3 sc, (sc, dec) X4, 4 sc (15)
- Row 16: 7 dec, sc (8)
Insert safety eyes here between rows 7-8 of the head, 7 stitches apart. Stuff the head here, make sure the head is firm after stuffing.
- Row 15: 3 sc, (sc, dec) X4, 4 sc (15)
- Row 16: 7 dec, sc (8)
Tie off the yarn, and weave in the ends.
Body
Start the body using navy plush yarn.
- Row 1: 6 sc in a magic ring (6)
- Row 2: 6 inc (12)
- Row 3: (sc, inc) X6 (18)
- Row 4: (2 sc, inc) X6 (24)
- Row 5: (3 sc, inc) X6 (30)
- Row 6: (4 sc, inc) X6 (36)
- Row 7-11: 36 sc (36)
- Row 12: 9 dec, (3 sc, dec) X3, sc, dec (23)
- Row 13: 5 dec, (2 sc, dec) X3, sc (15)
- Row 14-15: 15 sc (15)
Stuff the body here.
- Row 16: (sc, dec) X5 (10)
- Row 17: 5 dec (5)
Tie off the yarn and weave in the ends.
Tail
Start the tail using navy plush yarn.
- Row 1: 4 sc in a magic ring (4)
- Row 2: (1 sc, inc) X2 (6)
- Row 3: 6 sc (6)
- Row 4: (sc, inc) X3 (9)
- Row 5: (2 sc, inc) X3 (12)
- Row 6: (3 sc, inc) X3 (15)
- Row 7: (4 sc, inc) X3 (18)
- Row 8: (5 sc, inc) X3 (21)
- Row 9: 21 sc (21)
Tie off the yarn and leave a tail for sewing.

Arms
Start the arms with white plush yarn.
- Row 1: 6 sc in a magic ring (6)
- Row 2: 6 inc (12)
- Row 3: 12 sc (12)
Change colors to navy plush yarn on the last stitch of row 3.
- Row 4-7: 12 sc (12)
- Row 8: (4 sc, dec) X2 (10)
- Row 9: 10 sc (10)
- Row 10: (3 sc, dec) X2 (8)
Stuff the arm here.
Next, close the two ends of the arm together by making 4 sc across the top through both sides. Tie off the yarn and leave a tail for sewing.
Repeat this exact process again to make two arms.
Legs
Start the legs with white plush yarn.
- Row 1: 6 sc in a magic ring (6)
- Row 2: 6 inc (12)
- Row 3: (3 sc in 1, slst) X3, (sc, inc) x3 (21)
- Row 4: sc, (sc, inc, slts) X3, 11 sc (24)
Change colors to navy plush yarn on the last stitch of row 4.
- Row 5: sc, (sc, 2 inc, slst) X3, 11 sc (30)
- Row 6: 4 sc, dec, (3 sc, dec) X2, 14 sc (27)
- Row 7: 2 sc, (2 dec, slst) X3, 10 sc (21)
- Row 8: (4 sc, dec) X3, 3 sc (18)
- Row 9: (3 sc, dec) X3, 3 sc (15)
- Row 10-13: 15 sc (15)
- Row 14: (4 sc, dec) X2, sc, dec (12)
Stuff the leg here.
Next, close the two ends of the leg together by making 6 sc across the top through both sides. Tie off the yarn and leave a tail for sewing.
Repeat this exact process again to make two legs.
Next, to make the toes more prominent, insert your yarn at the back of the foot, through to the front of the foot in between the toe. Loop the yarn back through the front of the toe, to the back of the foot where you first inserted the yarn. Tie the ends together, and weave them into the leg. Repeat this between each toe on both feet!
Spikes
Make the spike using light blue plush yarn.
- Row 1: 4 sc in a magic ring (4)
- Row 2: (sc, inc) X2 (6)
- Row 3: 6 sc (6)
Tie off the yarn, and leave a tail for sewing. Repeat these steps to make 9 spikes total.

Bottom Tail Tip
Make the tip of the tail using light blue plush yarn.
- Row 1: 4 sc in a magic ring (4)
- Row 2: 4 inc (8)
- Row 3: 8 sc (8)
- Row 4: (2 sc, dec) X2 (6)
- Row 5: 3 dec (3)
Tie off the yarn, and leave a small tail for sewing.
Wings
- Using light blue plush yarn, make a slipknot on your hook and chain 16. This is row 1.
- Row 2: in the second chain from the hook, make 15 sc (15)
- Row 3: ch 2, turn, starting in the third chain from the hook, make 11 hdc.
- Row 4: ch 3, turn, starting in the fourth chain from the hook make 9 hdc, 2 sc.
- Row 5: ch 2, turn, starting in the 3rd stitch from the hook make 7 hdc.
- Row 6: ch 3, turn, starting in the fourth chain from the hook make 5 hdc, 2 sc.
- Sc all the way around the wing. Once you get all the way around, tie off the yarn, and leave a tail for sewing.
Next, make 3 dec across the bottom of the wing.
Next, make a slip knot on your hook with white plush yarn, and insert it at the bottom corner of the wing. Sc around the wing, but when you get back to the bottom, stop.
Next, you will be making single crochets directly into the wing from the bottom of the wing to the top. When you meet the white edge at the top, make a DC into the edge, tie off the yarn, and weave in the tail.
To make the other white line on the wing, make a slip knot on your hook, and insert it on the bottom of the wing where you left off with the sc previously. Make single crochets up to the top of the wing to the opposite edge. When you get to the opposite edge, make 1 DC into the edge of the wing, tie off the yarn, and weave in the ends.
Repeat this process again to make two wings. Make sure the wings are facing opposite directions (you can do this by simply turning one wing over when you begin crocheting the white border around it).
Horns
Make the horns using white plush yarn.
- Row 1: 5 sc in a magic ring (5)
- Row 2: 5 sc (5)
- Row 3: (sc, inc) X2, inc (8)
- Row 4: 2 inc, 2 sc, 2 dec (8)
- Row 5: 2 sc, 2 inc, 2 sc, dec (9)
Tie off, and leave a tail on the end of the horn for sewing.
Repeat this process again to make two horns.
Ears
Make the ears using navy plush yarn.
- Row 1: 6 sc in a magic ring (6)
- Row 2: 6 inc (12)
- Row 3: 12 sc (12)
Fold the ear in half, and make 2 sc through both sides to shape the ear.
Repeat this process again to make two ears.
Belly
Make the belly using light blue plush yarn.
- Row 1: 6 sc in a magic ring (6)
- Row 2: 6 inc (12)
- Row 3: (sc, inc) X6 (18)
- Row 4: 4 sc, chain 2, turn, 4 sc (4)
- Row 5: chain 2, turn, 4 sc (4)
- Sc all around the belly. When you get back to the top, tie off the yarn, and leave a tail for sewing.

Special Details and Finishing Touches
Adding Whites to the Eyes
To add white to the eyes, insert white plush yarn from the back of the head, to the top, outside corner of the eye. Then thread the yarn to the bottom, outside of the eye, and back to the back of the head where the yarn was first inserted. Tie the ends together, and weave them into the head. Repeat this on both eyes!
Shaping the Face
To shape the face, insert the needle with navy plush yarn into the top of the left eye, and thread it to the same place on the top of the right eye.
Next, thread the yarn to the bottom of the right eye, and then to the same place on the left eye.
Thread the yarn to the top of the left eye where it was first inserted, and tie the two ends together tight enough until you achieve the desired face shape.
Nostrils
Using navy yarn, insert your yarn into row 4 of the head, on the top, side of the nose, 2 stitches wide. Repeatedly thread the yarn over these two stitches until you have the desired look. Tie off the ends and weave them into the head. Do this again on the other side, leaving about 3 stitches between the two nostrils.
Assembly Instructions
Now comes the exciting part – bringing all the pieces together to create your finished dragon!
- Attaching the Head: Attach rows 7-11 of the head onto the center, top of the body.
- Attaching the Tail: Attach the tail by sewing it over rows 2-10 of the body, directly on the middle of the back. Add stuffing to the tail as you attach it.
- Attaching the Tail Tip: Attach the tip of the tail to row 1 of the tail.
- Attaching the Legs: Attach the legs by sewing them to rows 6-10 of the body directly on the sides. If you would like the legs to stay in one place, you can sew the insides of the legs to the body as well.
- Attaching the Arms: Attach the arms by sewing them to rows 14-16 of the body, directly on the sides.
- Attaching the Wings: Attach the wings onto the center of rows 12-15 of the back.
- Attaching the Spikes: Attach the spikes down the center of the dragon’s head and back starting from row 10 of the head. Skip the area where the wings have been attached.
- Attaching the Horns: Attach the horns to rows 11-12 of the head, 2 stitches from the first spike.
- Attaching the Ears: Attach the ears directly below the horns.
- Attaching the Belly: Lastly, attach the belly to the center of the dragon’s belly between rows 9-14 of the body.

Frequently Asked Questions
When made with super bulky yarn and a 5.00mm hook as specified, Dallas the Dragon will be approximately 10-12 inches tall depending on your tension and how firmly you stuff the amigurumi. Using different yarn weights will create smaller or larger dragons.
Yes, you can use different yarn weights, but you’ll need to adjust your hook size accordingly. Using a lighter weight yarn will create a smaller dragon, while heavier yarn will make a larger one. Just ensure your stitches are tight enough that the stuffing doesn’t show through.
The key is to maintain tight, even tension throughout your work. Make sure you’re using a hook size that’s slightly smaller than recommended for your yarn weight. If stuffing still shows through, you can work an extra round or two of single crochet, or try using a darker colored stuffing that matches your yarn.
Insert the safety eyes between rows 7-8 of the head, placing them 7 stitches apart. Before clicking the backs into place, make sure you’re happy with the positioning as they cannot be moved once secured. Always insert safety eyes before stuffing the head completely, and push the backing on as firmly as possible for maximum security.
Conclusion
Congratulations on completing Dallas the Dragon! This charming amigurumi project combines classic crochet techniques with creative details to create a truly special handmade treasure. Whether you followed the pattern exactly or added your own creative touches, you’ve created something unique and wonderful.
Remember, every crocheter’s tension and style is slightly different, so your Dallas may look a bit different from someone else’s – and that’s perfectly okay! These small variations are what make handmade items so special and one-of-a-kind.
Now that you’ve mastered this dragon pattern, why not experiment with different color combinations or even try adding your own custom features? The skills you’ve learned here can be applied to countless other amigurumi projects. Happy crocheting, and may your hook continue to create magic!
Remember it later!
Planning to try this soon? Pin it for a quick find later!