Table of contents
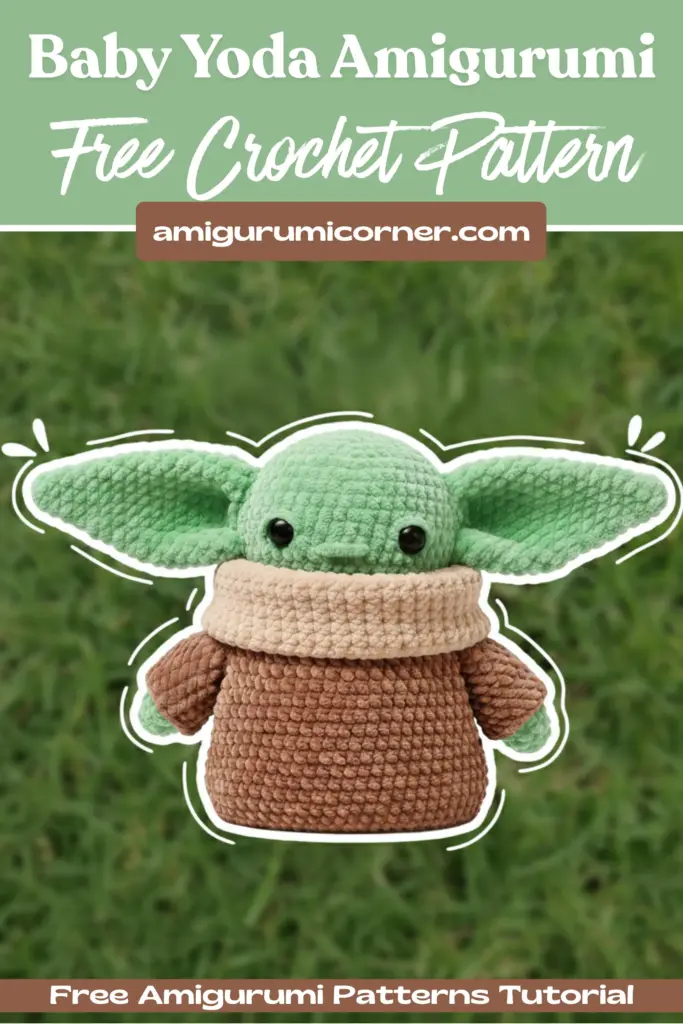
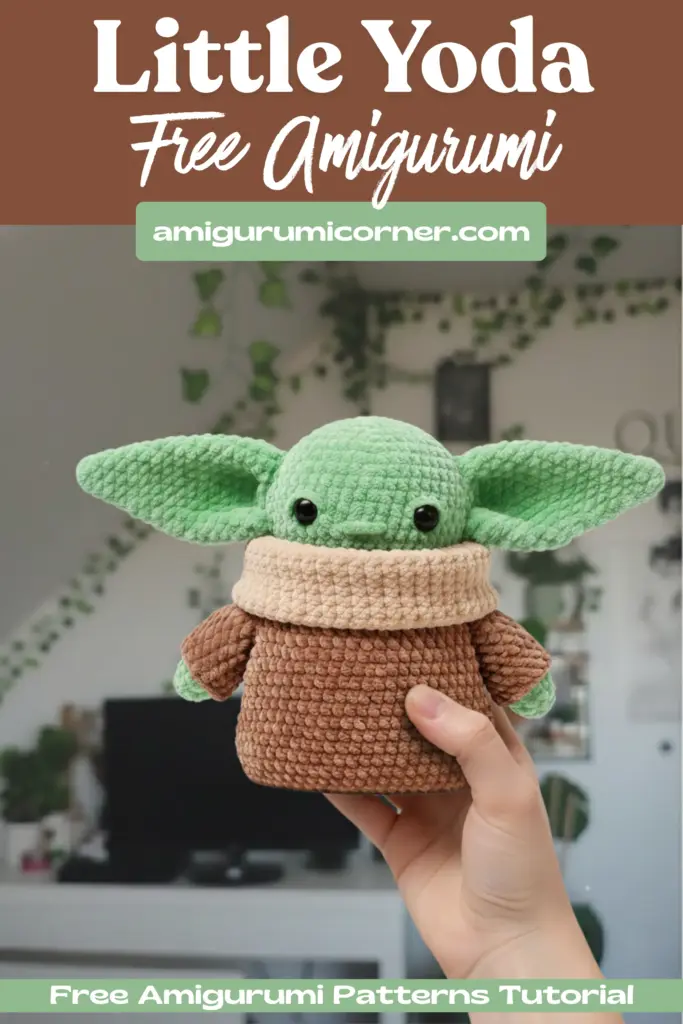
Are you a Star Wars fan with a love for crochet? If you’ve ever wanted to create your very own version of everyone’s favorite Force-sensitive infant, you’re in the right place. This comprehensive guide will walk you through creating an adorable crocheted Baby Yoda, complete with his iconic ears, tiny robe, and endearing expression.
What You’ll Need to Get Started
Before diving into this project, gather the following materials:
Yarn and Hook:
- 4.5 mm crochet hook
- Chenille yarn in green (for the body, head, ears, and arms)
- Chenille yarn in brown (for the robe)
Additional Supplies:
- A pair of 15 mm safety eyes
- Stitch markers
- Straight pins
- Tapestry needle
- Fiberfill stuffing
- Scissors
Understanding the Abbreviations
Familiarize yourself with these common crochet terms before starting:
- mr – magic ring
- ch – chain
- inc – increase
- dec – decrease
- slst – slip stitch
- sc – single crochet
- st/s – stitch/stitches
Important Notes Before You Begin
This pattern creates a Baby Yoda measuring approximately 21 cm (about 8 inches) tall. Keep in mind that your finished size may vary if you use different yarn weight or hook size than specified.
The head and body are worked as one continuous piece, starting from the head and working downward. This technique creates a seamless construction that gives your finished piece a professional look.
Pro Tip: Use straight pins to position all loose parts on the body before sewing them permanently. This allows you to adjust placement until you’re satisfied with the overall appearance.

Remember it later!
Planning to try this soon? Pin it for a quick find later!
Crafting the Signature Ears
Baby Yoda’s large, expressive ears are perhaps his most recognizable feature. You’ll need to make two ears—one right and one left—as they’re mirror images of each other.
Right Ear Instructions
Start with 6 single crochet stitches in a magic ring. Over the next 19 rounds, you’ll gradually increase the size, creating a gently curved ear shape. The increases are strategically placed to give the ear its characteristic shape:
- Rounds 1-9: Single increases placed at the beginning of each round
- Rounds 10-12: Increases placed at both the beginning and end
- Rounds 13-19: Work even without increases
- Round 20: Decrease to shape the bottom of the ear
Leave a long tail for sewing and do not stuff the ears—they should remain flat and floppy for an authentic look.
Left Ear Instructions
Follow a similar pattern to the right ear, but with increases placed at the end of rounds 1-9 instead of at the beginning. This creates the mirror image effect.
Creating the Tiny Arms
The arms are delightfully simple to make. Start with 6 single crochet in a magic ring, increase in round 2 to reach 12 stitches, then work even for 8 more rounds.
An important detail: Only stuff the lower half of each arm. This allows the upper portion to drape naturally against the body, giving your Baby Yoda a more realistic, relaxed appearance.
Constructing the Iconic Robe
The brown robe is worked in an innovative way that creates both the body and sleeves:
- Chain 54 stitches and join in the round
- Work 13 rounds of single crochet
- In round 14, create openings for the sleeves by chaining 10 and skipping 8 base stitches (do this twice)
- Continue working the body, gradually increasing the stitch count
- Work 11 rounds for the main body length
After completing the main body, return to the sleeve openings and work 8 rounds of 18 single crochet stitches for each sleeve. This technique creates a seamless, professional-looking garment.
Building the Head and Body
This is the centerpiece of your project, worked from the top of the head down to the bottom of the body:
Head Construction
Begin with 6 single crochet in a magic ring and increase steadily through round 8 until you reach 48 stitches. Work even through round 17 to create the rounded head shape.
Adding Facial Features:
- Insert safety eyes in round 13, spacing them 10 stitches apart
- Embroider eyelids with a single diagonal strand above each eye
- Add the nose in round 14 using embroidery stitches
Continue working even through round 32 to create the elongated head-to-body transition that gives Baby Yoda his distinctive silhouette.
Body Shaping
Starting at round 33, begin decreasing to shape the body:
- Work decreases every round from rounds 33-38
- Close the final 6 stitches by weaving through the front loops
Remember to stuff the piece firmly as you work, paying special attention to the head area to maintain its round shape.

Assembly: Bringing It All Together
With all pieces complete, it’s time to assemble your creation:
- Attach the arms at round 20 of the body, positioning them to angle slightly forward
- Dress your Baby Yoda in the brown robe
- Fold the collar of the robe for that signature look
- Sew the ears between rounds 10 and 15, angling them slightly outward
Take your time with assembly—proper positioning makes all the difference in achieving that adorable Baby Yoda expression.
Tips for Success
Gauge Matters: If your finished piece is larger or smaller than expected, adjust your hook size. A smaller hook creates tighter stitches and a smaller finished product, while a larger hook does the opposite.
Consistent Tension: Try to maintain even tension throughout your work. This ensures your stitches are uniform and your finished piece has a professional appearance.
Stuffing Technique: Add stuffing gradually and evenly, taking care to push it into corners and curves. Understuffing results in a floppy figure, while overstuffing can distort the shape.
Finishing Touches
Once assembly is complete, weave in all remaining yarn ends securely. Check that all parts are firmly attached and that safety eyes are secure, especially if the finished item will be handled by children.
Consider adding subtle shading around the eyes and nose area using fabric markers or embroidery floss to add depth and character to your Baby Yoda’s face.
Your Crocheted Companion Awaits
Creating this Baby Yoda amigurumi is a rewarding project that combines essential crochet techniques with creative assembly. The finished piece makes an excellent gift for Star Wars fans of all ages or a charming addition to your own collection.
Whether you’re a seasoned crocheter or tackling your first amigurumi project, take your time with each step. The beauty of handmade items lies not in perfection, but in the care and creativity you bring to each stitch.
May the Force—and your crochet hook—be with you as you embark on this creative journey. Your adorable green companion awaits, ready to bring a smile to anyone who sees him!
You’ll Love Also This

Remember it later!
Planning to try this soon? Pin it for a quick find later!