Table of contents
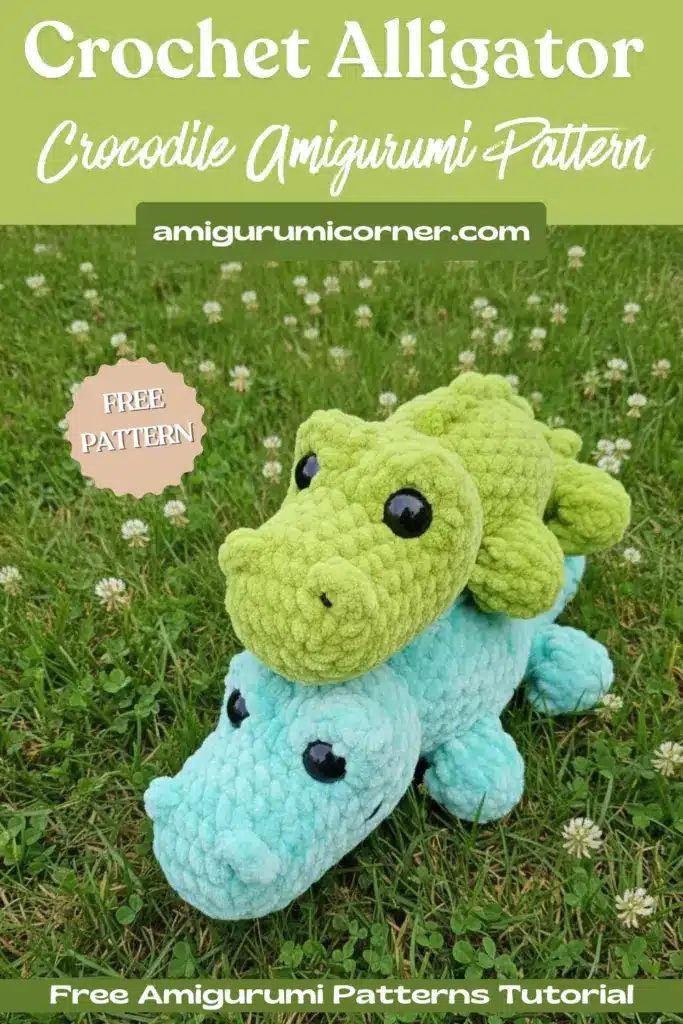
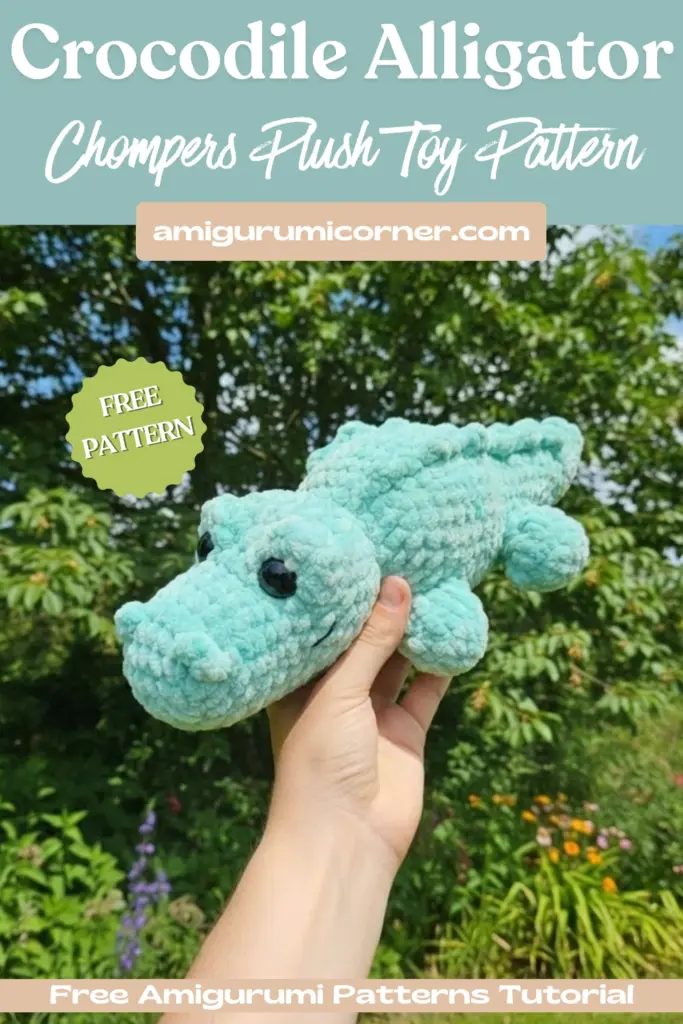
Looking for an adorable reptilian friend to add to your crochet collection? Meet Chompers, the Chompers Crochet Alligator that’s perfect for both beginners looking to challenge themselves and intermediate crocheters seeking a fun project. This delightful pattern creates a cuddly creature with distinctive eye bumps, textured spine, and four sturdy feet complete with tiny toes.
This comprehensive pattern includes everything you need to create your own Chompers, from detailed stitch instructions to assembly tips. Whether you’re making this as a gift for a child or adding to your own collection of crocheted creatures, this pattern offers clear, step-by-step guidance to help you succeed.
Remember it later!
Planning to try this soon? Pin it for a quick find later!
Materials Need For Chompers Crochet Alligator
- Scissors
- Yarn of your choice (weight options provided below)
- Crochet hook (size depends on yarn weight)
- Safety eyes
- Fiberfill
- Stitch marker(s)
Yarn Weight and Eye Size Options
Worsted Weight
- Approx. 25g
- Safety eyes: 10mm black, 12mm glitter
- Crochet hook: 2.75-3.75mm
Parfait Chunky/Honey Bunny
- Approx. 57g
- Safety eyes: 16mm black, 18mm glitter
- Crochet hook: 3.75-4.5mm
Sweet Snuggles Lite
- Approx. 76g
- Safety eyes: 18mm black, 20mm glitter
- Crochet hook: 4.5-5.5mm
Bernat Blanket
- Approx. 106g
- Safety eyes: 20mm black, 23mm glitter
- Crochet hook: 5-6mm
Sweet Snuggles/Parfait XL
- Approx. 284g
- Safety eyes: 24-26mm black, 28-30mm glitter
- Crochet hook: 7-8mm

Skills Required
This Chompers Crochet Alligator Pattern requires knowledge of magic ring, single crochet, increase, invisible decrease, four single crochet increase, chain and skip, fasten off, working in front loops only, working in back loops only, and working around a chain. The skill level is intermediate.
Abbreviations
- R – Round
- sc – single crochet
- inc – increase
- dec – decrease
- mr – magic ring or chain 2 method
- FLO – front loop(s) only
- FL – front loop(s)
- BLO – back loop(s) only
- BL – back loop(s)
- FO – fasten off
- (—–)x# – repeat the # of times stated outside the parentheses
- —– (#) – end of row count
- (# rounds) – repeat the number of rounds stated
- 4scinc – 4sc in one stitch
- FLO[—] – anything inside of the brackets will be working in the FLO
- BLO[—] – anything inside of the brackets will be working in the BLO
- hdcinc – half-double crochet increase
- dcinc – double crochet increase
Feet Instructions
Make 4 feet using the following pattern:
- R1 – 5sc in a mr (5)
- R2 – incx5 (10)
- R3 – (sc, chain 2, slst in second chain from hook)x3, 7sc (10, not counting toes)
- In the next round, skip the chains and only work in the sc stitches from R3.
- R4 – sc around (10)
- If the toes fell in, pull them through to the outside.
- R5 – (3sc, dec)x2 (8)
- R6 – sc around (8)
If you need to, add or subtract sc until you get to the side. Stuff and FO (there is no need to leave a long tail, these will be crocheted on).
Head and Body Instructions
- R1 – Chain 6, starting in the second chain from the hook: inc, 3sc, inc. Now working on the other side of the chain: inc, 3sc, inc (14)
- R2 – incx2, 3sc, incx4, 3sc, incx2 (22)
- In R3, mark the BLs of the 4scincs to make it easier to do R4.
- R3 – 2sc, FLO[4scinc], 5sc, FLO[4scinc], 13sc (28)
- In R4, you will be crocheting in the marked stitches from R3 instead of the 4scinc to create the nostrils.
- R4 – 2sc, sc in the marked stitch, skip 4scinc, 5sc, sc in the marked stitch, skip 4scinc, 13sc (22)
- R5-6 (2 rounds) – sc around (22)
- R7 – (inc, 10sc)x2 (24)
- In R8, the 3rd and 4th inc stitches should be centered between the nostrils, if they aren’t, add or subtract sc stitches until you get there.
- R8 – 4sc, incx6, 14sc (30)
- R9 – 4sc, chain 5, skip 5, 2sc, chain 5, skip 5, 14sc (30)
- R10 – 4sc, 5sc down chain, 2sc, 5sc down chain, 14sc (30)
- R11 – sc around (30)
Stop now and make the eye bumps by either cutting off the yarn, and reattaching, or using the other end of the yarn skein.
Eye Bumps
- R1 – With a slip knot on your hook, sc in the right gap (left gap if you are left handed) from between R8 and R9, 5sc down the skipped stitches from R8, sc in the other gap, 5sc down the backside of the chain from R9 (12)
- R2 – decx6 (6)
FO and sew the hole shut using the front loops of R2. Repeat for the second eye bump.
Insert eyes between R1 and R2 of the eye bump facing forward (1 eye per bump).
The gap is the space between R8 and R9 that looks similar to a stitch.
If you cut off your yarn, reattach it now.
Head and Body Continued
- R12 – (3sc, dec)x6 (24)
- R13 – (2sc, dec)x6 (18)
- R14 – (4sc, dec)x3 (15)
- Stuff head
- R15 – FLO[(4sc, inc)x3] (18)
- R16 – (2sc, inc)x6 (24)
- R17 – sc around (24)
In R18 and R19, you will be attaching 2 of the feet. In the stitches that are UNDERLINED, you will be crocheting through both sides of the feet and the body. The toes should be up against the body while crocheting on. If needed, adjust a few stitches to make them centered with the head. Make sure to tie a knot with your working yarn and the yarn tail of the feet to prevent unwinding.
- R18 – 17sc, 4sc, 3sc (24)
- R19 – 3sc, inc, (3sc, inc)x3, 8sc (28)
- R20-21 (2 rounds) – sc around (28)
- R22 – sc, (3sc, dec)x4, 7sc (24)
For the rest of the decreasing rounds, the 2nd decrease should be centered on the top of the back. If needed, add or subtract sc stitches to get there.
- R23 – 6sc, (sc, dec)x3, 9sc (21)
- R24 – sc around (21)
Continue stuffing
- R25 – 5sc, (sc, dec)x3, 7sc (18)
In R26 and R27, you will be attaching the other 2 feet. In the stitches that are UNDERLINED, you will be crocheting through both sides of the feet and the body. The toes should be up against the body while crocheting on. If needed, adjust a few stitches to make them centered with the head. Make sure to tie a knot with your working yarn and the yarn tail of the feet to prevent unwinding.
- R26 – 3sc, (sc, dec)x3, 4sc, 2sc (15)
- R27 – sc, 4sc, 10sc (15)
- R28 – 2sc, (sc, dec)x3, 4sc (12)
- R29 – (sc, dec)x3, 3sc (9)
- R30-31 (2 rounds) – sc around (9)
- R32 – (sc, dec)x3 (6)
- R33 – sc around (6)
FO, finish stuffing, and sew hole shut using the FLs of R33.
Spine
For the spine, we will be surface crocheting starting from the tip of the tail to the base of the head.
Start with a slip knot on your hook. I recommend adding pins or sewing needles up the back to make sure you go in a straight line up the back. You will be starting at the tip of the tail (R33).
slst, hdcinc, slst, (slst, dcinc, slst)-repeat () all the way to the base of the head. If there are any remaining stitches, make extra slsts to reach the base of the head. I repeated 5 times and had to make 1 extra slst.
FO and hide yarn tails.

Finishing Your Chompers
Congratulations! You’ve completed your very own Chompers Crochet Alligator. This charming creature makes an excellent addition to any stuffed animal collection and is sure to bring smiles to faces both young and old. The distinctive features – from the protruding eye bumps to the textured spine – give this pattern character and charm that sets it apart from typical amigurumi projects.
Take photos of your finished Chompers and share your creation with the crochet community. This pattern offers great opportunities for customization – try different yarn colors to create unique variations or adjust the eye sizes for different looks. Happy crocheting!

Remember it later!
Planning to try this soon? Pin it for a quick find later!