Table of contents
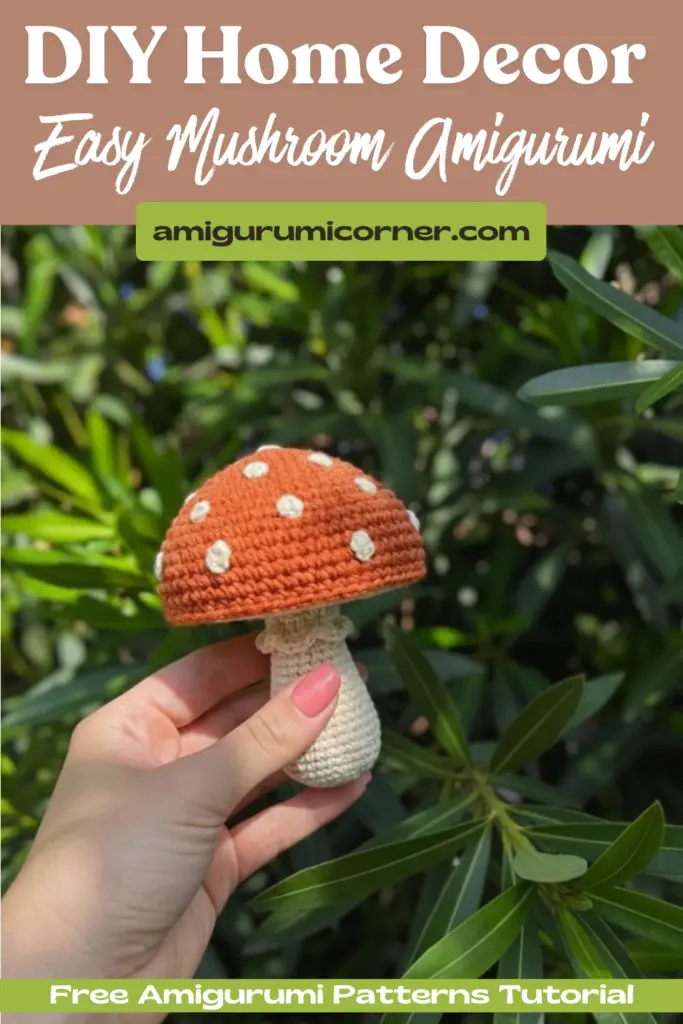
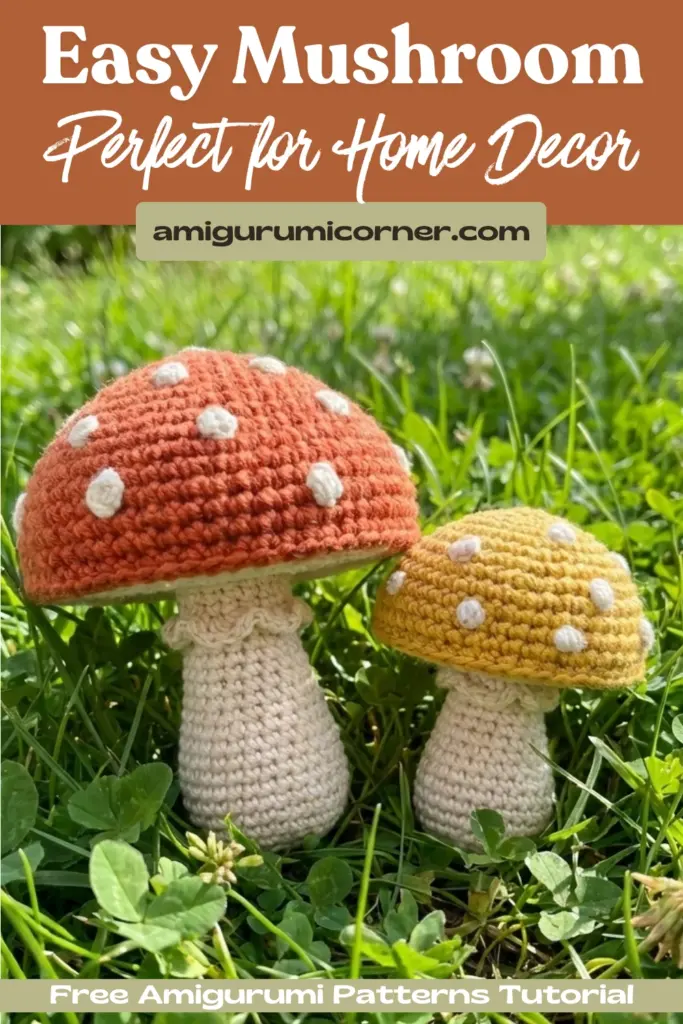
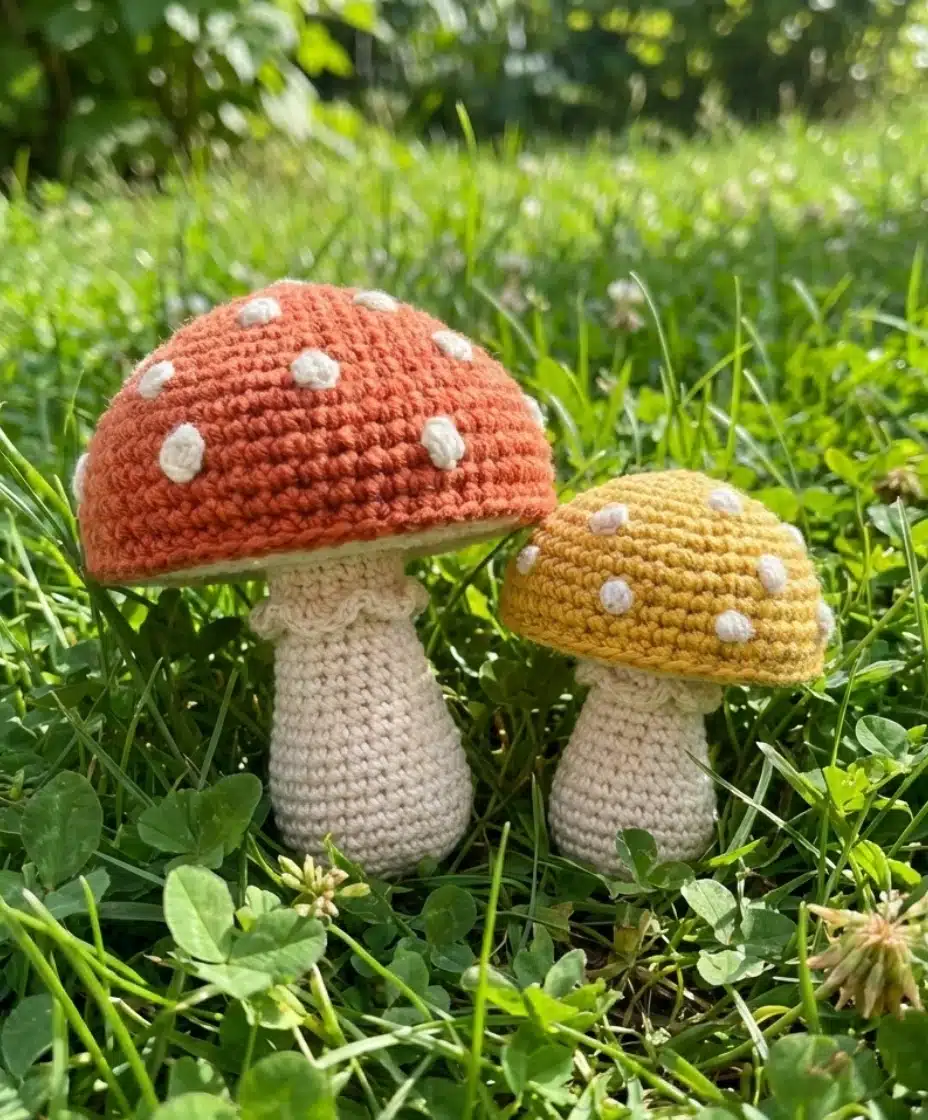
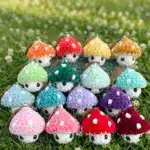
Create charming Fly Agaric Mushroom Crochet with this delightful crochet pattern! These whimsical toadstools make perfect decorative pieces for your home, seasonal displays, or as unique handmade gifts. This versatile pattern creates three different sizes of mushrooms – small, medium, and large – allowing you to craft an entire mushroom family.
Remember it later!
Planning to try this soon? Pin it for a quick find later!
Materials Needed for Fly Agaric Mushroom Crochet
- Catania Cotton thread from Schachenmayr (125m/50 gram or similar)
- 20 gram white
- 20 gram red
- Crochet hook: Size 2.5 mm
- Fiberfill or felting wool for stuffing
- Cardstock 10 cm²
- Double sided adhesive tape
- 1 embroidery needle
The finished mushrooms will measure 4, 7, and 9 cm tall when using the recommended thread and crochet hook size.

Important Notes Before Starting
Count your stitches carefully and use a contrasting color thread as a marker to keep track of where each round starts. All rounds are crocheted in continuous rounds – do not join rounds unless specifically stated in the pattern.
For best results, crochet over any loose ends whenever possible. This not only saves time on weaving in ends but often gives a neater finish. Choose a crochet hook one or two sizes smaller than recommended for your thread to ensure tight stitches that won’t show the stuffing between them.
Abbreviations (US Terms)
- sl st = slip stitch
- sc = single crochet
- hdc = half double crochet
- dc = double crochet
- tc = treble crochet
- tog = together
- st = stitch
- ch = chain
- nxt = next
- rnd = round
Invisible decrease technique: Insert hook into the front loops of the next 2 stitches, yarn over, pull through 2 loops on hook, yarn over, pull through final 2 loops on hook.
Fly Agaric Mushroom Crochet Pattern Instructions
STEM – Big & Medium Mushroom
With white thread:
Rnd 1: 6 sc in a magic ring (=6)
Rnd 2: (2 sc in each st) 6 times (=12)
Rnd 3: (1 sc, 2 sc in the next st) 6 times (= 18)
Rnd 4: In the back loop: Sc in each st around (= 18)
Rnd 5-7: Sc in each st around (= 18 or 54 in total)
Rnd 8: (1 sc, 2 sc tog) 6 times (= 12)
Big Mushroom:
Rnd 9-14: Sc in each st around (= 12 or 72 in total)
Rnd 15: Ring: In the front loop: (2 sc in the next st, 1 sc) 6 times (= 18)
Rnd 16: In the back loop of the same st as before: Ch 1, sc in each st around (= 12)
Rnd 17-20: Sc in each st around (= 12 or 48 in total)
Rnd 21: In the front loop: Ch 5, 2 tc in the same st, (3 tc in the next st) 11 times, 1 sc in the first st (= 36)
Medium Mushroom:
Rnd 9-11: Sc in each st around (= 12 or 36 in total)
Rnd 12: Ring: In the front loop: (2 sc in the next st, 1 sc) 6 times (= 18)
Rnd 13: In the back loop of the same st as before: Ch 1, sc in each st around (= 12)
Rnd 14-17: Sc in each st around (= 12 or 48 in total)
Rnd 18: In the front loop: Ch 4, 2 dc in the same st, (3 dc in the next st) 11 times, 1 sc in the first st (= 36)
STEM – Small Mushroom
With white thread:
Rnd 1: 6 sc in a magic ring (=6)
Rnd 2: (2 sc in each st) 6 times (=12)
Rnd 3: In the back loop: Sc in each st around (= 12)
Rnd 4-5: Sc in each st around (= 12)
Rnd 6: (2 sc, 2 sc tog) 3 times (= 9)
Rnd 7-8: Sc in each st around (= 9)
Rnd 9: In the front loop: Ch 3, 2 dc in the same st, (3 dc in the next st) 8 times, 1 sc in the first st = 27
Tip: If you want to crochet a mushroom without a ring on the stem, skip round 15 for the big mushroom or 12 for the medium mushroom, and crochet sc in each st around through both loops on the following round.
CAP – Big & Medium Mushroom
With red yarn:
Rnd 1: 6 sc in a magic circle (=6)
Rnd 2: 2 sc in each st around (=12)
Rnd 3: Sc in each st around (= 12)
Rnd 4: (1 sc, 2 sc in the next st) 6 times (= 18)
Rnd 5: Sc in each st around (= 18)
Rnd 6: (2 sc, 2 sc in the next st) 6 times (= 24)
Rnd 7: (3 sc, 2 sc in the next st) 6 times (= 30)
Rnd 8: (4 sc, 2 sc in the next st) 6 times (= 36)
Rnd 9: (5 sc, 2 sc in the next st) 6 times (= 42)
CAP – Small Mushroom
With red yarn:
Rnd 1: 6 sc in a magic circle (=6)
Rnd 2: 2 sc in each st around (=12)
Rnd 3: (1 sc, 2 sc in the next st) 6 times (= 18)
Rnd 4: (2 sc, 2 sc in the next st) 6 times (= 24)
Rnd 5: (3 sc, 2 sc in the next st) 6 times (= 30)
Rnd 6-9: Sc in each st around (= 30 or 120 in total)
Assembly Instructions
For Big & Medium Mushrooms:
Rnd 10: Place the wrong side of the cap against the wrong side of the stem. Crochet 1 sc through front loop on the cap and back (nearest) loop of the stem at the same time. Since the cap has 3 stitches more than the stem, every 10th sc is in the same st on the stem. Before the round is completed, stuff the cap firmly with fiberfill. (= 30)
Rnd 11: 1 sc in each st around (= 30). Crochet rather tight stitches so the cap will fold over the stem.
For Small Mushroom:
Rnd 10: Place the wrong side of the cap against the wrong side of the stem. Crochet 1 sc through front loop on the cap and back (nearest) loop of the stem at the same time. Since the cap has 6 stitches more than the stem, every 7th sc is in the same st on the stem. Before the round is completed, stuff the cap firmly with fiberfill. (= 42)
Rnd 11: Sc in each st around (= 42)
Rnd 12: 1 sl st in each st around (= 42). Crochet rather tight stitches so the cap will fold over the stem.

Finishing Touches for Fly Agaric Mushroom Crochet
- Smooth the gills so they are evenly distributed around the stem
- Stuff the stem firmly with fiberfill
- Cut off the yarn but leave a long thread end for sewing on the dots
- Measure the diameter of the stem and cut a round piece of cardboard with the same diameter minus a few millimeters (about 2 cm for the largest mushroom and 1.5 cm for the smallest)
- Glue the cardboard to the bottom using double-sided adhesive tape
- For the cap, measure the diameter and cut out a circle in cardboard with the same diameter minus a few millimeters (about 5 cm for large, 4.5 cm for medium, 3 cm for small)
- Glue it to the inside of the cap with double-sided tape
- With white thread, sew white spots randomly across the red cap, using 2-3 stitches for each spot
Frequently Asked Questions
Absolutely! You can easily make other kinds of mushrooms by changing the color of the cap and/or the stem. Consider brown caps for a more realistic look or bright colors for whimsical decorations.
Choose a crochet hook one or two sizes smaller than recommended for your thread choice. This ensures tight stitches so the stuffing won’t show between them.
The cardboard provides structure and stability to both the stem base and the cap, helping your mushroom maintain its shape and stand upright properly.
Yes! If you don’t want a ring on the stem, simply skip round 15 for the big mushroom or round 12 for the medium mushroom, and crochet single crochet stitches through both loops on the following round.
These delightful fly agaric mushroom crochet make wonderful additions to your home decor, especially during autumn seasons or as part of a fairy garden display. The varying sizes allow you to create an enchanting mushroom cluster that’s sure to charm anyone who sees them. Happy crocheting!


Remember it later!
Planning to try this soon? Pin it for a quick find later!