Table of contents
- Materials You’ll Need
- Charmander Amigurumi Crochet Abbreviations & Stitch Guide
- Head & Body Instructions
- Arms Instructions
- Legs Instructions
- Tail Instructions
- Yellow Feet Instructions
- Belly Instructions
- Flames – Yellow Instructions
- Flames – Red Instructions
- Optional Pikachu Hat Instructions
- Charmander Amigurumi Assembly Guide
- Frequently Asked Questions
- Charmander Amigurumi Crochet Pattern Conclusion & Final Tips
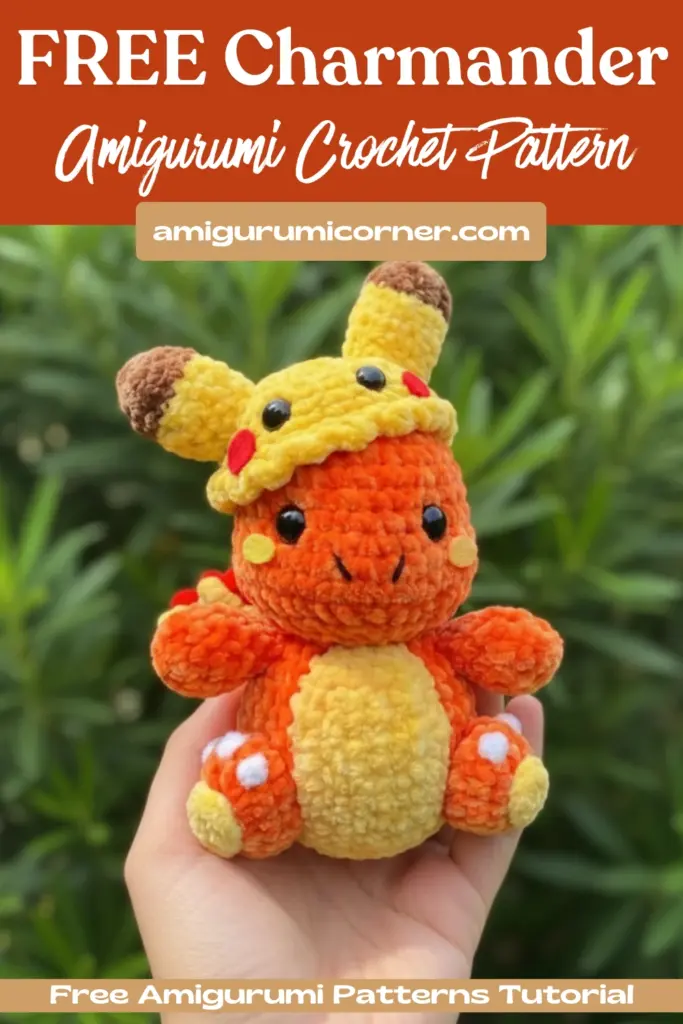
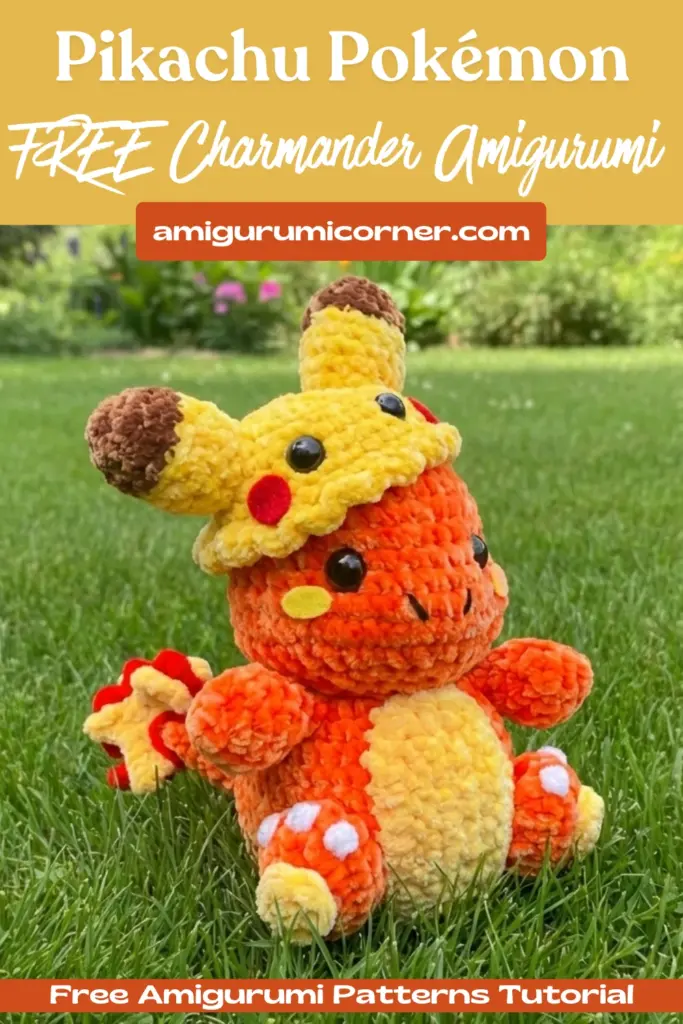
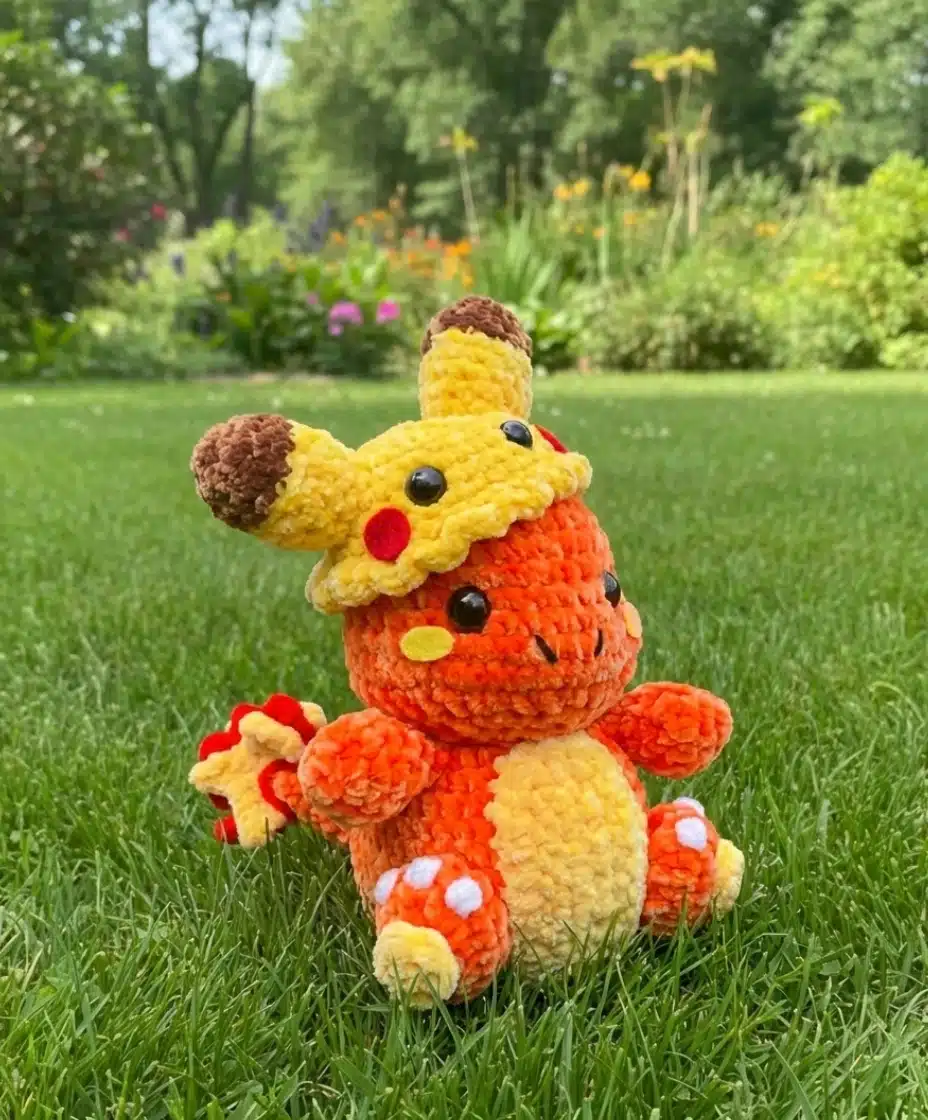
If you’re a Pokémon fan looking for your next crochet project, this free Charmander amigurumi pattern is perfect for you! This detailed guide will walk you through creating your very own cuddly Fire-type starter Pokémon. Whether you’re an experienced crocheter or looking to improve your amigurumi skills, this pattern offers clear instructions for crafting a charming Charmander plushie, complete with an optional Pikachu hat accessory.
Remember it later!
Planning to try this soon? Pin it for a quick find later!
Materials You’ll Need
Before starting your Charmander journey, gather these essential supplies:
Yarn:
- Orange (main body color)
- Yellow (belly and accents)
- Red (flame details)
- White (toe details)
- Brown (optional, for Pikachu hat ears)
Other Supplies:
- Crochet hook (any size appropriate for your chosen yarn; 5mm recommended for chenille yarn)
- Toy safety eyes
- Felt (for facial details and cheeks)
- Toy stuffing
- Scissors
- Sewing needles
- Craft glue
- Pins (helpful for positioning pieces before sewing)
Pro Tip: The size of your finished Charmander Amigurumi will depend on your hook size and yarn weight. For a larger plushie, use a bigger hook and bulkier yarn.

Charmander Amigurumi Crochet Abbreviations & Stitch Guide
Before we begin, familiarize yourself with these common crochet terms:
- MR – Magic Ring
- sc – Single Crochet
- inc – Increase
- dec – Decrease
- slst – Slip Stitch
- HDC – Half Double Crochet
- BLO – Back Loop Only
- “[….] x N” – Repeat instructions ‘N’ times that round
Head & Body Instructions
Start with Orange yarn
- R1) 7 sc in a MR (7)
- R2) inc around (14)
- R3) ( sc, inc ) x 7 (21)
- R4) ( 2 sc, inc ) x 7 (28)
- R5) ( 3 sc, inc ) x 7 (35)
- R6-10) sc around (35) [ 5 rounds ]
- R11) 8 sc, 6 inc, 2 sc, 4 inc, 2 sc, 6 inc, 7 sc (51)
- R12) sc around (51)
- R13) 8 sc, 6 dec, 2 sc, 4 dec, 2 sc, 6 dec, 7 sc (35)
- R14) ( 3 sc, dec ) x 7 (28)
- R15) ( 2 sc, dec ) x 7 (21)
- R16) ( sc, dec ) x7 (14)
Place eyes between the cheeks and nose in-between rounds 9-10 with 6 stitches between them. Continually stuff the head and body as we continue.
- R17) inc around (28)
- R18) ( sc, inc ) x 14 (42)
- R19-22) sc around (42) [ 4 rounds ]
- R23) ( 5 sc, inc ) x 7 (49)
- R24) sc around (49)
- R25) ( 5 sc, dec ) x 7 (42)
- R26) ( 4 sc, dec ) x 7 (35)
- R27) ( 3 sc, dec ) x 7 (28)
- R28) sc around (28)
- R29) ( 2 sc, dec ) x 7 (21)
- R30) ( sc, dec ) x 7 (14)
Continually stuff the body.
- R31) dec around (7)
- dec around and in the final stitch, slip stitch to fasten off and sew the hole closed.
Arms Instructions
Start with Orange yarn
- R1) 4 sc in a MR (4)
- R2) inc around (8)
- R3) ( sc, inc ) x 4 (12)
- R4) sc around (12)
- R5) ( sc, dec ) x 4 (8)
- R6-7) sc around (8)
You need to stuff your arm and then fold it flat and sc through both sides. Fasten off and leave a tail for sewing to the body later. Make two.
Legs Instructions
Start with Orange yarn
- R1) Chain 5 (5)
- R2) Going back along the chain, skip the first stitch. 3 sc, inc in the last stitch, turn to the other side then 3 sc, inc (10)
- R3) inc around (20)
- R4) sc around (20)
- R5) dec around (10)
Fasten off, leave a long tail for sewing to the body later and stuff each leg. Make two. For the toe details use white yarn and embroider them on (Do this after you have attached to the body for the best placement).
Tail Instructions
Start with Orange yarn
- R1) 4 sc in a MR (4)
- R2) sc around (4)
- R3) ( sc, inc ) x 2 (6)
- R4) sc around (6)
- R5) ( 2 sc, inc ) x 2 (8)
- R6) sc around (8)
- R7) ( 3 sc, inc ) x 2 (10)
- R8) sc around (10)
- R9) ( 4 sc, inc ) x 2 (12)
- R10) sc around (12)
- R11) ( 5 sc, inc ) x 2 (14)
- R12) sc around (14)
- R13) ( 6 sc, inc ) x 2 (16)
- R14) sc around (16)
Fasten off, leave a long tail for sewing to the body later and stuff.
Yellow Feet Instructions
Start with Yellow yarn
- R1) 5 sc in a MR (5)
Slst and fasten off, leave a long tail for sewing to the body later. Make two.
Belly Instructions
Start with Yellow yarn
- R1) chain 11, going back along the chain and skipping the first stitch, 9 sc, inc turn to the other side inc, 9 sc (22)
- R2) chain 1 then turn to the backside, 10 sc, 2 inc, 10 sc (24)
- R3) chain 1 then turn work back to the front side, 11 sc, 2 inc, 11 sc (26)
Fasten off, leave a long tail for sewing to the body later.
Flames – Yellow Instructions
Start with Yellow yarn
This part can be a little confusing so don’t forget to use video tutorials if you need help, or reach out for assistance!
- R1) chain 7, skipping the first stitch back along, sc, sc, chain 2, sc into the second stitch of that chain, sc back into the base chain stitch. You should have 4 stitches left on the original chain. In the next stitch sc, sc, chain 3, 2 sc back along that chain and skipping the first stitch, sc back into the base chain stitch. On the original chain there should be 2 stitches left. Then sc and in the last stitch sc, chain 2, sc back along skipping the first stitch, and then slip stitch back into the base chain.
Fasten off, leave a long tail for sewing to the body later. Make two.
Flames – Red Instructions
Start with Red yarn
- R1) Chain 8, skipping the first stitch, sc, sc then chain 2, in the second stitch sc and a final sc back into the base stitch in the original chain. Then sc and chain 3 in the same stitch, do 2 sc back along and a final sc back into the base stitch. Next we will sc and chain 4, sc back along the 3 and place a sc in the base stitch. We have made 3 little flame tails now and need to make two more. In the next stitch sc and chain 3, doing 2 sc back along and a sc in the base stitch. In the second to last stitch of the original chain we will sc and chain 2, doing one sc back along and place a sc going into the base stitch.
For the final stitch you need to sc then slip stitch and fasten off leaving a longer tail for sewing.
Optional Pikachu Hat Instructions
Start with Yellow yarn
- R1) 7 sc in a MR (7)
- R2) inc around (14)
- R3) ( sc, inc ) x 7 (21)
- R4) ( 2 sc, inc ) x 7 (28)
- R5) ( 3 sc, inc ) x 7 (35)
- R6 – 9 ) sc around (35) [ 4 rounds ]
- R10) In the BLO, slip stitch in the first stitch, in the next stitch (sc, HDC, sc) and repeat that the entire way around.
Fasten off, weave any tail into the front loops to hide it. Alternatively you could leave two strings either side to tie and help secure it onto the head of the Charmander.
Ears for Pikachu Hat
Start with Brown yarn
- R1) 6 sc in a MR (6)
- R2) inc around (12)
- R3) sc around in last stitch change to yellow (12)
- R4 – 5) sc around in BLO (12) [ 2 rounds ]
- R6) sc around (12)
- R7) ( 4 sc, dec ) x 2 (10)
- R8) sc around (10)
Fasten off leaving a tail for sewing and stuff each ear. Make two.

Charmander Amigurumi Assembly Guide
Now comes the fun part—bringing your Charmander to life! Here’s how to assemble all the pieces:
Facial Features:
- Use felt to create pink cheeks positioned just below the eyes
- With black yarn, sew two straight lines as nose holes from the top of round 11 downward (rounds 10-12 area)
- Consider making felt eyes if you prefer a more cartoon-accurate look
Attaching Limbs:
- Position arms just below the head between rounds 17-21
- Place legs at the base of the body, spacing them the same width apart as the arms
- Use pins to test placement before permanently sewing
Tail Attachment:
- Attach the tail to the back of the body between rounds 19-26
- Make sure it’s securely fastened as it’s a prominent feature
Flame Details:
- Layer the flames with one red flame between the two yellow flames
- Stitch them together first, then attach to the tail
- For a quicker method, hot glue can work, but sewing provides better durability, especially if you plan to sell your finished plushie
Yellow Belly:
- Center the belly piece on the front of Charmander’s body
- Sew securely around all edges
Pikachu Hat (Optional):
- Sew or position the Pikachu ears to the hat
- You can choose to permanently attach the hat or leave it removable for versatility
Pro Assembly Tips:
- Always use pins to temporarily position pieces before final attachment
- Take photos from different angles to ensure symmetrical placement
- Use a yarn needle and matching yarn color for invisible seams
- Weave in all loose ends securely for a professional finish
Frequently Asked Questions
Any yarn weight can work with this pattern! The key is matching your hook size to your yarn weight. For a standard-sized plushie, worsted weight (4) yarn with a 4-5mm hook works wonderfully. For a larger Charmander, try chenille or bulky yarn with a 5mm or larger hook. Always check your yarn label for recommended hook sizes.
Yes! You are allowed to sell finished plushies made from this pattern. However, please do not redistribute the pattern itself in part or in full. When selling your handmade Charmanders, it’s appreciated if you credit the original pattern designer.
Position safety eyes between rounds 9-10 with 6 stitches between them, placing them between the cheeks and nose area. Insert the eye post through your work from the right side, then secure with the washer on the wrong side before stuffing. Make sure to stuff around the eyes carefully to maintain their positioning and prevent them from sinking in.
Many crocheters find the flame pieces (both yellow and red) to be the trickiest part due to the chain work and directional changes. If you’re struggling with the flame instructions, consider watching video tutorials or drawing out the pattern on paper to visualize the construction. The written instructions include diagrams to help clarify the process.
Charmander Amigurumi Crochet Pattern Conclusion & Final Tips
Congratulations on completing your adorable Charmander amigurumi! This beginner-friendly pattern offers a fun way to celebrate your love for Pokémon while practicing essential amigurumi techniques. Whether you keep your Charmander for yourself, gift it to a fellow Pokémon fan, or sell it at craft fairs, you’ve created something truly special.
Don’t forget to check out companion patterns like the free Pikachu amigurumi to create a whole team of crocheted Pokémon friends. Share your finished creations on social media and connect with the global amigurumi community—we’d love to see your unique take on this classic Fire-type starter!
Ready to catch ’em all through crochet? Grab your hook and get started on your very own Charmander today!

Remember it later!
Planning to try this soon? Pin it for a quick find later!